 设计模式 - 结构型
# 设计模式 - 结构型
来源:极客时间《设计模式之美》 (opens new window)专栏
结构型设计模式主要解决“类或对象的组合或组装”问题。其中代理、桥接、装饰器、适配器,这 4 种模式是比较常用的结构型设计模式。它们的代码结构非常相似。笼统来说,它们都可以称为 Wrapper 模式,也就是通过 Wrapper 类二次封装原始类。尽管代码结构相似,但这 4 种设计模式的用意完全不同,也就是说要解决的问题、应用场景不同。
代理模式:代理模式在不改变原始类接口的条件下,为原始类定义一个代理类,主要目的是控制访问,而非加强功能,这是它跟装饰器模式最大的不同。
桥接模式:桥接模式的目的是将接口部分和实现部分分离,从而让它们可以较为容易、也相对独立地加以改变。
装饰器模式:装饰者模式在不改变原始类接口的情况下,对原始类功能进行增强,并且支持多个装饰器的嵌套使用。
适配器模式:适配器模式是一种事后的补救策略。适配器提供跟原始类不同的接口,而代理模式、装饰器模式提供的都是跟原始类相同的接口。
# 1. 代理模式
# 1.1 代理模式原理
代理模式(Proxy Design Pattern),它在不改变原始类(或叫被代理类)代码的情况下,通过引入代理类来给原始类附加功能。
通过之前实现的支持各种统计规则的性能计数器为例:
public class UserController {
  //...省略其他属性和方法...
  private MetricsCollector metricsCollector; // 依赖注入

  public UserVo login(String telephone, String password) {
    long startTimestamp = System.currentTimeMillis();

    // ... 省略login逻辑...

    long endTimeStamp = System.currentTimeMillis();
    long responseTime = endTimeStamp - startTimestamp;
    RequestInfo requestInfo = new RequestInfo("login", responseTime, startTimestamp);
    metricsCollector.recordRequest(requestInfo);

    //...返回UserVo数据...
  }

  public UserVo register(String telephone, String password) {
    long startTimestamp = System.currentTimeMillis();

    // ... 省略register逻辑...

    long endTimeStamp = System.currentTimeMillis();
    long responseTime = endTimeStamp - startTimestamp;
    RequestInfo requestInfo = new RequestInfo("register", responseTime, startTimestamp);
    metricsCollector.recordRequest(requestInfo);

    //...返回UserVo数据...
  }
}
2
3
4
5
6
7
8
9
10
11
12
13
14
15
16
17
18
19
20
21
22
23
24
25
26
27
28
29
30
上面的代码日常开发中肯定不会这么写,主要存在两个问题:第一,性能计数器框架代码侵入到业务代码中,跟业务代码高度耦合。如果未来需要替换这个框架,那替换的成本会比较大。第二,收集接口请求的代码跟业务代码无关,本就不应该放到一个类中。业务类最好职责更加单一,只聚焦业务处理。
为了将框架代码和业务代码解耦,代理模式就派上用场了。代理类 UserControllerProxy 和原始类 UserController 实现相同的接口 IUserController。UserController 类只负责业务功能。代理类 UserControllerProxy 负责在业务代码执行前后附加其他逻辑代码,并通过委托的方式调用原始类来执行业务代码。
public interface IUserController {
  UserVo login(String telephone, String password);
  UserVo register(String telephone, String password);
}

public class UserController implements IUserController {
  //...省略其他属性和方法...

  @Override
  public UserVo login(String telephone, String password) {
    //...省略login逻辑...
    //...返回UserVo数据...
  }

  @Override
  public UserVo register(String telephone, String password) {
    //...省略register逻辑...
    //...返回UserVo数据...
  }
}

public class UserControllerProxy implements IUserController {
  private MetricsCollector metricsCollector;
  private UserController userController;

  public UserControllerProxy(UserController userController) {
    this.userController = userController;
    this.metricsCollector = new MetricsCollector();
  }

  @Override
  public UserVo login(String telephone, String password) {
    long startTimestamp = System.currentTimeMillis();

    // 委托
    UserVo userVo = userController.login(telephone, password);

    long endTimeStamp = System.currentTimeMillis();
    long responseTime = endTimeStamp - startTimestamp;
    RequestInfo requestInfo = new RequestInfo("login", responseTime, startTimestamp);
    metricsCollector.recordRequest(requestInfo);

    return userVo;
  }

  @Override
  public UserVo register(String telephone, String password) {
    long startTimestamp = System.currentTimeMillis();

    UserVo userVo = userController.register(telephone, password);

    long endTimeStamp = System.currentTimeMillis();
    long responseTime = endTimeStamp - startTimestamp;
    RequestInfo requestInfo = new RequestInfo("register", responseTime, startTimestamp);
    metricsCollector.recordRequest(requestInfo);

    return userVo;
  }
}

//UserControllerProxy使用举例
//因为原始类和代理类实现相同的接口,是基于接口而非实现编程
//将UserController类对象替换为UserControllerProxy类对象,不需要改动太多代码
IUserController userController = new UserControllerProxy(new UserController());
2
3
4
5
6
7
8
9
10
11
12
13
14
15
16
17
18
19
20
21
22
23
24
25
26
27
28
29
30
31
32
33
34
35
36
37
38
39
40
41
42
43
44
45
46
47
48
49
50
51
52
53
54
55
56
57
58
59
60
61
62
63
64
如上面代码可见,代理类和原始类需要实现相同的接口。但如果原始类并没有定义接口或来自一个第三方的类库,即没办法直接修改原始类,给它重新定义一个接口。在这种情况下,可以使用继承来实现代理模式。
public class UserControllerProxy extends UserController {
  private MetricsCollector metricsCollector;

  public UserControllerProxy() {
    this.metricsCollector = new MetricsCollector();
  }

  public UserVo login(String telephone, String password) {
    long startTimestamp = System.currentTimeMillis();

    UserVo userVo = super.login(telephone, password);

    long endTimeStamp = System.currentTimeMillis();
    long responseTime = endTimeStamp - startTimestamp;
    RequestInfo requestInfo = new RequestInfo("login", responseTime, startTimestamp);
    metricsCollector.recordRequest(requestInfo);

    return userVo;
  }

  public UserVo register(String telephone, String password) {
    long startTimestamp = System.currentTimeMillis();

    UserVo userVo = super.register(telephone, password);

    long endTimeStamp = System.currentTimeMillis();
    long responseTime = endTimeStamp - startTimestamp;
    RequestInfo requestInfo = new RequestInfo("register", responseTime, startTimestamp);
    metricsCollector.recordRequest(requestInfo);

    return userVo;
  }
}
//UserControllerProxy使用举例
UserController userController = new UserControllerProxy();
2
3
4
5
6
7
8
9
10
11
12
13
14
15
16
17
18
19
20
21
22
23
24
25
26
27
28
29
30
31
32
33
34
35
# 1.2 动态代理模式原理
不过,刚刚的代码实现还是有点问题。一方面需要在代理类中,将原始类中的所有的方法,都重新实现一遍,并且为每个方法都附加相似的代码逻辑。另一方面,如果要添加的附加功能的类有不止一个,需要针对每个类都创建一个代理类,增加了不必要的开发成本。
可以使用动态代理来解决这个问题。所谓动态代理(Dynamic Proxy),就是不事先为每个原始类编写代理类,而是在运行的时候,动态地创建原始类对应的代理类,然后在系统中用代理类替换掉原始类。 Java 语言本身已经提供了动态代理的语法(动态代理底层依赖的就是 Java 的反射语法)。而常用的 Spring 框架中 Spring AOP 底层的实现原理就是基于动态代理,用户配置好需要给哪些类创建代理,并定义好在执行原始类的业务代码前后执行哪些附加功能,Spring 为这些类创建动态代理对象,并在 JVM 中替代原始类对象。
public class MetricsCollectorProxy {
  private MetricsCollector metricsCollector;

  public MetricsCollectorProxy() {
    this.metricsCollector = new MetricsCollector();
  }

  public Object createProxy(Object proxiedObject) {
    Class<?>[] interfaces = proxiedObject.getClass().getInterfaces();
    DynamicProxyHandler handler = new DynamicProxyHandler(proxiedObject);
    return Proxy.newProxyInstance(proxiedObject.getClass().getClassLoader(), interfaces, handler);
  }

  private class DynamicProxyHandler implements InvocationHandler {
    private Object proxiedObject;

    public DynamicProxyHandler(Object proxiedObject) {
      this.proxiedObject = proxiedObject;
    }

    @Override
    public Object invoke(Object proxy, Method method, Object[] args) throws Throwable {
      long startTimestamp = System.currentTimeMillis();
      Object result = method.invoke(proxiedObject, args);
      long endTimeStamp = System.currentTimeMillis();
      long responseTime = endTimeStamp - startTimestamp;
      String apiName = proxiedObject.getClass().getName() + ":" + method.getName();
      RequestInfo requestInfo = new RequestInfo(apiName, responseTime, startTimestamp);
      metricsCollector.recordRequest(requestInfo);
      return result;
    }
  }
}

//MetricsCollectorProxy使用举例
MetricsCollectorProxy proxy = new MetricsCollectorProxy();
IUserController userController = (IUserController) proxy.createProxy(new UserController());
2
3
4
5
6
7
8
9
10
11
12
13
14
15
16
17
18
19
20
21
22
23
24
25
26
27
28
29
30
31
32
33
34
35
36
37
# 1.3 代码模式应用
业务系统的非功能性需求开发
非功能性需求,比如:监控、统计、鉴权、限流、事务、幂等、日志。将这些附加功能与业务功能解耦,放到代理类中统一处理,让程序员只需要关注业务方面的开发。如果熟悉 Java 语言和 Spring 开发框架,这部分工作都是可以在 Spring AOP 切面中完成(底层的实现原理就是基于动态代理)。
代理模式在 RPC、缓存中的应用
RPC 框架也可以看作一种代理模式,也称作远程代理。通过远程代理,将网络通信、数据编解码等细节隐藏起来。客户端在使用 RPC 服务的时候,就像使用本地函数一样,无需了解跟服务器交互的细节。除此之外,RPC 服务的开发者也只需要开发业务逻辑,就像开发本地使用的函数一样,不需要关注跟客户端的交互细节。
代理模式在缓存中的应用。假设要开发一个接口请求的缓存功能,对于某些接口请求,如果入参相同,在设定的过期时间内,直接返回缓存结果,而不用重新进行逻辑处理。比如,针对获取用户个人信息的需求可以开发两个接口,一个支持缓存,一个支持实时查询。对于需要实时数据的需求,让其调用实时查询接口,对于不需要实时数据的需求,让其调用支持缓存的接口。
最简单的实现方法就是给每个需要支持缓存的查询需求都开发两个不同的接口,一个支持缓存,一个支持实时查询。但这样做显然增加开发成本,而且会让代码看起来非常臃肿(接口个数成倍增加),也不方便缓存接口的集中管理(增加、删除缓存接口)、集中配置(比如配置每个接口缓存过期时间)。
针对这些问题,可以使用动态代理。如果是基于 Spring 框架开发,就可以在 AOP 切面中完成接口缓存的功能。在应用启动的时候,从配置文件中加载需要支持缓存的接口,以及相应的缓存策略(比如过期时间)等。当请求到来的时候在 AOP 切面中拦截请求,如果请求中带有支持缓存的字段(比如 http://…?..&cached=true),便从缓存(内存缓存或者 Redis 缓存等)中获取数据直接返回。
# 2. 桥接模式
桥接模式,也叫作桥梁模式,英文是 Bridge Design Pattern。
GoF 的《设计模式》一书中对桥接模式的定义:“Decouple an abstraction from its implementation so that the two can vary independently。”翻译成中文就是:“将抽象和实现解耦,让它们可以独立变化。”
另一种比较通用、应用场景较多的理解方式:“一个类存在两个(或多个)独立变化的维度,我们通过组合的方式,让这两个(或多个)维度可以独立进行扩展。”通过组合关系来替代继承关系,避免继承层次的指数级爆炸。
# 2.1 桥接模式原理
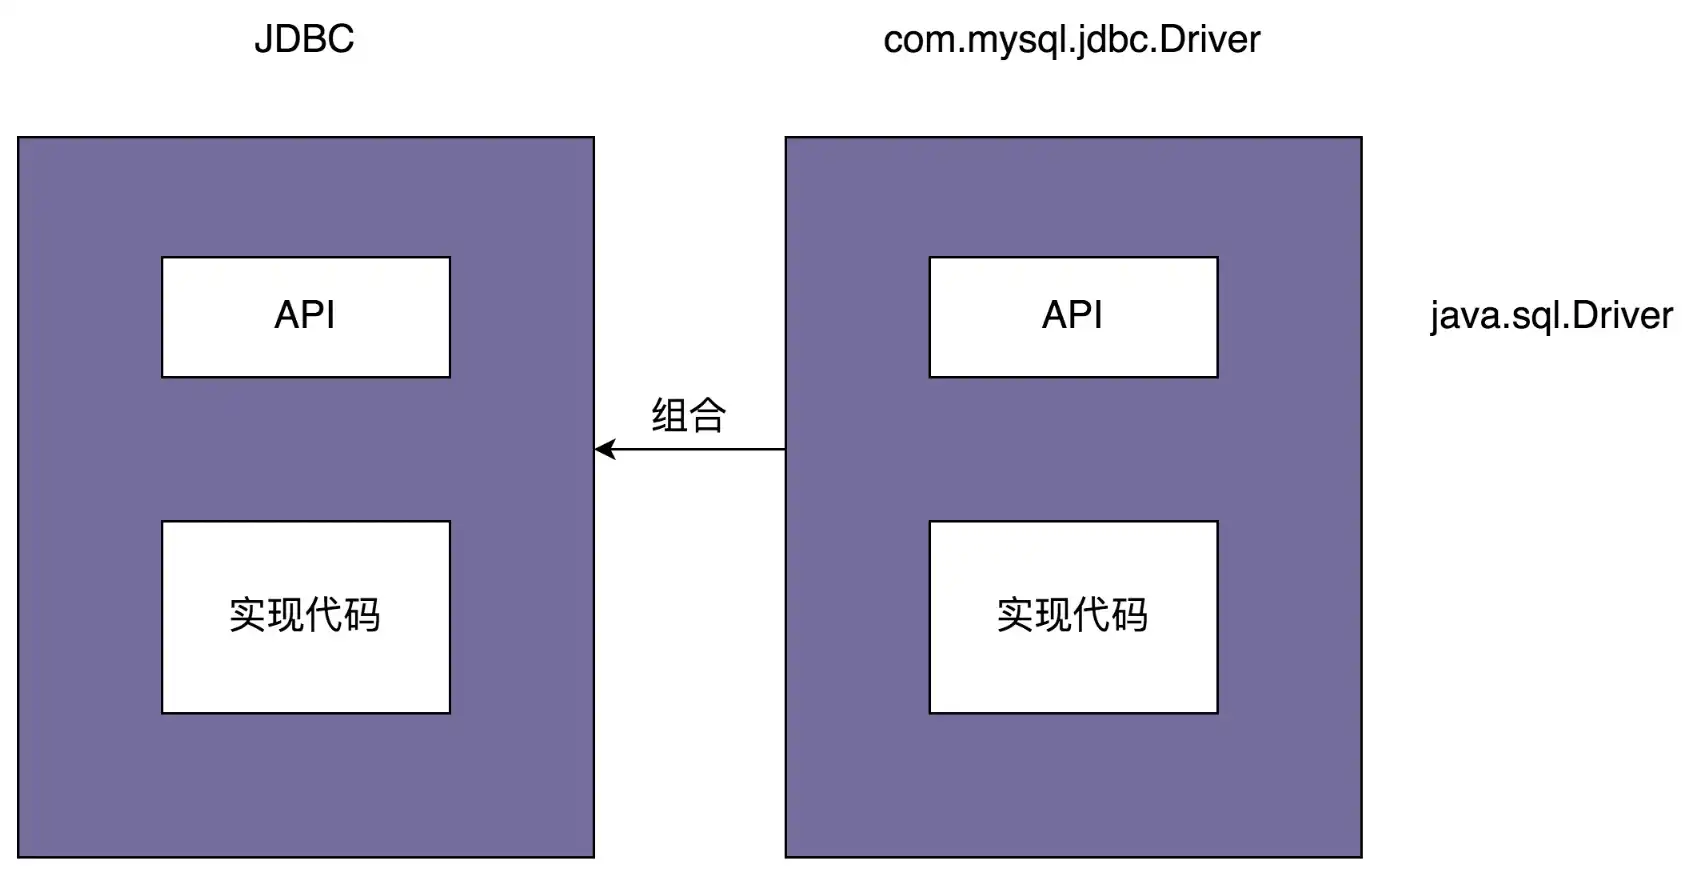
通过 JDBC 驱动的例子来解释一下。JDBC 驱动是桥接模式的经典应用。
Class.forName("com.mysql.jdbc.Driver"); //加载及注册JDBC驱动程序
String url = "jdbc:mysql://localhost:3306/sample_db?user=root&password=your_password";
Connection con = DriverManager.getConnection(url);
Statement stmt = con.createStatement();
String query = "select * from test";
ResultSet rs=stmt.executeQuery(query);
while(rs.next()) {
  rs.getString(1);
  rs.getInt(2);
}
2
3
4
5
6
7
8
9
10
如果想要把 MySQL 数据库换成 Oracle 数据库,只需要把第一行代码中的 com.mysql.jdbc.Driver 换成 oracle.jdbc.driver.OracleDriver 就行。也可以把需要加载的 Driver 类写到配置文件中,当程序启动的时候,自动从配置文件中加载,这样在切换数据库的时候就不需要修改代码,只需要修改配置文件就可以了。其实现方式从源码中可以看出。
package com.mysql.jdbc;
import java.sql.SQLException;

public class Driver extends NonRegisteringDriver implements java.sql.Driver {
  static {
    try {
      java.sql.DriverManager.registerDriver(new Driver());
    } catch (SQLException E) {
      throw new RuntimeException("Can't register driver!");
    }
  }

  /**
   * Construct a new driver and register it with DriverManager
   * @throws SQLException if a database error occurs.
   */
  public Driver() throws SQLException {
    // Required for Class.forName().newInstance()
  }
}
2
3
4
5
6
7
8
9
10
11
12
13
14
15
16
17
18
19
20
可见当执行 Class.forName(“com.mysql.jdbc.Driver”) 这条语句的时候,实际上是做了两件事情。第一件事情是要求 JVM 查找并加载指定的 Driver 类,第二件事情是执行该类的静态代码,也就是将 MySQL Driver 注册到 DriverManager 类中。
当把具体的 Driver 实现类(比如,com.mysql.jdbc.Driver)注册到 DriverManager 之后,后续所有对 JDBC 接口的调用,都会委派到对具体的 Driver 实现类来执行。而 Driver 实现类都实现了相同的接口(java.sql.Driver ),这也是可以灵活切换 Driver 的原因。
public class DriverManager {
  private final static CopyOnWriteArrayList<DriverInfo> registeredDrivers = new CopyOnWriteArrayList<DriverInfo>();

  //...
  static {
    loadInitialDrivers();
    println("JDBC DriverManager initialized");
  }
  //...

  public static synchronized void registerDriver(java.sql.Driver driver) throws SQLException {
    if (driver != null) {
      registeredDrivers.addIfAbsent(new DriverInfo(driver));
    } else {
      throw new NullPointerException();
    }
  }

  public static Connection getConnection(String url, String user, String password) throws SQLException {
    java.util.Properties info = new java.util.Properties();
    if (user != null) {
      info.put("user", user);
    }
    if (password != null) {
      info.put("password", password);
    }
    return (getConnection(url, info, Reflection.getCallerClass()));
  }
  //...
}
2
3
4
5
6
7
8
9
10
11
12
13
14
15
16
17
18
19
20
21
22
23
24
25
26
27
28
29
30
桥接模式的定义是“将抽象和实现解耦,让它们可以独立变化”。那弄懂定义中“抽象”和“实现”两个概念,就是理解桥接模式的关键。
JDBC 本身就相当于“抽象”。注意,这里所说的“抽象”,指的并非“抽象类”或“接口”,而是跟具体的数据库无关的、被抽象出来的一套“类库”。具体的 Driver(比如,com.mysql.jdbc.Driver)就相当于“实现”。注意,这里所说的“实现”,也并非指“接口的实现类”,而是跟具体数据库相关的一套“类库”。JDBC 和 Driver 独立开发,通过对象之间的组合关系,组装在一起。JDBC 的所有逻辑操作,最终都委托给 Driver 来执行。
# 2.2 桥接模式应用
在设计原则中开闭原则中的 API 接口监控告警 为例:根据不同的告警规则,触发不同类型的告警。告警支持多种通知渠道,包括:邮件、短信、微信、自动语音电话。通知的紧急程度有多种类型,包括:SEVERE(严重)、URGENCY(紧急)、NORMAL(普通)、TRIVIAL(无关紧要)。不同的紧急程度对应不同的通知渠道。比如,SERVE(严重)级别的消息会通过“自动语音电话”告知相关人员。
通知部分的代码如下:
public enum NotificationEmergencyLevel {
  SEVERE, URGENCY, NORMAL, TRIVIAL
}

public class Notification {
  private List<String> emailAddresses;
  private List<String> telephones;
  private List<String> wechatIds;

  public Notification() {}

  public void setEmailAddress(List<String> emailAddress) {
    this.emailAddresses = emailAddress;
  }

  public void setTelephones(List<String> telephones) {
    this.telephones = telephones;
  }

  public void setWechatIds(List<String> wechatIds) {
    this.wechatIds = wechatIds;
  }

  public void notify(NotificationEmergencyLevel level, String message) {
    if (level.equals(NotificationEmergencyLevel.SEVERE)) {
      //...自动语音电话
    } else if (level.equals(NotificationEmergencyLevel.URGENCY)) {
      //...发微信
    } else if (level.equals(NotificationEmergencyLevel.NORMAL)) {
      //...发邮件
    } else if (level.equals(NotificationEmergencyLevel.TRIVIAL)) {
      //...发邮件
    }
  }
}

//在API监控告警的例子中,我们如下方式来使用Notification类:
public class ErrorAlertHandler extends AlertHandler {
  public ErrorAlertHandler(AlertRule rule, Notification notification){
    super(rule, notification);
  }

  @Override
  public void check(ApiStatInfo apiStatInfo) {
    if (apiStatInfo.getErrorCount() > rule.getMatchedRule(apiStatInfo.getApi()).getMaxErrorCount()) {
      notification.notify(NotificationEmergencyLevel.SEVERE, "...");
    }
  }
}
2
3
4
5
6
7
8
9
10
11
12
13
14
15
16
17
18
19
20
21
22
23
24
25
26
27
28
29
30
31
32
33
34
35
36
37
38
39
40
41
42
43
44
45
46
47
48
49
从 Notification 的代码可见,notify 的每个 if-else 分支中的代码逻辑都比较复杂,发送通知的所有逻辑都扎堆在 Notification 类中,影响可读性且不易维护。可以将不同渠道的发送逻辑剥离出来,形成独立的消息发送类(MsgSender 相关类)。其中,Notification 类相当于抽象,MsgSender 类相当于实现,两者可以独立开发,通过组合关系(也就是桥梁)任意组合在一起。所谓任意组合的意思就是,不同紧急程度的消息和发送渠道之间的对应关系,不是在代码中固定写死的,可以动态地去指定(比如,通过读取配置来获取对应关系)。
public interface MsgSender {
  void send(String message);
}

public class TelephoneMsgSender implements MsgSender {
  private List<String> telephones;

  public TelephoneMsgSender(List<String> telephones) {
    this.telephones = telephones;
  }

  @Override
  public void send(String message) {
    //...
  }
}

public class EmailMsgSender implements MsgSender {
  // 与TelephoneMsgSender代码结构类似,所以省略...
}

public class WechatMsgSender implements MsgSender {
  // 与TelephoneMsgSender代码结构类似,所以省略...
}

public abstract class Notification {
  protected MsgSender msgSender;

  public Notification(MsgSender msgSender) {
    this.msgSender = msgSender;
  }

  public abstract void notify(String message);
}

public class SevereNotification extends Notification {
  public SevereNotification(MsgSender msgSender) {
    super(msgSender);
  }

  @Override
  public void notify(String message) {
    msgSender.send(message);
  }
}

public class UrgencyNotification extends Notification {
  // 与SevereNotification代码结构类似,所以省略...
}
public class NormalNotification extends Notification {
  // 与SevereNotification代码结构类似,所以省略...
}
public class TrivialNotification extends Notification {
  // 与SevereNotification代码结构类似,所以省略...
}
2
3
4
5
6
7
8
9
10
11
12
13
14
15
16
17
18
19
20
21
22
23
24
25
26
27
28
29
30
31
32
33
34
35
36
37
38
39
40
41
42
43
44
45
46
47
48
49
50
51
52
53
54
55
# 3. 装饰器模式
装饰器模式主要解决继承关系过于复杂的问题,通过组合来替代继承。它主要的作用是给原始类添加增强功能。
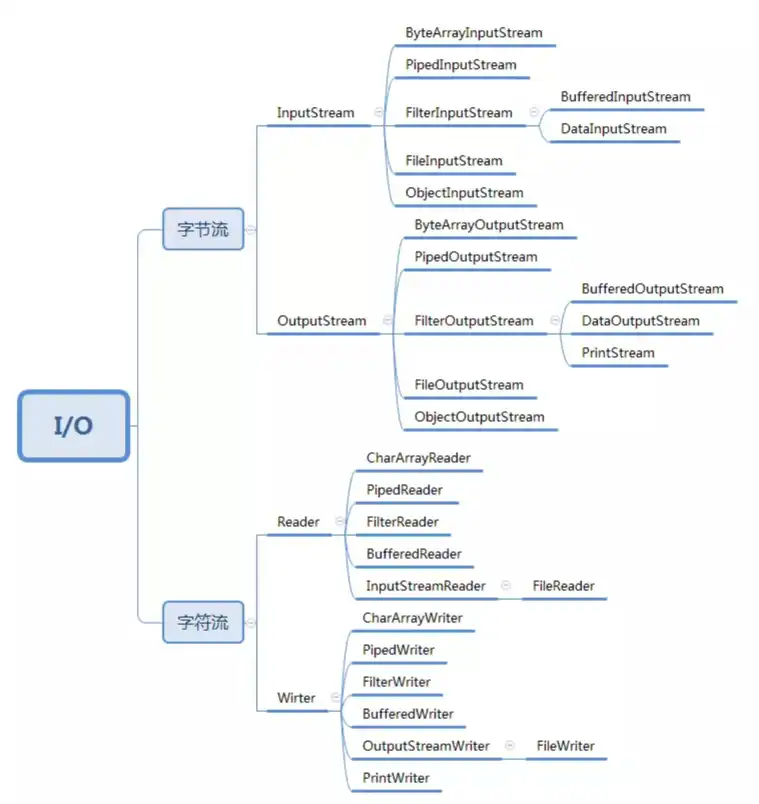
# 3.1 Java 的 I/O 类
Java IO 类库非常庞大和复杂,有几十个类,负责 IO 数据的读取和写入。可从下面两个维度将它划分为四类。

针对不同的读取和写入场景,Java IO 又在这四个父类基础之上,扩展出了很多子类。
下面一段代码:打开文件 test.txt,从中读取数据。其中,InputStream 是一个抽象类,FileInputStream 是专门用来读取文件流的子类。BufferedInputStream 是一个支持带缓存功能的数据读取类,可以提高数据读取的效率。
InputStream in = new FileInputStream("/user/wangzheng/test.txt");
InputStream bin = new BufferedInputStream(in);
byte[] data = new byte[128];
while (bin.read(data) != -1) {
  //...
}
2
3
4
5
6
上面代码需要先创建一个 FileInputStream 对象,然后再传递给 BufferedInputStream 对象来使用。Java IO 为什么不设计一个继承 FileInputStream 并且支持缓存的 BufferedFileInputStream 类呢?直接创建一个 BufferedFileInputStream 类对象,打开文件读取数据岂不是更加简单?
InputStream bin = new BufferedFileInputStream("/user/wangzheng/test.txt");
byte[] data = new byte[128];
while (bin.read(data) != -1) {
  //...
}
2
3
4
5
# 3.2 基于继承实现
如果 InputStream 只有一个子类 FileInputStream 的话,再设计一个孙子类 BufferedFileInputStream,也算是可以接受的,毕竟继承结构还算简单。但继承 InputStream 的子类有很多,需要给每一个 InputStream 的子类再继续派生支持缓存读取的子类。除了支持缓存读取之外,如果还需要对功能进行其他方面的增强,比如下面的 DataInputStream 类,支持按照基本数据类型(int、boolean、long 等)来读取数据。
FileInputStream in = new FileInputStream("/user/wangzheng/test.txt");
DataInputStream din = new DataInputStream(in);
int data = din.readInt();
2
3
这种情况下,如果继续按照继承的方式来实现的话,就需要再继续派生出 DataFileInputStream、DataPipedInputStream 等类。如果还需要既支持缓存、又支持按照基本类型读取数据的类,那就要再继续派生出 BufferedDataFileInputStream、BufferedDataPipedInputStream 等 n 多类。如果需要附加更多的增强功能,那就会导致类继承结构变得无比复杂,代码既不好扩展,也不好维护。这时就不推荐使用继承。
# 3.3.3 基于装饰器模式实现
可以“使用组合来替代继承”。针对继承结构过于复杂的问题,可以通过将继承关系改为组合关系来解决。下面简化后的代码展示了 Java IO 的这种设计思路。
public abstract class InputStream {
  //...
  public int read(byte b[]) throws IOException {
    return read(b, 0, b.length);
  }

  public int read(byte b[], int off, int len) throws IOException {
    //...
  }

  public long skip(long n) throws IOException {
    //...
  }

  public int available() throws IOException {
    return 0;
  }

  public void close() throws IOException {}

  public synchronized void mark(int readlimit) {}

  public synchronized void reset() throws IOException {
    throw new IOException("mark/reset not supported");
  }

  public boolean markSupported() {
    return false;
  }
}

public class BufferedInputStream extends InputStream {
  protected volatile InputStream in;

  protected BufferedInputStream(InputStream in) {
    this.in = in;
  }

  //...实现基于缓存的读数据接口...
}

public class DataInputStream extends InputStream {
  protected volatile InputStream in;

  protected DataInputStream(InputStream in) {
    this.in = in;
  }

  //...实现读取基本类型数据的接口
}
2
3
4
5
6
7
8
9
10
11
12
13
14
15
16
17
18
19
20
21
22
23
24
25
26
27
28
29
30
31
32
33
34
35
36
37
38
39
40
41
42
43
44
45
46
47
48
49
50
从 Java IO 的设计来看,装饰器模式相对于简单的组合关系,还有两个比较特殊的地方。
第一个比较特殊的地方是:装饰器类和原始类继承同样的父类,这样可以对原始类“嵌套”多个装饰器类。比如,下面代码对 FileInputStream 嵌套了两个装饰器类:BufferedInputStream 和 DataInputStream,让它既支持缓存读取,又支持按照基本数据类型来读取数据。
InputStream in = new FileInputStream("/user/wangzheng/test.txt");
InputStream bin = new BufferedInputStream(in);
DataInputStream din = new DataInputStream(bin);
int data = din.readInt();
2
3
4
第二个比较特殊的地方是:装饰器类是对功能的增强,这也是装饰器模式应用场景的一个重要特点。实际上,符合“组合关系”这种代码结构的设计模式有很多,比如代理模式、桥接模式,还有现在的装饰器模式。尽管它们的代码结构很相似,但是每种设计模式的意图是不同的。就拿比较相似的代理模式和装饰器模式来说吧,代理模式中代理类附加的是跟原始类无关的功能,而在装饰器模式中装饰器类附加的是跟原始类相关的增强功能。
// 代理模式的代码结构(下面的接口也可以替换成抽象类)
public interface IA {
  void f();
}
public class A impelements IA {
  public void f() { //... }
}
public class AProxy implements IA {
  private IA a;
  public AProxy(IA a) {
    this.a = a;
  }

  public void f() {
    // 新添加的代理逻辑
    a.f();
    // 新添加的代理逻辑
  }
}

// 装饰器模式的代码结构(下面的接口也可以替换成抽象类)
public interface IA {
  void f();
}
public class A implements IA {
  public void f() { //... }
}
public class ADecorator implements IA {
  private IA a;
  public ADecorator(IA a) {
    this.a = a;
  }

  public void f() {
    // 功能增强代码
    a.f();
    // 功能增强代码
  }
}
2
3
4
5
6
7
8
9
10
11
12
13
14
15
16
17
18
19
20
21
22
23
24
25
26
27
28
29
30
31
32
33
34
35
36
37
38
39
查看 JDK 的源码会发现 BufferedInputStream、DataInputStream 并非继承自 InputStream,而是另外一个叫 FilterInputStream 的类。那这这个类的设计意图是什么?
重新来看一下 BufferedInputStream 类的代码。InputStream 是一个抽象类而非接口,而且它的大部分函数(比如 read()、available())都有默认实现,按理来说只需要在 BufferedInputStream 类中重新实现那些需要增加缓存功能的函数就可以了,其他函数继承 InputStream 的默认实现。但实际上,这样做是行不通的。
对于即便是不需要增加缓存功能的函数来说,BufferedInputStream 还是必须把它重新实现一遍,简单包裹对 InputStream 对象的函数调用。如果不重新实现,那 BufferedInputStream 类就无法将最终读取数据的任务,委托给传递进来的 InputStream 对象来完成。这一部分稍微有点不好理解需要多思考一下。
public class BufferedInputStream extends InputStream {
  protected volatile InputStream in;

  protected BufferedInputStream(InputStream in) {
    this.in = in;
  }

  // f()函数不需要增强,只是重新调用一下InputStream in对象的f()
  public void f() {
    in.f();
  }
}
2
3
4
5
6
7
8
9
10
11
12
实际上,DataInputStream 也存在跟 BufferedInputStream 同样的问题。为了避免代码重复,Java IO 抽象出了一个装饰器父类 FilterInputStream,代码实现如下所示。InputStream 的所有的装饰器类(BufferedInputStream、DataInputStream)都继承自这个装饰器父类。这样,装饰器类只需要实现它需要增强的方法就可以了,其他方法继承装饰器父类的默认实现。
public class FilterInputStream extends InputStream {
  protected volatile InputStream in;

  protected FilterInputStream(InputStream in) {
    this.in = in;
  }

  public int read() throws IOException {
    return in.read();
  }

  public int read(byte b[]) throws IOException {
    return read(b, 0, b.length);
  }

  public int read(byte b[], int off, int len) throws IOException {
    return in.read(b, off, len);
  }

  public long skip(long n) throws IOException {
    return in.skip(n);
  }

  public int available() throws IOException {
    return in.available();
  }

  public void close() throws IOException {
    in.close();
  }

  public synchronized void mark(int readlimit) {
    in.mark(readlimit);
  }

  public synchronized void reset() throws IOException {
    in.reset();
  }

  public boolean markSupported() {
    return in.markSupported();
  }
}
2
3
4
5
6
7
8
9
10
11
12
13
14
15
16
17
18
19
20
21
22
23
24
25
26
27
28
29
30
31
32
33
34
35
36
37
38
39
40
41
42
43
# 4. 适配器模式
# 4.1 适配器模式原理
适配器模式的英文翻译是 Adapter Design Pattern。顾名思义,这个模式就是用来做适配的,它将不兼容的接口转换为可兼容的接口,让原本由于接口不兼容而不能一起工作的类可以一起工作。对于这个模式,有一个经常被拿来解释它的例子,就是 USB 转接头充当适配器,把两种不兼容的接口,通过转接变得可以一起工作。
适配器模式有两种实现方式:类适配器和对象适配器。其中,类适配器使用继承关系来实现,对象适配器使用组合关系来实现。具体的代码实现如下所示。其中,ITarget 表示要转化成的接口定义。Adaptee 是一组不兼容 ITarget 接口定义的接口,Adaptor 将 Adaptee 转化成一组符合 ITarget 接口定义的接口。
// 类适配器: 基于继承
public interface ITarget {
  void f1();
  void f2();
  void fc();
}

public class Adaptee {
  public void fa() { //... }
  public void fb() { //... }
  public void fc() { //... }
}

public class Adaptor extends Adaptee implements ITarget {
  public void f1() {
    super.fa();
  }

  public void f2() {
    //...重新实现f2()...
  }

  // 这里fc()不需要实现,直接继承自Adaptee,这是跟对象适配器最大的不同点
}

// 对象适配器:基于组合
public interface ITarget {
  void f1();
  void f2();
  void fc();
}

public class Adaptee {
  public void fa() { //... }
  public void fb() { //... }
  public void fc() { //... }
}

public class Adaptor implements ITarget {
  private Adaptee adaptee;

  public Adaptor(Adaptee adaptee) {
    this.adaptee = adaptee;
  }

  public void f1() {
    adaptee.fa(); //委托给Adaptee
  }

  public void f2() {
    //...重新实现f2()...
  }

  public void fc() {
    adaptee.fc();
  }
}
2
3
4
5
6
7
8
9
10
11
12
13
14
15
16
17
18
19
20
21
22
23
24
25
26
27
28
29
30
31
32
33
34
35
36
37
38
39
40
41
42
43
44
45
46
47
48
49
50
51
52
53
54
55
56
57
针对这两种实现方式的选择,判断标准主要有两个,一个是 Adaptee 接口的个数,另一个是 Adaptee 和 ITarget 的契合程度。
- 如果 Adaptee 接口并不多,那两种实现方式都可以。
- 如果 Adaptee 接口很多,而且 Adaptee 和 ITarget 接口定义大部分都相同,那推荐使用类适配器,因为 Adaptor 复用父类 Adaptee 的接口,比起对象适配器的实现方式,Adaptor 的代码量要少一些。
- 如果 Adaptee 接口很多,而且 Adaptee 和 ITarget 接口定义大部分都不相同,那推荐使用对象适配器,因为组合结构相对于继承更加灵活。
# 4.2 适配器模式应用场景
一般来说,适配器模式可以看作一种“补偿模式”,用来补救设计上的缺陷。应用这种模式算是“无奈之举”。如果在设计初期就能协调规避接口不兼容的问题,那这种模式就没有应用的机会了。
封装有缺陷的接口设计
假设依赖的外部系统在接口设计方面有缺陷(比如包含大量静态方法),引入之后会影响到自身代码的可测试性。为了隔离设计上的缺陷,希望对外部系统提供的接口进行二次封装,抽象出更好的接口设计,这个时候就可以使用适配器模式了。
public class CD { //这个类来自外部sdk,我们无权修改它的代码
  //...
  public static void staticFunction1() { //... }

  public void uglyNamingFunction2() { //... }

  public void tooManyParamsFunction3(int paramA, int paramB, ...) { //... }

   public void lowPerformanceFunction4() { //... }
}

// 使用适配器模式进行重构
public interface ITarget {
  void function1();
  void function2();
  void fucntion3(ParamsWrapperDefinition paramsWrapper);
  void function4();
  //...
}
// 注意:适配器类的命名不一定非得末尾带Adaptor
public class CDAdaptor extends CD implements ITarget {
  //...
  public void function1() {
     super.staticFunction1();
  }

  public void function2() {
    super.uglyNamingFucntion2();
  }

  public void function3(ParamsWrapperDefinition paramsWrapper) {
     super.tooManyParamsFunction3(paramsWrapper.getParamA(), ...);
  }

  public void function4() {
    //...reimplement it...
  }
}
1
2
3
4
5
6
7
8
9
10
11
12
13
14
15
16
17
18
19
20
21
22
23
24
25
26
27
28
29
30
31
32
33
34
35
36
37
38统一多个类的接口设计
某个功能的实现依赖多个外部系统(或者说类)。通过适配器模式,将它们的接口适配为统一的接口定义,然后就可以使用多态的特性来复用代码逻辑。举个例子来解释一下。
假设系统要对用户输入的文本内容做敏感词过滤,为了提高过滤的召回率,引入了多款第三方敏感词过滤系统,依次对用户输入的内容进行过滤,过滤掉尽可能多的敏感词。但是,每个系统提供的过滤接口都是不同的。这就意味着没法复用一套逻辑来调用各个系统。这个时候就可以使用适配器模式,将所有系统的接口适配为统一的接口定义,这样可以复用调用敏感词过滤的代码。
public class ASensitiveWordsFilter { // A敏感词过滤系统提供的接口
  //text是原始文本,函数输出用***替换敏感词之后的文本
  public String filterSexyWords(String text) {
    // ...
  }

  public String filterPoliticalWords(String text) {
    // ...
  }
}

public class BSensitiveWordsFilter  { // B敏感词过滤系统提供的接口
  public String filter(String text) {
    //...
  }
}

public class CSensitiveWordsFilter { // C敏感词过滤系统提供的接口
  public String filter(String text, String mask) {
    //...
  }
}

// 未使用适配器模式之前的代码:代码的可测试性、扩展性不好
public class RiskManagement {
  private ASensitiveWordsFilter aFilter = new ASensitiveWordsFilter();
  private BSensitiveWordsFilter bFilter = new BSensitiveWordsFilter();
  private CSensitiveWordsFilter cFilter = new CSensitiveWordsFilter();

  public String filterSensitiveWords(String text) {
    String maskedText = aFilter.filterSexyWords(text);
    maskedText = aFilter.filterPoliticalWords(maskedText);
    maskedText = bFilter.filter(maskedText);
    maskedText = cFilter.filter(maskedText, "***");
    return maskedText;
  }
}

// 使用适配器模式进行改造
public interface ISensitiveWordsFilter { // 统一接口定义
  String filter(String text);
}

public class ASensitiveWordsFilterAdaptor implements ISensitiveWordsFilter {
  private ASensitiveWordsFilter aFilter;
  public String filter(String text) {
    String maskedText = aFilter.filterSexyWords(text);
    maskedText = aFilter.filterPoliticalWords(maskedText);
    return maskedText;
  }
}
//...省略BSensitiveWordsFilterAdaptor、CSensitiveWordsFilterAdaptor...

// 扩展性更好,更加符合开闭原则,如果添加一个新的敏感词过滤系统,
// 这个类完全不需要改动;而且基于接口而非实现编程,代码的可测试性更好。
public class RiskManagement {
  private List<ISensitiveWordsFilter> filters = new ArrayList<>();

  public void addSensitiveWordsFilter(ISensitiveWordsFilter filter) {
    filters.add(filter);
  }

  public String filterSensitiveWords(String text) {
    String maskedText = text;
    for (ISensitiveWordsFilter filter : filters) {
      maskedText = filter.filter(maskedText);
    }
    return maskedText;
  }
}
1
2
3
4
5
6
7
8
9
10
11
12
13
14
15
16
17
18
19
20
21
22
23
24
25
26
27
28
29
30
31
32
33
34
35
36
37
38
39
40
41
42
43
44
45
46
47
48
49
50
51
52
53
54
55
56
57
58
59
60
61
62
63
64
65
66
67
68
69
70替换依赖的外部系统
当把项目中依赖的一个外部系统替换为另一个外部系统的时候,利用适配器模式,可以减少对代码的改动。代码示例如下:
// 外部系统A
public interface IA {
  //...
  void fa();
}
public class A implements IA {
  //...
  public void fa() {
      //...
  }
}
// 在我们的项目中,外部系统A的使用示例
public class Demo {
  private IA a;
  public Demo(IA a) {
    this.a = a;
  }
  //...
}
Demo d = new Demo(new A());

// 将外部系统A替换成外部系统B
public class BAdaptor implemnts IA {
  private B b;
  public BAdaptor(B b) {
    this.b= b;
  }
  public void fa() {
    //...
    b.fb();
  }
}
// 借助BAdaptor,Demo的代码中,调用IA接口的地方都无需改动,
// 只需要将BAdaptor如下注入到Demo即可。
Demo d = new Demo(new BAdaptor(new B()));
1
2
3
4
5
6
7
8
9
10
11
12
13
14
15
16
17
18
19
20
21
22
23
24
25
26
27
28
29
30
31
32
33
34
35兼容老版本接口
在做版本升级的时候,对于一些要废弃的接口不直接将其删除,而是暂时保留,并且标注为 deprecated,并将内部实现逻辑委托为新的接口实现。这样做的好处是,让使用它的项目有个过渡期,而不是强制进行代码修改。这也可以粗略地看作适配器模式的一个应用场景。
例如:JDK1.0 中包含一个遍历集合容器的类 Enumeration。JDK2.0 对这个类进行了重构,将它改名为 Iterator 类,并且对它的代码实现做了优化。但是考虑到如果将 Enumeration 直接从 JDK2.0 中删除,那使用 JDK1.0 的项目如果切换到 JDK2.0,代码就会编译不通过。为了避免这种情况的发生,必须把项目中所有使用到 Enumeration 的地方,都修改为使用 Iterator 才行。
单独一个项目做 Enumeration 到 Iterator 的替换,勉强还能接受。但是,使用 Java 开发的项目太多了,一次 JDK 的升级,导致所有的项目不做代码修改就会编译报错,这显然是不合理的。这就是经常所说的不兼容升级。为了做到兼容使用低版本 JDK 的老代码,可以暂时保留 Enumeration 类,并将其实现替换为直接调用 Itertor。代码示例如下所示:
public class Collections {
  public static Emueration emumeration(final Collection c) {
    return new Enumeration() {
      Iterator i = c.iterator();

      public boolean hasMoreElments() {
        return i.hashNext();
      }

      public Object nextElement() {
        return i.next():
      }
    }
  }
}
1
2
3
4
5
6
7
8
9
10
11
12
13
14
15适配不同格式的数据
适配器模式还可以用在不同格式的数据之间的适配。比如,把从不同征信系统拉取的不同格式的征信数据,统一为相同的格式,以方便存储和使用。再比如,Java 中的 Arrays.asList() 也可以看作一种数据适配器,将数组类型的数据转化为集合容器类型。
List<String> stooges = Arrays.asList("Larry", "Moe", "Curly");1
# 4.3 剖析适配器模式在 Java 日志中的应用
Java 中有很多日志框架,在项目开发中常常用它们来打印日志信息。其中,比较常用的有 log4j、logback,以及 JDK 提供的 JUL(java.util.logging) 和 Apache 的 JCL(Jakarta Commons Logging) 等。
大部分日志框架都提供了相似的功能,比如按照不同级别(debug、info、warn、erro……)打印日志等,但它们却并没有实现统一的接口。这主要可能是历史的原因,它不像 JDBC 那样,一开始就制定了数据库操作的接口规范。
如果只是开发一个自己用的项目,那用什么日志框架都可以,log4j、logback 随便选一个就好。但是,如果开发的是一个集成到其他系统的组件、框架、类库等,那日志框架的选择就没那么随意了。比如,项目中用到的某个组件使用 log4j 来打印日志,而我们项目本身使用的是 logback。将组件引入到项目之后,我们的项目就相当于有了两套日志打印框架。每种日志框架都有自己特有的配置方式。所以,我们要针对每种日志框架编写不同的配置文件(比如,日志存储的文件地址、打印日志的格式)。如果引入多个组件,每个组件使用的日志框架都不一样,那日志本身的管理工作就变得非常复杂。所以为了解决这个问题,需要统一日志打印框架。
Java 中 Slf4j 这个日志框架相当于 JDBC 规范,提供了一套打印日志的统一接口规范。不过它只定义了接口,并没有提供具体的实现,需要配合其他日志框架(log4j、logback……)来使用。
不仅如此,Slf4j 的出现晚于 JUL、JCL、log4j 等日志框架,所以,这些日志框架也不可能牺牲掉版本兼容性,将接口改造成符合 Slf4j 接口规范。Slf4j 也事先考虑到了这个问题,所以 Slf4j 不仅仅提供了统一的接口定义,还提供了针对不同日志框架的适配器。对不同日志框架的接口进行二次封装,适配成统一的 Slf4j 接口定义。具体的代码示例如下所示:
// slf4j统一的接口定义
package org.slf4j;
public interface Logger {
  public boolean isTraceEnabled();
  public void trace(String msg);
  public void trace(String format, Object arg);
  public void trace(String format, Object arg1, Object arg2);
  public void trace(String format, Object[] argArray);
  public void trace(String msg, Throwable t);

  public boolean isDebugEnabled();
  public void debug(String msg);
  public void debug(String format, Object arg);
  public void debug(String format, Object arg1, Object arg2)
  public void debug(String format, Object[] argArray)
  public void debug(String msg, Throwable t);

  //...省略info、warn、error等一堆接口
}

// log4j日志框架的适配器
// Log4jLoggerAdapter实现了LocationAwareLogger接口,
// 其中LocationAwareLogger继承自Logger接口,
// 也就相当于Log4jLoggerAdapter实现了Logger接口。
package org.slf4j.impl;
public final class Log4jLoggerAdapter extends MarkerIgnoringBase
  implements LocationAwareLogger, Serializable {
  final transient org.apache.log4j.Logger logger; // log4j

  public boolean isDebugEnabled() {
    return logger.isDebugEnabled();
  }

  public void debug(String msg) {
    logger.log(FQCN, Level.DEBUG, msg, null);
  }

  public void debug(String format, Object arg) {
    if (logger.isDebugEnabled()) {
      FormattingTuple ft = MessageFormatter.format(format, arg);
      logger.log(FQCN, Level.DEBUG, ft.getMessage(), ft.getThrowable());
    }
  }

  public void debug(String format, Object arg1, Object arg2) {
    if (logger.isDebugEnabled()) {
      FormattingTuple ft = MessageFormatter.format(format, arg1, arg2);
      logger.log(FQCN, Level.DEBUG, ft.getMessage(), ft.getThrowable());
    }
  }

  public void debug(String format, Object[] argArray) {
    if (logger.isDebugEnabled()) {
      FormattingTuple ft = MessageFormatter.arrayFormat(format, argArray);
      logger.log(FQCN, Level.DEBUG, ft.getMessage(), ft.getThrowable());
    }
  }

  public void debug(String msg, Throwable t) {
    logger.log(FQCN, Level.DEBUG, msg, t);
  }
  //...省略一堆接口的实现...
}
2
3
4
5
6
7
8
9
10
11
12
13
14
15
16
17
18
19
20
21
22
23
24
25
26
27
28
29
30
31
32
33
34
35
36
37
38
39
40
41
42
43
44
45
46
47
48
49
50
51
52
53
54
55
56
57
58
59
60
61
62
63
所以在开发业务系统或者开发框架、组件的时候,统一使用 Slf4j 提供的接口来编写打印日志的代码,具体使用哪种日志框架实现(log4j、logback……),是可以动态地指定的(使用 Java 的 SPI 技术:“基于接口的编程+策略模式+配置文件”组合实现的动态加载机制),只需要将相应的 SDK 导入到项目中即可。
不过如果一些老的项目没有使用 Slf4j,而是直接使用比如 JCL 来打印日志,那如果想要替换成其他日志框架,比如 log4j,该怎么办呢?实际上,Slf4j 不仅仅提供了从其他日志框架到 Slf4j 的适配器,还提供了反向适配器,也就是从 Slf4j 到其他日志框架的适配。可以先将 JCL 切换为 Slf4j,然后再将 Slf4j 切换为 log4j。经过两次适配器的转换,就能成功将 JCL 切换为了 log4j。
# 5. 门面模式
# 5.1 门面模式原理
门面模式,也叫外观模式,英文全称是 Facade Design Pattern。门面模式定义:门面模式为子系统提供一组统一的接口,定义一组高层接口让子系统更易用。
假设有一个系统 A(后端服务器),提供了 a、b、c、d 四个接口。系统 B( App 客户端) 完成某个业务功能,需要调用 A 系统的 a、b、d 接口。利用门面模式提供一个包裹 a、b、d 接口调用的门面接口 x,给系统 B 直接使用。App 和服务器之间是通过移动网络通信的,网络通信耗时比较多,为了提高 App 的响应速度,要尽量减少 App 与服务器之间的网络通信次数。假设系统 B 完成某个业务功能(比如显示某个页面信息)需要“依次”调用 a、b、d 三个接口,因自身业务的特点,不支持并发调用这三个接口。通过门面模式 App 客户端调用一次接口 x,来获取到所有想要的数据,将网络通信的次数从 3 次减少到 1 次,也就提高了 App 的响应速度。
# 5.2 门面模式应用
解决易用性问题
门面模式可以用来封装系统的底层实现,隐藏系统的复杂性,提供一组更加简单易用、更高层的接口。比如,Linux 系统调用函数就可以看作一种“门面”。它是 Linux 操作系统暴露给开发者的一组“特殊”的编程接口,它封装了底层更基础的 Linux 内核调用。
从隐藏实现复杂性,提供更易用接口这个意图来看,门面模式有点类似迪米特法则(最少知识原则)和接口隔离原则:两个有交互的系统,只暴露有限的必要的接口。除此之外,门面模式还有点类似之前提到封装、抽象的设计思想,提供更抽象的接口,封装底层实现细节。
解决性能问题
例如通过将多个接口调用替换为一个门面接口调用,减少网络通信成本,提高 App 客户端的响应速度。
从代码实现的角度来看,该如何组织门面接口和非门面接口?
如果门面接口不多,完全可以将它跟非门面接口放到一块,也不需要特殊标记,当作普通接口来用即可。如果门面接口很多,可以在已有的接口之上,再重新抽象出一层,专门放置门面接口,从类、包的命名上跟原来的接口层做区分。如果门面接口特别多,并且很多都是跨多个子系统的,可以将门面接口放到一个新的子系统中。
解决分布式事务问题
用户注册包含创建用户和钱包的两个操作,可以通过依次调用用户的创建接口和钱包的创建接口来完成,但需要支持事务,要么都成功,要么都失败,不能一个成功、一个失败。
要支持两个接口调用在一个事务中执行,是比较难实现的,这涉及分布式事务问题。虽然可以通过引入分布式事务框架或者事后补偿的机制来解决,但代码实现都比较复杂。而最简单的解决方案是,利用数据库事务或者 Spring 框架提供的事务(如果是 Java 语言的话),在一个事务中,执行创建用户和创建钱包这两个 SQL 操作。这就要求两个 SQL 操作要在一个接口中完成,所以可以借鉴门面模式的思想,再设计一个包裹这两个操作的新接口,让新接口在一个事务中执行两个 SQL 操作。
# 6. 组合模式
# 6.1 组合模式原理
组合模式定义:将一组对象组织(Compose)成树形结构,以表示一种“部分 - 整体”的层次结构。组合让客户端(在很多设计模式书籍中,“客户端”代指代码的使用者。)可以统一单个对象和组合对象的处理逻辑。
组合模式,将一组对象组织成树形结构,将单个对象和组合对象都看做树中的节点,以统一处理逻辑,并且它利用树形结构的特点,递归地处理每个子树,依次简化代码实现。使用组合模式的前提在于,业务场景必须能够表示成树形结构。所以,组合模式的应用场景也比较局限,它并不是一种很常用的设计模式。
例子:设计一个类来表示文件系统中的目录,能方便地实现下面这些功能:
- 动态地添加、删除某个目录下的子目录或文件;
- 统计指定目录下的文件个数;
- 统计指定目录下的文件总大小。
把文件和目录统一用 FileSystemNode 类来表示,并且通过 isFile 属性来区分:
public class FileSystemNode {
  private String path;
  private boolean isFile;
  private List<FileSystemNode> subNodes = new ArrayList<>();

  public FileSystemNode(String path, boolean isFile) {
    this.path = path;
    this.isFile = isFile;
  }

  public int countNumOfFiles() {
    if (isFile) {
      return 1;
    }
    int numOfFiles = 0;
    for (FileSystemNode fileOrDir : subNodes) {
      numOfFiles += fileOrDir.countNumOfFiles();
    }
    return numOfFiles;
  }

  public long countSizeOfFiles() {
    if (isFile) {
      File file = new File(path);
      if (!file.exists()) return 0;
      return file.length();
    }
    long sizeofFiles = 0;
    for (FileSystemNode fileOrDir : subNodes) {
      sizeofFiles += fileOrDir.countSizeOfFiles();
    }
    return sizeofFiles;
  }

  public String getPath() {
    return path;
  }

  public void addSubNode(FileSystemNode fileOrDir) {
    subNodes.add(fileOrDir);
  }

  public void removeSubNode(FileSystemNode fileOrDir) {
    int size = subNodes.size();
    int i = 0;
    for (; i < size; ++i) {
      if (subNodes.get(i).getPath().equalsIgnoreCase(fileOrDir.getPath())) {
        break;
      }
    }
    if (i < size) {
      subNodes.remove(i);
    }
  }
}
2
3
4
5
6
7
8
9
10
11
12
13
14
15
16
17
18
19
20
21
22
23
24
25
26
27
28
29
30
31
32
33
34
35
36
37
38
39
40
41
42
43
44
45
46
47
48
49
50
51
52
53
54
55
单纯从功能实现角度来说,上面的代码已经实现了想要的功能。但如果开发的是一个大型系统,从扩展性(文件或目录可能会对应不同的操作)、业务建模(文件和目录从业务上是两个概念)、代码的可读性(文件和目录区分对待更加符合人们对业务的认知)的角度来说,最好对文件和目录进行区分设计,定义为 File 和 Directory 两个类。
public abstract class FileSystemNode {
  protected String path;

  public FileSystemNode(String path) {
    this.path = path;
  }

  public abstract int countNumOfFiles();
  public abstract long countSizeOfFiles();

  public String getPath() {
    return path;
  }
}

public class File extends FileSystemNode {
  public File(String path) {
    super(path);
  }

  @Override
  public int countNumOfFiles() {
    return 1;
  }

  @Override
  public long countSizeOfFiles() {
    java.io.File file = new java.io.File(path);
    if (!file.exists()) return 0;
    return file.length();
  }
}

public class Directory extends FileSystemNode {
  private List<FileSystemNode> subNodes = new ArrayList<>();

  public Directory(String path) {
    super(path);
  }

  @Override
  public int countNumOfFiles() {
    int numOfFiles = 0;
    for (FileSystemNode fileOrDir : subNodes) {
      numOfFiles += fileOrDir.countNumOfFiles();
    }
    return numOfFiles;
  }

  @Override
  public long countSizeOfFiles() {
    long sizeofFiles = 0;
    for (FileSystemNode fileOrDir : subNodes) {
      sizeofFiles += fileOrDir.countSizeOfFiles();
    }
    return sizeofFiles;
  }

  public void addSubNode(FileSystemNode fileOrDir) {
    subNodes.add(fileOrDir);
  }

  public void removeSubNode(FileSystemNode fileOrDir) {
    int size = subNodes.size();
    int i = 0;
    for (; i < size; ++i) {
      if (subNodes.get(i).getPath().equalsIgnoreCase(fileOrDir.getPath())) {
        break;
      }
    }
    if (i < size) {
      subNodes.remove(i);
    }
  }
}
2
3
4
5
6
7
8
9
10
11
12
13
14
15
16
17
18
19
20
21
22
23
24
25
26
27
28
29
30
31
32
33
34
35
36
37
38
39
40
41
42
43
44
45
46
47
48
49
50
51
52
53
54
55
56
57
58
59
60
61
62
63
64
65
66
67
68
69
70
71
72
73
74
75
使用上面代码来表示一个文件系统中的目录树结构:
public class Demo {
  public static void main(String[] args) {
    /**
     * /
     * /wz/
     * /wz/a.txt
     * /wz/b.txt
     * /wz/movies/
     * /wz/movies/c.avi
     * /xzg/
     * /xzg/docs/
     * /xzg/docs/d.txt
     */
    Directory fileSystemTree = new Directory("/");
    Directory node_wz = new Directory("/wz/");
    Directory node_xzg = new Directory("/xzg/");
    fileSystemTree.addSubNode(node_wz);
    fileSystemTree.addSubNode(node_xzg);

    File node_wz_a = new File("/wz/a.txt");
    File node_wz_b = new File("/wz/b.txt");
    Directory node_wz_movies = new Directory("/wz/movies/");
    node_wz.addSubNode(node_wz_a);
    node_wz.addSubNode(node_wz_b);
    node_wz.addSubNode(node_wz_movies);

    File node_wz_movies_c = new File("/wz/movies/c.avi");
    node_wz_movies.addSubNode(node_wz_movies_c);

    Directory node_xzg_docs = new Directory("/xzg/docs/");
    node_xzg.addSubNode(node_xzg_docs);

    File node_xzg_docs_d = new File("/xzg/docs/d.txt");
    node_xzg_docs.addSubNode(node_xzg_docs_d);

    System.out.println("/ files num:" + fileSystemTree.countNumOfFiles());
    System.out.println("/wz/ files num:" + node_wz.countNumOfFiles());
  }
}
2
3
4
5
6
7
8
9
10
11
12
13
14
15
16
17
18
19
20
21
22
23
24
25
26
27
28
29
30
31
32
33
34
35
36
37
38
39
再重新看一下组合模式的定义:“将一组对象(文件和目录)组织成树形结构,以表示一种‘部分 - 整体’的层次结构(目录与子目录的嵌套结构)。组合模式让客户端可以统一单个对象(文件)和组合对象(目录)的处理逻辑(递归遍历)。”
# 6.2 组合模式应用
假设在开发一个 OA 系统(办公自动化系统)。公司的组织结构包含部门和员工两种数据类型。其中部门又可以包含子部门和员工。在数据库中的表结构如下所示:
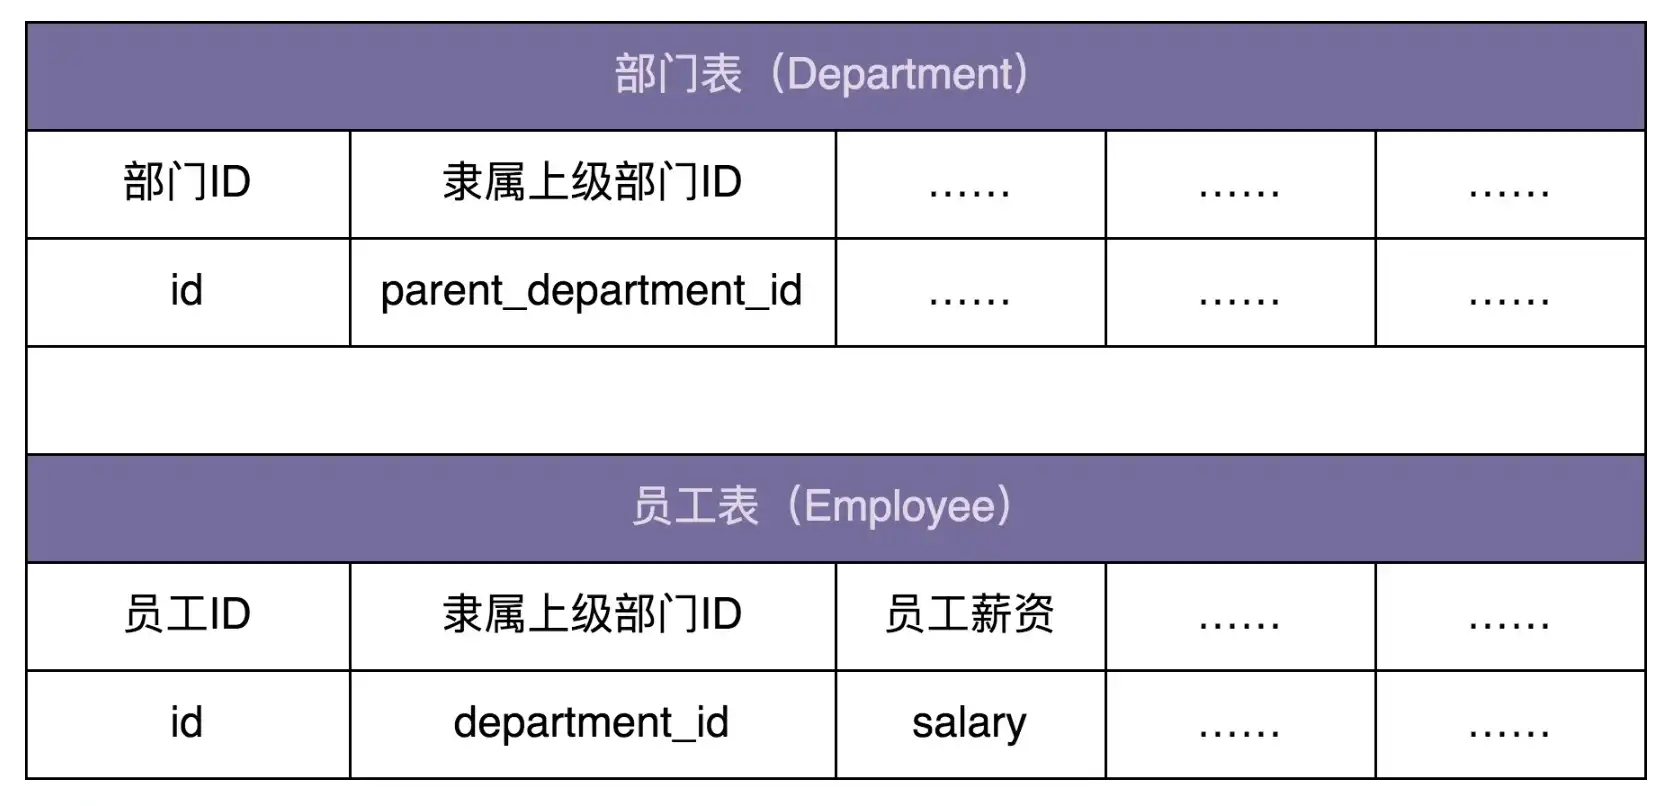
希望在内存中构建整个公司的人员架构图(部门、子部门、员工的隶属关系),并且提供接口计算出部门的薪资成本(隶属于这个部门的所有员工的薪资和)。这个应用场景可以使用组合模式来设计和实现
如下代码,HumanResource 是部门类(Department)和员工类(Employee)抽象出来的父类,为的是能统一薪资的处理逻辑。Demo 中的代码负责从数据库中读取数据并在内存中构建组织架构图。
public abstract class HumanResource {
  protected long id;
  protected double salary;

  public HumanResource(long id) {
    this.id = id;
  }

  public long getId() {
    return id;
  }

  public abstract double calculateSalary();
}

public class Employee extends HumanResource {
  public Employee(long id, double salary) {
    super(id);
    this.salary = salary;
  }

  @Override
  public double calculateSalary() {
    return salary;
  }
}

public class Department extends HumanResource {
  private List<HumanResource> subNodes = new ArrayList<>();

  public Department(long id) {
    super(id);
  }

  @Override
  public double calculateSalary() {
    double totalSalary = 0;
    for (HumanResource hr : subNodes) {
      totalSalary += hr.calculateSalary();
    }
    this.salary = totalSalary;
    return totalSalary;
  }

  public void addSubNode(HumanResource hr) {
    subNodes.add(hr);
  }
}

// 构建组织架构的代码
public class Demo {
  private static final long ORGANIZATION_ROOT_ID = 1001;
  private DepartmentRepo departmentRepo; // 依赖注入
  private EmployeeRepo employeeRepo; // 依赖注入

  public void buildOrganization() {
    Department rootDepartment = new Department(ORGANIZATION_ROOT_ID);
    buildOrganization(rootDepartment);
  }

  private void buildOrganization(Department department) {
    List<Long> subDepartmentIds = departmentRepo.getSubDepartmentIds(department.getId());
    for (Long subDepartmentId : subDepartmentIds) {
      Department subDepartment = new Department(subDepartmentId);
      department.addSubNode(subDepartment);
      buildOrganization(subDepartment);
    }
    List<Long> employeeIds = employeeRepo.getDepartmentEmployeeIds(department.getId());
    for (Long employeeId : employeeIds) {
      double salary = employeeRepo.getEmployeeSalary(employeeId);
      department.addSubNode(new Employee(employeeId, salary));
    }
  }
}
2
3
4
5
6
7
8
9
10
11
12
13
14
15
16
17
18
19
20
21
22
23
24
25
26
27
28
29
30
31
32
33
34
35
36
37
38
39
40
41
42
43
44
45
46
47
48
49
50
51
52
53
54
55
56
57
58
59
60
61
62
63
64
65
66
67
68
69
70
71
72
73
74
再拿组合模式的定义跟这个例子对照一下:“将一组对象(员工和部门)组织成树形结构,以表示一种‘部分 - 整体’的层次结构(部门与子部门的嵌套结构)。组合模式让客户端可以统一单个对象(员工)和组合对象(部门)的处理逻辑(递归遍历)。”
# 7. 享元模式
# 7.1 享元模式原理
所谓“享元”,顾名思义就是被共享的单元。享元模式的意图是复用对象,节省内存,前提是享元对象是不可变对象。
具体来讲,当一个系统中存在大量重复对象的时候,如果这些重复的对象是不可变对象,就可以利用享元模式将对象设计成享元,在内存中只保留一份实例,供多处代码引用。这样可以减少内存中对象的数量,起到节省内存的目的。实际上,不仅仅相同对象可以设计成享元,对于相似对象也可以将这些对象中相同的部分(字段)提取出来,设计成享元,让这些大量相似对象引用这些享元。
定义中的“不可变对象”指的是,一旦通过构造函数初始化完成之后,它的状态(对象的成员变量或者属性)就不会再被修改了。所以不可变对象不能暴露任何 set() 等修改内部状态的方法。之所以要求享元是不可变对象,那是因为它会被多处代码共享使用,避免一处代码对享元进行了修改,影响到其他使用它的代码。
例子:开发一个棋牌游戏(比如象棋)。一个游戏厅中有成千上万个“房间”,每个房间对应一个棋局。棋局要保存每个棋子的数据,比如:棋子类型(将、相、士、炮等)、棋子颜色(红方、黑方)、棋子在棋局中的位置。利用这些数据就能显示一个完整的棋盘给玩家。具体的代码如下所示。其中,ChessPiece 类表示棋子,ChessBoard 类表示一个棋局,里面保存了象棋中 30 个棋子的信息。
public class ChessPiece {//棋子
  private int id;
  private String text;
  private Color color;
  private int positionX;
  private int positionY;

  public ChessPiece(int id, String text, Color color, int positionX, int positionY) {
    this.id = id;
    this.text = text;
    this.color = color;
    this.positionX = positionX;
    this.positionY = positionX;
  }

  public static enum Color {
    RED, BLACK
  }

  // ...省略其他属性和getter/setter方法...
}

public class ChessBoard {//棋局
  private Map<Integer, ChessPiece> chessPieces = new HashMap<>();

  public ChessBoard() {
    init();
  }

  private void init() {
    chessPieces.put(1, new ChessPiece(1, "車", ChessPiece.Color.BLACK, 0, 0));
    chessPieces.put(2, new ChessPiece(2,"馬", ChessPiece.Color.BLACK, 0, 1));
    //...省略摆放其他棋子的代码...
  }

  public void move(int chessPieceId, int toPositionX, int toPositionY) {
    //...省略...
  }
}
2
3
4
5
6
7
8
9
10
11
12
13
14
15
16
17
18
19
20
21
22
23
24
25
26
27
28
29
30
31
32
33
34
35
36
37
38
39
为了记录每个房间当前的棋局情况,需要给每个房间都创建一个 ChessBoard 棋局对象。因为游戏大厅中有成千上万的房间(实际上,百万人同时在线的游戏大厅也有很多),那保存这么多棋局对象就会消耗大量的内存。
可以使用享元模式解决该问题。像刚刚的实现方式,在内存中会有大量的相似对象。这些相似对象的 id、text、color 都是相同的,唯独 positionX、positionY 不同。实际上可以将棋子的 id、text、color 属性拆分出来,设计成独立的类,并且作为享元供多个棋盘复用。这样棋盘只需要记录每个棋子的位置信息就可以了。代码如下:
// 享元类
public class ChessPieceUnit {
  private int id;
  private String text;
  private Color color;

  public ChessPieceUnit(int id, String text, Color color) {
    this.id = id;
    this.text = text;
    this.color = color;
  }

  public static enum Color {
    RED, BLACK
  }

  // ...省略其他属性和getter方法...
}

public class ChessPieceUnitFactory {
  private static final Map<Integer, ChessPieceUnit> pieces = new HashMap<>();

  static {
    pieces.put(1, new ChessPieceUnit(1, "車", ChessPieceUnit.Color.BLACK));
    pieces.put(2, new ChessPieceUnit(2,"馬", ChessPieceUnit.Color.BLACK));
    //...省略摆放其他棋子的代码...
  }

  public static ChessPieceUnit getChessPiece(int chessPieceId) {
    return pieces.get(chessPieceId);
  }
}

public class ChessPiece {
  private ChessPieceUnit chessPieceUnit;
  private int positionX;
  private int positionY;

  public ChessPiece(ChessPieceUnit unit, int positionX, int positionY) {
    this.chessPieceUnit = unit;
    this.positionX = positionX;
    this.positionY = positionY;
  }
  // 省略getter、setter方法
}

public class ChessBoard {
  private Map<Integer, ChessPiece> chessPieces = new HashMap<>();

  public ChessBoard() {
    init();
  }

  private void init() {
    chessPieces.put(1, new ChessPiece(
            ChessPieceUnitFactory.getChessPiece(1), 0,0));
    chessPieces.put(1, new ChessPiece(
            ChessPieceUnitFactory.getChessPiece(2), 1,0));
    //...省略摆放其他棋子的代码...
  }

  public void move(int chessPieceId, int toPositionX, int toPositionY) {
    //...省略...
  }
}
2
3
4
5
6
7
8
9
10
11
12
13
14
15
16
17
18
19
20
21
22
23
24
25
26
27
28
29
30
31
32
33
34
35
36
37
38
39
40
41
42
43
44
45
46
47
48
49
50
51
52
53
54
55
56
57
58
59
60
61
62
63
64
65
在上面的代码实现中,利用工厂类来缓存 ChessPieceUnit 信息(也就是 id、text、color)。通过工厂类获取到的 ChessPieceUnit 就是享元。所有的 ChessBoard 对象共享这 32 个 ChessPieceUnit 对象。在使用享元模式之前,记录 1 万个棋局,我们要创建 32 万个棋子的 ChessPieceUnit 对象。利用享元模式,只需要创建 32 个享元对象供所有棋局共享使用即可,大大节省了内存。
实际上,享元模式主要是通过工厂模式,在工厂类中,通过一个 Map 来缓存已经创建过的享元对象,来达到复用的目的。
需注意:享元模式对 JVM 的垃圾回收并不友好。因为享元工厂类一直保存了对享元对象的引用,这就导致享元对象在没有任何代码使用的情况下,也并不会被 JVM 垃圾回收机制自动回收掉。因此,在某些情况下,如果对象的生命周期很短,也不会被密集使用,利用享元模式反倒可能会浪费更多的内存。所以,除非经过线上验证,利用享元模式真的可以大大节省内存,否则,就不要过度使用这个模式,为了一点点内存的节省而引入一个复杂的设计模式,得不偿失。
# 7.2 享元模式在文本编辑器中的应用
利用享元模式来优化文本编辑器的内存占用。这里的文本编辑器想象成 Office 的 Word。为了简化需求假设这个文本编辑器只实现了文字编辑功能,不包含图片、表格等复杂的编辑功能。要在内存中表示一个文本文件,只需要记录文字和格式两部分信息就可以了,其中,格式又包括文字的字体、大小、颜色等信息。
把每个文字都当作一个独立的对象来看待,并且在其中包含它的格式信息。具体的代码示例如下所示:
//文字
public class Character {
  private char c;

  private Font font;
  private int size;
  private int colorRGB;

  public Character(char c, Font font, int size, int colorRGB) {
    this.c = c;
    this.font = font;
    this.size = size;
    this.colorRGB = colorRGB;
  }
}

public class Editor {
  private List<Character> chars = new ArrayList<>();

  public void appendCharacter(char c, Font font, int size, int colorRGB) {
    Character character = new Character(c, font, size, colorRGB);
    chars.add(character);
  }
}
2
3
4
5
6
7
8
9
10
11
12
13
14
15
16
17
18
19
20
21
22
23
24
在文本编辑器中每敲一个文字,都会调用 Editor 类中的 appendCharacter() 方法,创建一个新的 Character 对象,保存到 chars 数组中。如果一个文本文件中,有上万、十几万、几十万的文字,那就要在内存中存储这么多 Character 对象。
实际上在一个文本文件中,用到的字体格式不会太多,毕竟不大可能有人把每个文字都设置成不同的格式。所以,对于字体格式可以将它设计成享元,让不同的文字共享使用。重构后的代码如下所示:
public class CharacterStyle {
  private Font font;
  private int size;
  private int colorRGB;

  public CharacterStyle(Font font, int size, int colorRGB) {
    this.font = font;
    this.size = size;
    this.colorRGB = colorRGB;
  }

  @Override
  public boolean equals(Object o) {
    CharacterStyle otherStyle = (CharacterStyle) o;
    return font.equals(otherStyle.font)
            && size == otherStyle.size
            && colorRGB == otherStyle.colorRGB;
  }
}

public class CharacterStyleFactory {
  private static final List<CharacterStyle> styles = new ArrayList<>();

  public static CharacterStyle getStyle(Font font, int size, int colorRGB) {
    CharacterStyle newStyle = new CharacterStyle(font, size, colorRGB);
    for (CharacterStyle style : styles) {
      if (style.equals(newStyle)) {
        return style;
      }
    }
    styles.add(newStyle);
    return newStyle;
  }
}

public class Character {
  private char c;
  private CharacterStyle style;

  public Character(char c, CharacterStyle style) {
    this.c = c;
    this.style = style;
  }
}

public class Editor {
  private List<Character> chars = new ArrayList<>();

  public void appendCharacter(char c, Font font, int size, int colorRGB) {
    Character character = new Character(c, CharacterStyleFactory.getStyle(font, size, colorRGB));
    chars.add(character);
  }
}
2
3
4
5
6
7
8
9
10
11
12
13
14
15
16
17
18
19
20
21
22
23
24
25
26
27
28
29
30
31
32
33
34
35
36
37
38
39
40
41
42
43
44
45
46
47
48
49
50
51
52
53
# 7.3 享元模式 VS 单例、缓存、对象池
享元模式跟单例的区别
在单例模式中,一个类只能创建一个对象,而在享元模式中,一个类可以创建多个对象,每个对象被多处代码引用共享。实际上,享元模式有点类似于之前讲到的单例的变体:多例。
尽管从代码实现上来看,享元模式和多例有很多相似之处,但从设计意图上来看,它们是完全不同的。应用享元模式是为了对象复用,节省内存,而应用多例模式是为了限制对象的个数。
享元模式跟缓存的区别
在享元模式的实现中,通过工厂类来“缓存”已经创建好的对象。这里的“缓存”实际上是“存储”的意思,平时所讲的缓存,主要是为了提高访问效率,而非复用。
享元模式跟对象池的区别
池化技术中的“复用”可以理解为“重复使用”,主要目的是节省时间(比如从数据库池中取一个连接,不需要重新创建)。在任意时刻,每一个对象、连接、线程,并不会被多处使用,而是被一个使用者独占,当使用完成之后,放回到池中,再由其他使用者重复利用。享元模式中的“复用”可以理解为“共享使用”,在整个生命周期中,都是被所有使用者共享的,主要目的是节省空间。
简单概括:应用单例模式是为了保证对象全局唯一。应用享元模式是为了实现对象复用,节省内存。缓存是为了提高访问效率,而非复用。池化技术中的“复用”理解为“重复使用”,主要是为了节省时间。
# 7.4 剖析享元模式在 Java Integer、String 中的应用
Integer i1 = 56;
Integer i2 = 56;
Integer i3 = 129;
Integer i4 = 129;
System.out.println(i1 == i2);
System.out.println(i3 == i4);
2
3
4
5
6
要正确地分析上面的代码需要弄清楚下面两个问题:
- 如何判定两个 Java 对象是否相等(也就代码中的“==”操作符的含义)?
- 什么是自动装箱(Autoboxing)和自动拆箱(Unboxing)?
Java 为基本数据类型提供了对应的包装器类型。所谓的自动装箱,就是自动将基本数据类型转换为包装器类型。所谓的自动拆箱,也就是自动将包装器类型转化为基本数据类型。具体的代码示例如下所示:
Integer i = 56; //自动装箱,底层执行了:Integer i = Integer.valueOf(59);
int j = i; //自动拆箱,底层执行了:int j = i.intValue();
2
在 Java 中当通过“==”来判定两个对象是否相等的时候,实际上是在判断两个局部变量存储的地址是否相同,换句话说,是在判断两个局部变量是否指向相同的对象。
现在可以分析 i1、i2 尽管存储的数值相同,都是 56,但是指向不同的 Integer 对象,所以通过“==”来判定是否相同的时候,会返回 false。同理,i3==i4 判定语句也会返回 false。但实际正确结果是:i1==i2 为 true;i3==i4 为 false。
正是因为 Integer 用到了享元模式来复用对象,才导致了这样的运行结果。当通过自动装箱,也就是调用 valueOf() 来创建 Integer 对象的时候,如果要创建的 Integer 对象的值在 -128 到 127 之间,会从 IntegerCache 类中直接返回,否则才调用 new 方法创建。看代码更加清晰一些,Integer 类的 valueOf() 函数的具体代码如下所示:
public static Integer valueOf(int i) {
    if (i >= IntegerCache.low && i <= IntegerCache.high)
        return IntegerCache.cache[i + (-IntegerCache.low)];
    return new Integer(i);
}
2
3
4
5
这里的 IntegerCache 相当于生成享元对象的工厂类,只不过名字不叫 xxxFactory 而已。
private static class IntegerCache {
    static final int low = -128;
    static final int high;
    static final Integer cache[];

    static {
        // high value may be configured by property
        int h = 127;
        String integerCacheHighPropValue =
            sun.misc.VM.getSavedProperty("java.lang.Integer.IntegerCache.high");
        if (integerCacheHighPropValue != null) {
            try {
                int i = parseInt(integerCacheHighPropValue);
                i = Math.max(i, 127);
                // Maximum array size is Integer.MAX_VALUE
                h = Math.min(i, Integer.MAX_VALUE - (-low) -1);
            } catch( NumberFormatException nfe) {
                // If the property cannot be parsed into an int, ignore it.
            }
        }
        high = h;

        cache = new Integer[(high - low) + 1];
        int j = low;
        for(int k = 0; k < cache.length; k++)
            cache[k] = new Integer(j++);

        // range [-128, 127] must be interned (JLS7 5.1.7)
        assert IntegerCache.high >= 127;
    }

    private IntegerCache() {}
}
2
3
4
5
6
7
8
9
10
11
12
13
14
15
16
17
18
19
20
21
22
23
24
25
26
27
28
29
30
31
32
33
在 IntegerCache 的代码实现中,当这个类被加载的时候,缓存的享元对象会被集中一次性创建好。毕竟整型值太多了,不可能在 IntegerCache 类中预先创建好所有的整型值,这样既占用太多内存,也使得加载 IntegerCache 类的时间过长。所以只能选择缓存对于大部分应用来说最常用的整型值,也就是一个字节的大小(-128 到 127 之间的数据)。
实际上,JDK 也提供了方法来自定义缓存的最大值,有下面两种方式。如果你通过分析应用的 JVM 内存占用情况,发现 -128 到 255 之间的数据占用的内存比较多,就可以用如下方式,将缓存的最大值从 127 调整到 255。不过,这里注意一下,JDK 并没有提供设置最小值的方法。
//方法一:
-Djava.lang.Integer.IntegerCache.high=255
//方法二:
-XX:AutoBoxCacheMax=255
2
3
4
因为 56 处于 -128 和 127 之间,i1 和 i2 会指向相同的享元对象,所以 i1==i2 返回 true。而 129 大于 127,并不会被缓存,每次都会创建一个全新的对象,也就是说,i3 和 i4 指向不同的 Integer 对象,所以 i3==i4 返回 false。
除了 Integer 类型之外,其他包装器类型,比如 Long、Short、Byte 等,也都利用了享元模式来缓存 -128 到 127 之间的数据。
在平时的开发中,对于下面这样三种创建整型对象的方式,我们优先使用后两种。
Integer a = new Integer(123);
Integer a = 123;
Integer a = Integer.valueOf(123);
2
3
# 7.5 享元模式在 Java String 中的应用
String s1 = "小争哥";
String s2 = "小争哥";
String s3 = new String("小争哥");

System.out.println(s1 == s2);
System.out.println(s1 == s3);
2
3
4
5
6
上面代码的运行结果是:一个 true,一个 false。跟 Integer 类的设计思路相似,String 类利用享元模式来复用相同的字符串常量(也就是代码中的“小争哥”)。JVM 会专门开辟一块存储区来存储字符串常量,这块存储区叫作“字符串常量池”。上面代码对应的内存存储结构如下所示:
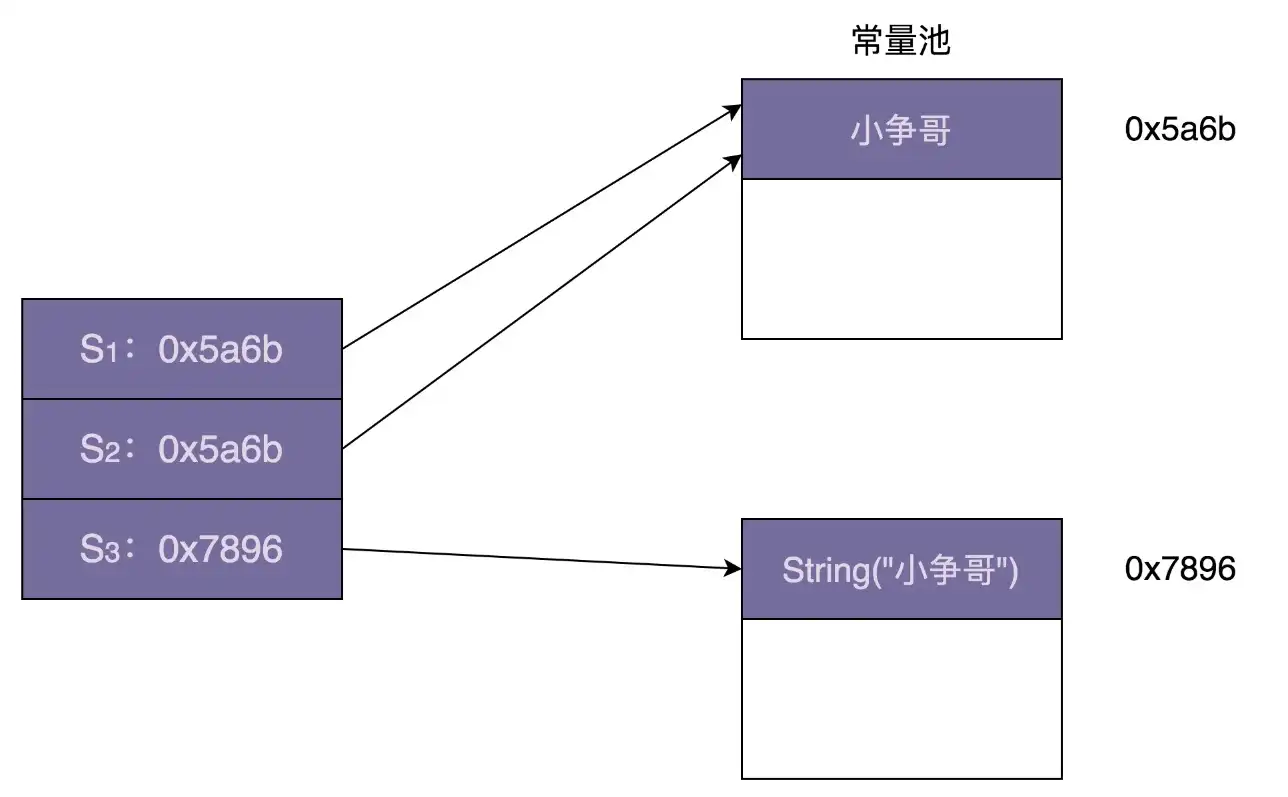
不过,String 类的享元模式的设计,跟 Integer 类稍微有些不同。Integer 类中要共享的对象,是在类加载的时候,就集中一次性创建好的。但对于字符串来说,没法事先知道要共享哪些字符串常量,所以没办法事先创建好,只能在某个字符串常量第一次被用到的时候,存储到常量池中,当之后再用到的时候,直接引用常量池中已经存在的即可,就不需要再重新创建了。