 设计模式 - 行为型(下)
# 设计模式 - 行为型(下)
来源:极客时间《设计模式之美》 (opens new window)专栏
# 1. 访问者模式
# 1.1 访问者模式原理与实现
访问者模式可以算是 23 种经典设计模式中最难理解的几个之一。因为它难理解、难实现,应用它会导致代码的可读性、可维护性变差,所以,访问者模式在实际的软件开发中很少被用到,在没有特别必要的情况下,建议不要使用访问者模式。
访问者者模式的英文翻译是 Visitor Design Pattern。定义:允许一个或者多个操作应用到一组对象上,解耦操作和对象本身。
假设从网站上爬取了很多资源文件,它们的格式有三种:PDF、PPT、Word。现在要开发一个工具来处理这批资源文件。这个工具的其中一个功能是,把这些资源文件中的文本内容抽取出来放到 txt 文件中。
代码实现如下,ResourceFile 是一个抽象类,包含一个抽象函数 extract2txt()。PdfFile、PPTFile、WordFile 都继承 ResourceFile 类,并且重写了 extract2txt() 函数。在 ToolApplication 中,可以利用多态特性,根据对象的实际类型,来决定执行哪个方法。
public abstract class ResourceFile {
  protected String filePath;

  public ResourceFile(String filePath) {
    this.filePath = filePath;
  }

  public abstract void extract2txt();
}

public class PPTFile extends ResourceFile {
  public PPTFile(String filePath) {
    super(filePath);
  }

  @Override
  public void extract2txt() {
    //...省略一大坨从PPT中抽取文本的代码...
    //...将抽取出来的文本保存在跟filePath同名的.txt文件中...
    System.out.println("Extract PPT.");
  }
}

public class PdfFile extends ResourceFile {
  public PdfFile(String filePath) {
    super(filePath);
  }

  @Override
  public void extract2txt() {
    //...
    System.out.println("Extract PDF.");
  }
}

public class WordFile extends ResourceFile {
  public WordFile(String filePath) {
    super(filePath);
  }

  @Override
  public void extract2txt() {
    //...
    System.out.println("Extract WORD.");
  }
}

// 运行结果是:
// Extract PDF.
// Extract WORD.
// Extract PPT.
public class ToolApplication {
  public static void main(String[] args) {
    List<ResourceFile> resourceFiles = listAllResourceFiles(args[0]);
    for (ResourceFile resourceFile : resourceFiles) {
      resourceFile.extract2txt();
    }
  }

  private static List<ResourceFile> listAllResourceFiles(String resourceDirectory) {
    List<ResourceFile> resourceFiles = new ArrayList<>();
    //...根据后缀(pdf/ppt/word)由工厂方法创建不同的类对象(PdfFile/PPTFile/WordFile)
    resourceFiles.add(new PdfFile("a.pdf"));
    resourceFiles.add(new WordFile("b.word"));
    resourceFiles.add(new PPTFile("c.ppt"));
    return resourceFiles;
  }
}
2
3
4
5
6
7
8
9
10
11
12
13
14
15
16
17
18
19
20
21
22
23
24
25
26
27
28
29
30
31
32
33
34
35
36
37
38
39
40
41
42
43
44
45
46
47
48
49
50
51
52
53
54
55
56
57
58
59
60
61
62
63
64
65
66
67
68
如果工具的功能不停地扩展,不仅要能抽取文本内容,还要支持压缩、提取文件元信息(文件名、大小、更新时间等等)构建索引等一系列的功能,那如果继续按照上面的实现思路,就会存在这样几个问题:
- 违背开闭原则,添加一个新的功能,所有类的代码都要修改;
- 虽然功能增多,每个类的代码都不断膨胀,可读性和可维护性都变差了;
- 把所有比较上层的业务逻辑都耦合到 PdfFile、PPTFile、WordFile 类中,导致这些类的职责不够单一,变成了大杂烩。
针对上面的问题,常用的解决方法就是拆分解耦,把业务操作跟具体的数据结构解耦,设计成独立的类。这里按照访问者模式的演进思路来对上面的代码进行重构。
public abstract class ResourceFile {
  protected String filePath;
  public ResourceFile(String filePath) {
    this.filePath = filePath;
  }
}

public class PdfFile extends ResourceFile {
  public PdfFile(String filePath) {
    super(filePath);
  }
  //...
}
//...PPTFile、WordFile代码省略...
public class Extractor {
  public void extract2txt(PPTFile pptFile) {
    //...
    System.out.println("Extract PPT.");
  }

  public void extract2txt(PdfFile pdfFile) {
    //...
    System.out.println("Extract PDF.");
  }

  public void extract2txt(WordFile wordFile) {
    //...
    System.out.println("Extract WORD.");
  }
}

public class ToolApplication {
  public static void main(String[] args) {
    Extractor extractor = new Extractor();
    List<ResourceFile> resourceFiles = listAllResourceFiles(args[0]);
    for (ResourceFile resourceFile : resourceFiles) {
      extractor.extract2txt(resourceFile);
    }
  }

  private static List<ResourceFile> listAllResourceFiles(String resourceDirectory) {
    List<ResourceFile> resourceFiles = new ArrayList<>();
    //...根据后缀(pdf/ppt/word)由工厂方法创建不同的类对象(PdfFile/PPTFile/WordFile)
    resourceFiles.add(new PdfFile("a.pdf"));
    resourceFiles.add(new WordFile("b.word"));
    resourceFiles.add(new PPTFile("c.ppt"));
    return resourceFiles;
  }
}
2
3
4
5
6
7
8
9
10
11
12
13
14
15
16
17
18
19
20
21
22
23
24
25
26
27
28
29
30
31
32
33
34
35
36
37
38
39
40
41
42
43
44
45
46
47
48
49
这其中最关键的一点设计是把抽取文本内容的操作,设计成了三个重载函数。函数重载是 Java、C++ 这类面向对象编程语言中常见的语法机制。所谓重载函数是指,在同一类中函数名相同、参数不同的一组函数。上面的代码是编译通过不了的,第 37 行会报错。
首先多态是一种动态绑定,可以在运行时获取对象的实际类型,来运行实际类型对应的方法。而函数重载是一种静态绑定,在编译时并不能获取对象的实际类型,而是根据声明类型执行声明类型对应的方法。
在上面代码的第 35~38 行中,resourceFiles 包含的对象的声明类型都是 ResourceFile,并没有在 Extractor 类中定义参数类型是 ResourceFile 的 extract2txt() 重载函数,所以在编译阶段就通过不了,更别说在运行时根据对象的实际类型执行不同的重载函数了。解决的办法如下。
public abstract class ResourceFile {
  protected String filePath;
  public ResourceFile(String filePath) {
    this.filePath = filePath;
  }
  abstract public void accept(Extractor extractor);
}

public class PdfFile extends ResourceFile {
  public PdfFile(String filePath) {
    super(filePath);
  }

  @Override
  public void accept(Extractor extractor) {
    extractor.extract2txt(this);
  }

  //...
}

//...PPTFile、WordFile跟PdfFile类似,这里就省略了...
//...Extractor代码不变...

public class ToolApplication {
  public static void main(String[] args) {
    Extractor extractor = new Extractor();
    List<ResourceFile> resourceFiles = listAllResourceFiles(args[0]);
    for (ResourceFile resourceFile : resourceFiles) {
      resourceFile.accept(extractor);
    }
  }

  private static List<ResourceFile> listAllResourceFiles(String resourceDirectory) {
    List<ResourceFile> resourceFiles = new ArrayList<>();
    //...根据后缀(pdf/ppt/word)由工厂方法创建不同的类对象(PdfFile/PPTFile/WordFile)
    resourceFiles.add(new PdfFile("a.pdf"));
    resourceFiles.add(new WordFile("b.word"));
    resourceFiles.add(new PPTFile("c.ppt"));
    return resourceFiles;
  }
}
2
3
4
5
6
7
8
9
10
11
12
13
14
15
16
17
18
19
20
21
22
23
24
25
26
27
28
29
30
31
32
33
34
35
36
37
38
39
40
41
42
在执行第 30 行的时候,根据多态特性,程序会调用实际类型的 accept 函数,比如 PdfFile 的 accept 函数,也就是第 16 行代码。而 16 行代码中的 this 类型是 PdfFile 的,在编译的时候就确定了,所以会调用 extractor 的 extract2txt(PdfFile pdfFile) 这个重载函数。
现在,如果要继续添加新的功能,比如前面提到的压缩功能,根据不同的文件类型,使用不同的压缩算法来压缩资源文件,需要实现一个类似 Extractor 类的新类 Compressor 类,在其中定义三个重载函数,实现对不同类型资源文件的压缩。除此之外还要在每个资源文件类中定义新的 accept 重载函数。具体的代码如下所示:
public abstract class ResourceFile {
  protected String filePath;
  public ResourceFile(String filePath) {
    this.filePath = filePath;
  }
  abstract public void accept(Extractor extractor);
  abstract public void accept(Compressor compressor);
}

public class PdfFile extends ResourceFile {
  public PdfFile(String filePath) {
    super(filePath);
  }

  @Override
  public void accept(Extractor extractor) {
    extractor.extract2txt(this);
  }

  @Override
  public void accept(Compressor compressor) {
    compressor.compress(this);
  }

  //...
}
}
//...PPTFile、WordFile跟PdfFile类似,这里就省略了...
//...Extractor代码不变

public class ToolApplication {
  public static void main(String[] args) {
    Extractor extractor = new Extractor();
    List<ResourceFile> resourceFiles = listAllResourceFiles(args[0]);
    for (ResourceFile resourceFile : resourceFiles) {
      resourceFile.accept(extractor);
    }

    Compressor compressor = new Compressor();
    for(ResourceFile resourceFile : resourceFiles) {
      resourceFile.accept(compressor);
    }
  }

  private static List<ResourceFile> listAllResourceFiles(String resourceDirectory) {
    List<ResourceFile> resourceFiles = new ArrayList<>();
    //...根据后缀(pdf/ppt/word)由工厂方法创建不同的类对象(PdfFile/PPTFile/WordFile)
    resourceFiles.add(new PdfFile("a.pdf"));
    resourceFiles.add(new WordFile("b.word"));
    resourceFiles.add(new PPTFile("c.ppt"));
    return resourceFiles;
  }
}
2
3
4
5
6
7
8
9
10
11
12
13
14
15
16
17
18
19
20
21
22
23
24
25
26
27
28
29
30
31
32
33
34
35
36
37
38
39
40
41
42
43
44
45
46
47
48
49
50
51
52
53
上面代码还存在一些问题,添加一个新的业务,还是需要修改每个资源文件类,违反了开闭原则。针对这个问题抽象出来一个 Visitor 接口,包含是三个命名非常通用的 visit() 重载函数,分别处理三种不同类型的资源文件。具体做什么业务处理,由实现这个 Visitor 接口的具体的类来决定,比如 Extractor 负责抽取文本内容,Compressor 负责压缩。当新添加一个业务功能的时候,资源文件类不需要做任何修改,只需要修改 ToolApplication 的代码就可以了。重构之后的代码如下所示:
public abstract class ResourceFile {
  protected String filePath;
  public ResourceFile(String filePath) {
    this.filePath = filePath;
  }
  abstract public void accept(Visitor vistor);
}

public class PdfFile extends ResourceFile {
  public PdfFile(String filePath) {
    super(filePath);
  }

  @Override
  public void accept(Visitor visitor) {
    visitor.visit(this);
  }

  //...
}
//...PPTFile、WordFile跟PdfFile类似,这里就省略了...

public interface Visitor {
  void visit(PdfFile pdfFile);
  void visit(PPTFile pdfFile);
  void visit(WordFile pdfFile);
}

public class Extractor implements Visitor {
  @Override
  public void visit(PPTFile pptFile) {
    //...
    System.out.println("Extract PPT.");
  }

  @Override
  public void visit(PdfFile pdfFile) {
    //...
    System.out.println("Extract PDF.");
  }

  @Override
  public void visit(WordFile wordFile) {
    //...
    System.out.println("Extract WORD.");
  }
}

public class Compressor implements Visitor {
  @Override
  public void visit(PPTFile pptFile) {
    //...
    System.out.println("Compress PPT.");
  }

  @Override
  public void visit(PdfFile pdfFile) {
    //...
    System.out.println("Compress PDF.");
  }

  @Override
  public void visit(WordFile wordFile) {
    //...
    System.out.println("Compress WORD.");
  }

}

public class ToolApplication {
  public static void main(String[] args) {
    Extractor extractor = new Extractor();
    List<ResourceFile> resourceFiles = listAllResourceFiles(args[0]);
    for (ResourceFile resourceFile : resourceFiles) {
      resourceFile.accept(extractor);
    }

    Compressor compressor = new Compressor();
    for(ResourceFile resourceFile : resourceFiles) {
      resourceFile.accept(compressor);
    }
  }

  private static List<ResourceFile> listAllResourceFiles(String resourceDirectory) {
    List<ResourceFile> resourceFiles = new ArrayList<>();
    //...根据后缀(pdf/ppt/word)由工厂方法创建不同的类对象(PdfFile/PPTFile/WordFile)
    resourceFiles.add(new PdfFile("a.pdf"));
    resourceFiles.add(new WordFile("b.word"));
    resourceFiles.add(new PPTFile("c.ppt"));
    return resourceFiles;
  }
}
2
3
4
5
6
7
8
9
10
11
12
13
14
15
16
17
18
19
20
21
22
23
24
25
26
27
28
29
30
31
32
33
34
35
36
37
38
39
40
41
42
43
44
45
46
47
48
49
50
51
52
53
54
55
56
57
58
59
60
61
62
63
64
65
66
67
68
69
70
71
72
73
74
75
76
77
78
79
80
81
82
83
84
85
86
87
88
89
90
91
92
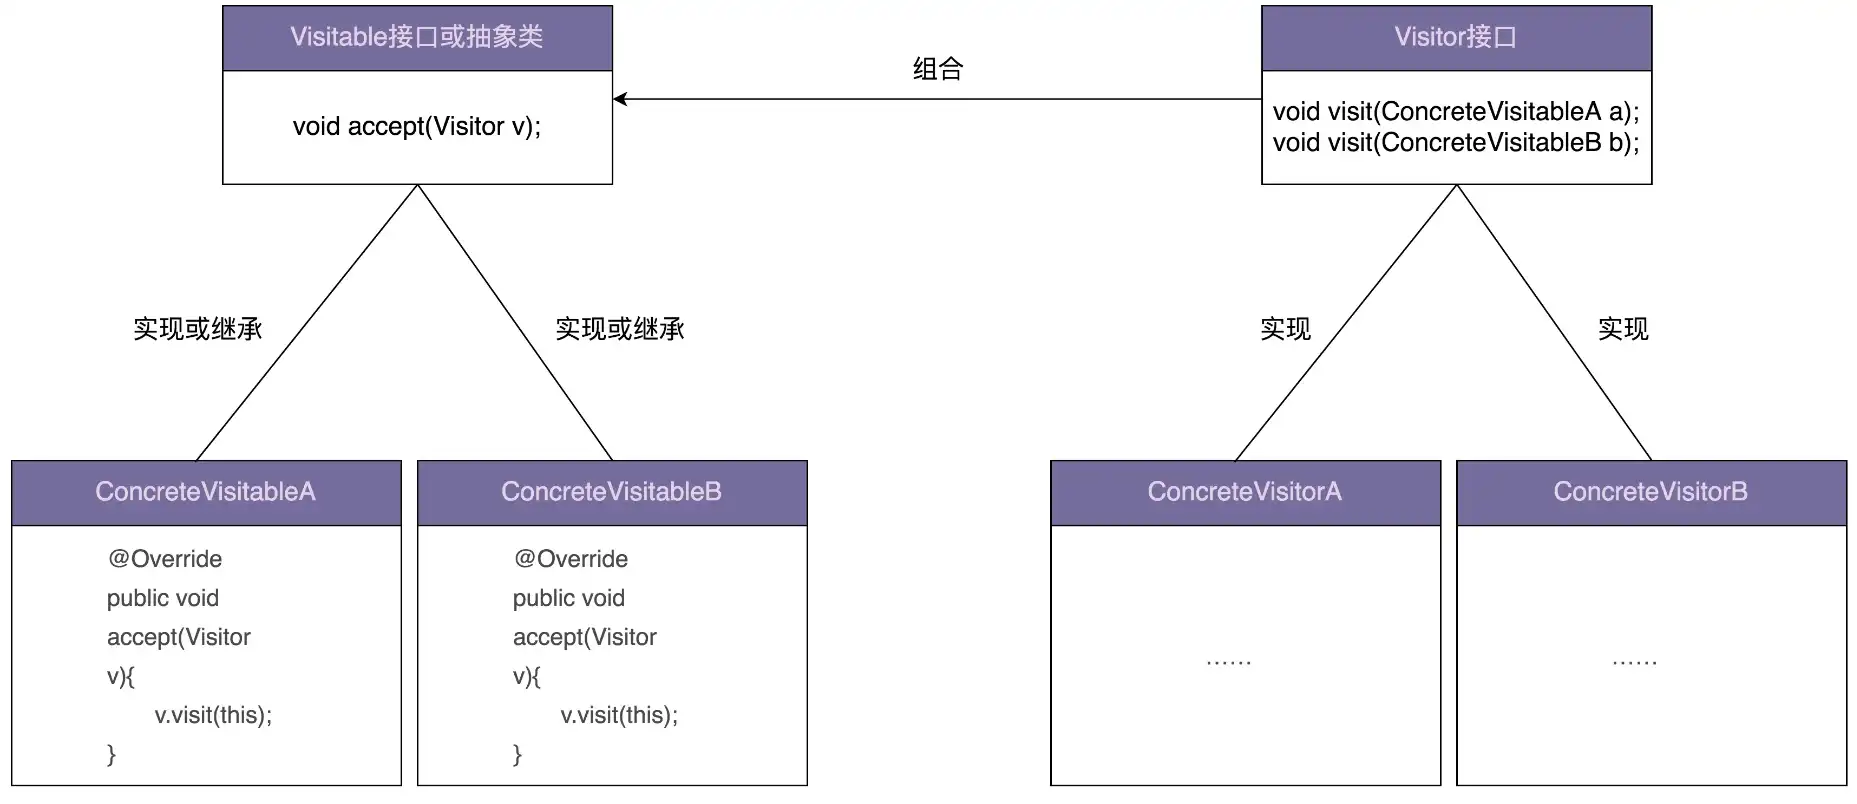
一般来说,访问者模式针对的是一组类型不同的对象(PdfFile、PPTFile、WordFile)。不过,尽管这组对象的类型是不同的,但是,它们继承相同的父类(ResourceFile)或者实现相同的接口。在不同的应用场景下需要对这组对象进行一系列不相关的业务操作(抽取文本、压缩等),但为了避免不断添加功能导致类(PdfFile、PPTFile、WordFile)不断膨胀,职责越来越不单一,以及避免频繁地添加功能导致的频繁代码修改,使用访问者模式将对象与操作解耦,将这些业务操作抽离出来,定义在独立细分的访问者类(Extractor、Compressor)中。
# 1.2 为什么支持双分派的语言不需要访问者模式
Double Dispatch,中文翻译为双分派。既然有 Double Dispatch,对应的就有 Single Dispatch。所谓 Single Dispatch,指的是执行哪个对象的方法,根据对象的运行时类型来决定;执行对象的哪个方法,根据方法参数的编译时类型来决定。所谓 Double Dispatch,指的是执行哪个对象的方法,根据对象的运行时类型来决定;执行对象的哪个方法,根据方法参数的运行时类型来决定。
如何理解“Dispatch”这个单词呢? 在面向对象编程语言中,可以把方法调用理解为一种消息传递,也就是“Dispatch”。一个对象调用另一个对象的方法,就相当于给它发送一条消息。这条消息起码要包含对象名、方法名、方法参数。
如何理解“Single”“Double”这两个单词呢?“Single”“Double”指的是执行哪个对象的哪个方法,跟几个因素的运行时类型有关。Single Dispatch 之所以称为“Single”,是因为执行哪个对象的哪个方法,只跟“对象”的运行时类型有关。Double Dispatch 之所以称为“Double”,是因为执行哪个对象的哪个方法,跟“对象”和“方法参数”两者的运行时类型有关。
具体到编程语言的语法机制,Single Dispatch 和 Double Dispatch 跟多态和函数重载直接相关。当前主流的面向对象编程语言(比如,Java、C++、C#)都只支持 Single Dispatch,不支持 Double Dispatch。
Java 支持多态特性,代码可以在运行时获得对象的实际类型(也就是前面提到的运行时类型),然后根据实际类型决定调用哪个方法。尽管 Java 支持函数重载,但 Java 设计的函数重载的语法规则是,并不是在运行时,根据传递进函数的参数的实际类型,来决定调用哪个重载函数,而是在编译时,根据传递进函数的参数的声明类型(也就是前面提到的编译时类型),来决定调用哪个重载函数。也就是说,具体执行哪个对象的哪个方法,只跟对象的运行时类型有关,跟参数的运行时类型无关。所以,Java 语言只支持 Single Dispatch。
代码举例如下:
public class ParentClass {
  public void f() {
    System.out.println("I am ParentClass's f().");
  }
}

public class ChildClass extends ParentClass {
  public void f() {
    System.out.println("I am ChildClass's f().");
  }
}

public class SingleDispatchClass {
  public void polymorphismFunction(ParentClass p) {
    p.f();
  }

  public void overloadFunction(ParentClass p) {
    System.out.println("I am overloadFunction(ParentClass p).");
  }

  public void overloadFunction(ChildClass c) {
    System.out.println("I am overloadFunction(ChildClass c).");
  }
}

public class DemoMain {
  public static void main(String[] args) {
    SingleDispatchClass demo = new SingleDispatchClass();
    ParentClass p = new ChildClass();
    demo.polymorphismFunction(p);//执行哪个对象的方法,由对象的实际类型决定
    demo.overloadFunction(p);//执行对象的哪个方法,由参数对象的声明类型决定
  }
}

//代码执行结果:
I am ChildClass's f().
I am overloadFunction(ParentClass p).
2
3
4
5
6
7
8
9
10
11
12
13
14
15
16
17
18
19
20
21
22
23
24
25
26
27
28
29
30
31
32
33
34
35
36
37
38
在上面的代码中,第 31 行代码的 polymorphismFunction() 函数,执行 p 的实际类型的 f() 函数,也就是 ChildClass 的 f() 函数。第 32 行代码的 overloadFunction() 函数,匹配的是重载函数中的 overloadFunction(ParentClass p),也就是根据 p 的声明类型来决定匹配哪个重载函数。
假设 Java 语言支持 Double Dispatch,那之前的第 37 行就不会报错。代码会在运行时,根据参数(resourceFile)的实际类型(PdfFile、PPTFile、WordFile),来决定使用 extract2txt 的三个重载函数中的哪一个,也就不需要访问者模式了。这也回答了为什么支持 Double Dispatch 的语言不需要访问者模式。
# 1.3 使用工厂模式实现抽取文件内容等功能
利用工厂模式,定义一个包含 extract2txt() 接口函数的 Extractor 接口。PdfExtractor、PPTExtractor、WordExtractor 类实现 Extractor 接口,并且在各自的 extract2txt() 函数中,分别实现 Pdf、PPT、Word 格式文件的文本内容抽取。ExtractorFactory 工厂类根据不同的文件类型,返回不同的 Extractor。
public abstract class ResourceFile {
  protected String filePath;
  public ResourceFile(String filePath) {
    this.filePath = filePath;
  }
  public abstract ResourceFileType getType();
}

public class PdfFile extends ResourceFile {
  public PdfFile(String filePath) {
    super(filePath);
  }

  @Override
  public ResourceFileType getType() {
    return ResourceFileType.PDF;
  }

  //...
}

//...PPTFile/WordFile跟PdfFile代码结构类似,此处省略...

public interface Extractor {
  void extract2txt(ResourceFile resourceFile);
}

public class PdfExtractor implements Extractor {
  @Override
  public void extract2txt(ResourceFile resourceFile) {
    //...
  }
}

//...PPTExtractor/WordExtractor跟PdfExtractor代码结构类似,此处省略...

public class ExtractorFactory {
  private static final Map<ResourceFileType, Extractor> extractors = new HashMap<>();
  static {
    extractors.put(ResourceFileType.PDF, new PdfExtractor());
    extractors.put(ResourceFileType.PPT, new PPTExtractor());
    extractors.put(ResourceFileType.WORD, new WordExtractor());
  }

  public static Extractor getExtractor(ResourceFileType type) {
    return extractors.get(type);
  }
}

public class ToolApplication {
  public static void main(String[] args) {
    List<ResourceFile> resourceFiles = listAllResourceFiles(args[0]);
    for (ResourceFile resourceFile : resourceFiles) {
      Extractor extractor = ExtractorFactory.getExtractor(resourceFile.getType());
      extractor.extract2txt(resourceFile);
    }
  }

  private static List<ResourceFile> listAllResourceFiles(String resourceDirectory) {
    List<ResourceFile> resourceFiles = new ArrayList<>();
    //...根据后缀(pdf/ppt/word)由工厂方法创建不同的类对象(PdfFile/PPTFile/WordFile)
    resourceFiles.add(new PdfFile("a.pdf"));
    resourceFiles.add(new WordFile("b.word"));
    resourceFiles.add(new PPTFile("c.ppt"));
    return resourceFiles;
  }
}
2
3
4
5
6
7
8
9
10
11
12
13
14
15
16
17
18
19
20
21
22
23
24
25
26
27
28
29
30
31
32
33
34
35
36
37
38
39
40
41
42
43
44
45
46
47
48
49
50
51
52
53
54
55
56
57
58
59
60
61
62
63
64
65
66
67
当需要添加新的功能的时候,比如压缩资源文件,类似抽取文本内容功能的代码实现,只需要添加一个 Compressor 接口,PdfCompressor、PPTCompressor、WordCompressor 三个实现类,以及创建它们的 CompressorFactory 工厂类即可。唯一需要修改的只有最上层的 ToolApplication 类。基本上符合“对扩展开放、对修改关闭”的设计原则。
对于资源文件处理工具这个例子,如果工具提供的功能并不是非常多,只有几个而已,更推荐使用工厂模式的实现方式,毕竟代码更加清晰、易懂。如果工具提供非常多的功能,比如有十几个,更推荐使用访问者模式,因为访问者模式需要定义的类要比工厂模式的实现方式少很多,类太多也会影响到代码的可维护性。
# 2. 备忘录模式
# 2.1 备忘录模式原理和实现
备忘录模式,也叫快照(Snapshot)模式,英文翻译是 Memento Design Pattern。定义:在不违背封装原则的前提下,捕获一个对象的内部状态,并在该对象之外保存这个状态,以便之后恢复对象为先前的状态。
这个模式的定义主要表达了两部分内容。一部分是,存储副本以便后期恢复。这一部分很好理解。另一部分是,要在不违背封装原则的前提下,进行对象的备份和恢复。这部分不太好理解。需搞清楚下面问题:
- 为什么存储和恢复副本会违背封装原则?
- 备忘录模式是如何做到不违背封装原则的?
编写一个小程序,可以接收命令行的输入。用户输入文本时,程序将其追加存储在内存文本中;用户输入“:list”,程序在命令行中输出内存文本的内容;用户输入“:undo”,程序会撤销上一次输入的文本,也就是从内存文本中将上次输入的文本删除掉。
>hello
>:list
hello
>world
>:list
helloworld
>:undo
>:list
hello
2
3
4
5
6
7
8
9
public class InputText {
  private StringBuilder text = new StringBuilder();

  public String getText() {
    return text.toString();
  }

  public void append(String input) {
    text.append(input);
  }

  public void setText(String text) {
    this.text.replace(0, this.text.length(), text);
  }
}

public class SnapshotHolder {
  private Stack<InputText> snapshots = new Stack<>();

  public InputText popSnapshot() {
    return snapshots.pop();
  }

  public void pushSnapshot(InputText inputText) {
    InputText deepClonedInputText = new InputText();
    deepClonedInputText.setText(inputText.getText());
    snapshots.push(deepClonedInputText);
  }
}

public class ApplicationMain {
  public static void main(String[] args) {
    InputText inputText = new InputText();
    SnapshotHolder snapshotsHolder = new SnapshotHolder();
    Scanner scanner = new Scanner(System.in);
    while (scanner.hasNext()) {
      String input = scanner.next();
      if (input.equals(":list")) {
        System.out.println(inputText.getText());
      } else if (input.equals(":undo")) {
        InputText snapshot = snapshotsHolder.popSnapshot();
        inputText.setText(snapshot.getText());
      } else {
        snapshotsHolder.pushSnapshot(inputText);
        inputText.append(input);
      }
    }
  }
}
2
3
4
5
6
7
8
9
10
11
12
13
14
15
16
17
18
19
20
21
22
23
24
25
26
27
28
29
30
31
32
33
34
35
36
37
38
39
40
41
42
43
44
45
46
47
48
49
实际上,备忘录模式的实现很灵活,也没有很固定的实现方式,在不同的业务需求、不同编程语言下,代码实现可能都不大一样。上面的代码基本上已经实现了最基本的备忘录的功能。但是,如果深究一下的话还有一些问题要解决,那就是前面定义中提到的第二点:要在不违背封装原则的前提下,进行对象的备份和恢复。而上面的代码并不满足这一点,主要体现在下面两方面:
- 第一,为了能用快照恢复 InputText 对象在 InputText 类中定义了 setText() 函数,但这个函数有可能会被其他业务使用,所以,暴露不应该暴露的函数违背了封装原则;
- 第二,快照本身是不可变的,理论上讲不应该包含任何 set() 等修改内部状态的函数,但在上面的代码实现中,“快照“这个业务模型复用了 InputText 类的定义,而 InputText 类本身有一系列修改内部状态的函数,所以用 InputText 类来表示快照违背了封装原则。
针对以上问题对代码做两点修改。其一,定义一个独立的类(Snapshot 类)来表示快照,而不是复用 InputText 类。这个类只暴露 get() 方法,没有 set() 等任何修改内部状态的方法。其二,在 InputText 类中,把 setText() 方法重命名为 restoreSnapshot() 方法,用意更加明确,只用来恢复对象。
public class InputText {
  private StringBuilder text = new StringBuilder();

  public String getText() {
    return text.toString();
  }

  public void append(String input) {
    text.append(input);
  }

  public Snapshot createSnapshot() {
    return new Snapshot(text.toString());
  }

  public void restoreSnapshot(Snapshot snapshot) {
    this.text.replace(0, this.text.length(), snapshot.getText());
  }
}

public class Snapshot {
  private String text;

  public Snapshot(String text) {
    this.text = text;
  }

  public String getText() {
    return this.text;
  }
}

public class SnapshotHolder {
  private Stack<Snapshot> snapshots = new Stack<>();

  public Snapshot popSnapshot() {
    return snapshots.pop();
  }

  public void pushSnapshot(Snapshot snapshot) {
    snapshots.push(snapshot);
  }
}

public class ApplicationMain {
  public static void main(String[] args) {
    InputText inputText = new InputText();
    SnapshotHolder snapshotsHolder = new SnapshotHolder();
    Scanner scanner = new Scanner(System.in);
    while (scanner.hasNext()) {
      String input = scanner.next();
      if (input.equals(":list")) {
        System.out.println(inputText.toString());
      } else if (input.equals(":undo")) {
        Snapshot snapshot = snapshotsHolder.popSnapshot();
        inputText.restoreSnapshot(snapshot);
      } else {
        snapshotsHolder.pushSnapshot(inputText.createSnapshot());
        inputText.append(input);
      }
    }
  }
}
2
3
4
5
6
7
8
9
10
11
12
13
14
15
16
17
18
19
20
21
22
23
24
25
26
27
28
29
30
31
32
33
34
35
36
37
38
39
40
41
42
43
44
45
46
47
48
49
50
51
52
53
54
55
56
57
58
59
60
61
62
63
# 2.2 如何优化内存和时间消耗
如果要备份的对象数据比较大,备份频率又比较高,那快照占用的内存会比较大,备份和恢复的耗时会比较长。这个问题该如何解决呢?
不同的应用场景下有不同的解决方法。比如前面举的那个例子,应用场景是利用备忘录来实现撤销操作,而且仅仅支持顺序撤销,也就是说,每次操作只能撤销上一次的输入,不能跳过上次输入撤销之前的输入。在具有这样特点的应用场景下,为了节省内存不需要在快照中存储完整的文本,只需要记录少许信息,比如在获取快照当下的文本长度,用这个值结合 InputText 类对象存储的文本来做撤销操作。
再举一个例子,假设每当有数据改动都需要生成一个备份,以备之后恢复。如果需要备份的数据很大,这样高频率的备份,不管是对存储(内存或者硬盘)的消耗,还是对时间的消耗,都可能是无法接受的。想要解决这个问题,一般会采用“低频率全量备份”和“高频率增量备份”相结合的方法。
全量备份就是把所有的数据“拍个快照”保存下来。所谓“增量备份”,指的是记录每次操作或数据变动。当需要恢复到某一时间点的备份的时候,如果这一时间点有做全量备份直接拿来恢复就可以了。如果这一时间点没有对应的全量备份,就先找到最近的一次全量备份,然后用它来恢复,之后执行此次全量备份跟这一时间点之间的所有增量备份,也就是对应的操作或者数据变动。这样就能减少全量备份的数量和频率,减少对时间、内存的消耗。
# 3. 命令模式
# 3.1 命令模式原理
命令模式的英文翻译是 Command Design Pattern。定义:命令模式将请求(命令)封装为一个对象,这样可以使用不同的请求参数化其他对象(将不同请求依赖注入到其他对象),并且能够支持请求(命令)的排队执行、记录日志、撤销等(附加控制)功能。
落实到编码实现,命令模式用的最核心的实现手段,是将函数封装成对象。C 语言支持函数指针,可以把函数当作变量传递来传递去。但是,在大部分编程语言中,函数没法儿作为参数传递给其他函数,也没法儿赋值给变量。借助命令模式可以将函数封装成对象。具体来说就是,设计一个包含这个函数的类,实例化一个对象传来传去,这样就可以实现把函数像对象一样使用。从实现的角度来说,它类似回调。
当把函数封装成对象之后,对象就可以存储下来,方便控制执行。所以命令模式的主要作用和应用场景,是用来控制命令的执行,比如,异步、延迟、排队执行命令、撤销重做命令、存储命令、给命令记录日志等等,这才是命令模式能发挥独一无二作用的地方。
# 3.2 命令模式实战
假设正在开发一个类似《天天酷跑》或者《QQ 卡丁车》这样的手游。这种游戏本身的复杂度集中在客户端。后端基本上只负责数据(比如积分、生命值、装备)的更新和查询,所以后端逻辑相对于客户端来说,要简单很多。
为了提高性能会把游戏中玩家的信息保存在内存中。在游戏进行的过程中,只更新内存中的数据,游戏结束之后,再将内存中的数据存档,也就是持久化到数据库中。为了降低实现的难度,一般来说同一个游戏场景里的玩家,会被分配到同一台服务上。这样一个玩家拉取同一个游戏场景中的其他玩家的信息,就不需要跨服务器去查找了,实现起来就简单了很多。
一般来说,游戏客户端和服务器之间的数据交互是比较频繁的,所以为了节省网络连接建立的开销,客户端和服务器之间一般采用长连接的方式来通信。通信的格式有多种,比如 Protocol Buffer、JSON、XML,甚至可以自定义格式。不管是什么格式,客户端发送给服务器的请求,一般都包括两部分内容:指令和数据。其中,指令也可以叫作事件,数据是执行这个指令所需的数据。
服务器在接收到客户端的请求之后,会解析出指令和数据,并且根据指令的不同,执行不同的处理逻辑。对于这样的一个业务场景,一般有两种架构实现思路。
- 常用的一种实现思路是利用多线程。一个线程接收请求,接收到请求之后,启动一个新的线程来处理请求。具体点讲,一般是通过一个主线程来接收客户端发来的请求。每当接收到一个请求之后,就从一个专门用来处理请求的线程池中,捞出一个空闲线程来处理。
- 另一种实现思路是在一个线程内轮询接收请求和处理请求。这种处理方式不太常见。尽管它无法利用多线程多核处理的优势,但是对于 IO 密集型的业务来说,它避免了多线程不停切换对性能的损耗,并且克服了多线程编程 Bug 比较难调试的缺点,也算是手游后端服务器开发中比较常见的架构模式了。
这里采用第二种实现方式:整个手游后端服务器轮询获取客户端发来的请求,获取到请求之后,借助命令模式,把请求包含的数据和处理逻辑封装为命令对象,并存储在内存队列中。然后,再从队列中取出一定数量的命令来执行。执行完成之后,再重新开始新的一轮轮询。具体的示例代码如下所示:
public interface Command {
  void execute();
}

public class GotDiamondCommand implements Command {
  // 省略成员变量

  public GotDiamondCommand(/*数据*/) {
    //...
  }

  @Override
  public void execute() {
    // 执行相应的逻辑
  }
}
//GotStartCommand/HitObstacleCommand/ArchiveCommand类省略

public class GameApplication {
  private static final int MAX_HANDLED_REQ_COUNT_PER_LOOP = 100;
  private Queue<Command> queue = new LinkedList<>();

  public void mainloop() {
    while (true) {
      List<Request> requests = new ArrayList<>();

      //省略从epoll或者select中获取数据,并封装成Request的逻辑,
      //注意设置超时时间,如果很长时间没有接收到请求,就继续下面的逻辑处理。

      for (Request request : requests) {
        Event event = request.getEvent();
        Command command = null;
        if (event.equals(Event.GOT_DIAMOND)) {
          command = new GotDiamondCommand(/*数据*/);
        } else if (event.equals(Event.GOT_STAR)) {
          command = new GotStartCommand(/*数据*/);
        } else if (event.equals(Event.HIT_OBSTACLE)) {
          command = new HitObstacleCommand(/*数据*/);
        } else if (event.equals(Event.ARCHIVE)) {
          command = new ArchiveCommand(/*数据*/);
        } // ...一堆else if...

        queue.add(command);
      }

      int handledCount = 0;
      while (handledCount < MAX_HANDLED_REQ_COUNT_PER_LOOP) {
        if (queue.isEmpty()) {
          break;
        }
        Command command = queue.poll();
        command.execute();
      }
    }
  }
}
2
3
4
5
6
7
8
9
10
11
12
13
14
15
16
17
18
19
20
21
22
23
24
25
26
27
28
29
30
31
32
33
34
35
36
37
38
39
40
41
42
43
44
45
46
47
48
49
50
51
52
53
54
55
56
# 3.3 命令模式 VS 策略模式
每个设计模式都应该由两部分组成:第一部分是应用场景,即这个模式可以解决哪类问题;第二部分是解决方案,即这个模式的设计思路和具体的代码实现。不过,代码实现并不是模式必须包含的。
设计模式之间的主要区别还是在于设计意图,也就是应用场景。单纯地看设计思路或者代码实现,有些模式确实很相似,比如策略模式和工厂模式。
策略模式包含策略的定义、创建和使用三部分,从代码结构上来,它非常像工厂模式。它们的区别在于,策略模式侧重“策略”或“算法”这个特定的应用场景,用来解决根据运行时状态从一组策略中选择不同策略的问题,而工厂模式侧重封装对象的创建过程,这里的对象没有任何业务场景的限定,可以是策略,但也可以是其他东西。从设计意图上来,这两个模式完全是两回事儿。
命令模式跟策略模式的区别:在策略模式中,不同的策略具有相同的目的、不同的实现、互相之间可以替换。比如,BubbleSort、SelectionSort 都是为了实现排序的,只不过一个是用冒泡排序算法来实现的,另一个是用选择排序算法来实现的。而在命令模式中,不同的命令具有不同的目的,对应不同的处理逻辑,并且互相之间不可替换。
# 4. 解释器模式
# 4.1 解释器模式原理
解释器模式的英文翻译是 Interpreter Design Pattern。定义:解释器模式为某个语言定义它的语法(或者叫文法)表示,并定义一个解释器用来处理这个语法。
理解这个概念,可以类比中英文翻译。把英文翻译成中文是有一定规则的。这个规则就是定义中的“语法”。开发一个类似 Google Translate 这样的翻译器,这个翻译器能够根据语法规则,将输入的中文翻译成英文。这里的翻译器就是解释器模式定义中的“解释器”。
更加贴近编程的例子,假设定义了一个新的加减乘除计算“语言”,语法规则如下:
- 运算符只包含加、减、乘、除,并且没有优先级的概念;
- 表达式(也就是前面提到的“句子”)中,先书写数字,后书写运算符,空格隔开;
- 按照先后顺序,取出两个数字和一个运算符计算结果,结果重新放入数字的最头部位置,循环上述过程,直到只剩下一个数字,这个数字就是表达式最终的计算结果。
比如“ 8 3 2 4 - + * ”这样一个表达式,按照上面的语法规则来处理,取出数字“8 3”和“-”运算符,计算得到 5,于是表达式就变成了“ 5 2 4 + * ”。然后再取出“ 5 2 ”和“ + ”运算符,计算得到 7,表达式就变成了“ 7 4 * ”。最后取出“ 7 4”和“ * ”运算符,最终得到的结果就是 28。代码如下:
public class ExpressionInterpreter {
  private Deque<Long> numbers = new LinkedList<>();

  public long interpret(String expression) {
    String[] elements = expression.split(" ");
    int length = elements.length;
    for (int i = 0; i < (length+1)/2; ++i) {
      numbers.addLast(Long.parseLong(elements[i]));
    }

    for (int i = (length+1)/2; i < length; ++i) {
      String operator = elements[i];
      boolean isValid = "+".equals(operator) || "-".equals(operator)
              || "*".equals(operator) || "/".equals(operator);
      if (!isValid) {
        throw new RuntimeException("Expression is invalid: " + expression);
      }

      long number1 = numbers.pollFirst();
      long number2 = numbers.pollFirst();
      long result = 0;
      if (operator.equals("+")) {
        result = number1 + number2;
      } else if (operator.equals("-")) {
        result = number1 - number2;
      } else if (operator.equals("*")) {
        result = number1 * number2;
      } else if (operator.equals("/")) {
        result = number1 / number2;
      }
      numbers.addFirst(result);
    }

    if (numbers.size() != 1) {
      throw new RuntimeException("Expression is invalid: " + expression);
    }

    return numbers.pop();
  }
}
2
3
4
5
6
7
8
9
10
11
12
13
14
15
16
17
18
19
20
21
22
23
24
25
26
27
28
29
30
31
32
33
34
35
36
37
38
39
40
在上面的代码实现中,语法规则的解析逻辑(第 23、25、27、29 行)都集中在一个函数中,对于简单的语法规则的解析,这样的设计就足够了。但是,对于复杂的语法规则的解析,逻辑复杂,代码量多,所有的解析逻辑都耦合在一个函数中,这样显然是不合适的。这个时候,就要考虑拆分代码,将解析逻辑拆分到独立的小类中。
前面定义的语法规则有两类表达式,一类是数字,一类是运算符,运算符又包括加减乘除。利用解释器模式把解析的工作拆分到 NumberExpression、AdditionExpression、SubstractionExpression、MultiplicationExpression、DivisionExpression 这样五个解析类中。
public interface Expression {
  long interpret();
}

public class NumberExpression implements Expression {
  private long number;

  public NumberExpression(long number) {
    this.number = number;
  }

  public NumberExpression(String number) {
    this.number = Long.parseLong(number);
  }

  @Override
  public long interpret() {
    return this.number;
  }
}

public class AdditionExpression implements Expression {
  private Expression exp1;
  private Expression exp2;

  public AdditionExpression(Expression exp1, Expression exp2) {
    this.exp1 = exp1;
    this.exp2 = exp2;
  }

  @Override
  public long interpret() {
    return exp1.interpret() + exp2.interpret();
  }
}
// SubstractionExpression/MultiplicationExpression/DivisionExpression与AdditionExpression代码结构类似,这里就省略了

public class ExpressionInterpreter {
  private Deque<Expression> numbers = new LinkedList<>();

  public long interpret(String expression) {
    String[] elements = expression.split(" ");
    int length = elements.length;
    for (int i = 0; i < (length+1)/2; ++i) {
      numbers.addLast(new NumberExpression(elements[i]));
    }

    for (int i = (length+1)/2; i < length; ++i) {
      String operator = elements[i];
      boolean isValid = "+".equals(operator) || "-".equals(operator)
              || "*".equals(operator) || "/".equals(operator);
      if (!isValid) {
        throw new RuntimeException("Expression is invalid: " + expression);
      }

      Expression exp1 = numbers.pollFirst();
      Expression exp2 = numbers.pollFirst();
      Expression combinedExp = null;
      if (operator.equals("+")) {
        combinedExp = new AdditionExpression(exp1, exp2);
      } else if (operator.equals("-")) {
        combinedExp = new AdditionExpression(exp1, exp2);
      } else if (operator.equals("*")) {
        combinedExp = new AdditionExpression(exp1, exp2);
      } else if (operator.equals("/")) {
        combinedExp = new AdditionExpression(exp1, exp2);
      }
      long result = combinedExp.interpret();
      numbers.addFirst(new NumberExpression(result));
    }

    if (numbers.size() != 1) {
      throw new RuntimeException("Expression is invalid: " + expression);
    }

    return numbers.pop().interpret();
  }
}
2
3
4
5
6
7
8
9
10
11
12
13
14
15
16
17
18
19
20
21
22
23
24
25
26
27
28
29
30
31
32
33
34
35
36
37
38
39
40
41
42
43
44
45
46
47
48
49
50
51
52
53
54
55
56
57
58
59
60
61
62
63
64
65
66
67
68
69
70
71
72
73
74
75
76
77
78
# 4.2 解释器模式实战
如何实现一个自定义接口告警规则功能?
在平时的项目开发中,监控系统非常重要,它可以时刻监控业务系统的运行情况,及时将异常报告给开发者。比如,如果每分钟接口出错数超过 100,监控系统就通过短信、微信、邮件等方式发送告警给开发者。
一般来讲,监控系统支持开发者自定义告警规则,比如可以用下面这样一个表达式,来表示一个告警规则,它表达的意思是:每分钟 API 总出错数超过 100 或者每分钟 API 总调用数超过 10000 就触发告警。
api_error_per_minute > 100 || api_count_per_minute > 10000
在监控系统中,告警模块只负责根据统计数据和告警规则,判断是否触发告警。至于每分钟 API 接口出错数、每分钟接口调用数等统计数据的计算,是由其他模块来负责的。其他模块将统计数据放到一个 Map 中(数据的格式如下所示),发送给告警模块。接下来只关注告警模块。
Map<String, Long> apiStat = new HashMap<>();
apiStat.put("api_error_per_minute", 103);
apiStat.put("api_count_per_minute", 987);
2
3
为了简化讲解和代码实现,假设自定义的告警规则只包含“||、&&、>、<、==”这五个运算符,其中,“>、<、==”运算符的优先级高于“||、&&”运算符,“&&”运算符优先级高于“||”。在表达式中,任意元素之间需要通过空格来分隔。除此之外,用户可以自定义要监控的 key,比如前面的 api_error_per_minute、api_count_per_minute。
骨架代码如下:
public class AlertRuleInterpreter {

  // key1 > 100 && key2 < 1000 || key3 == 200
  public AlertRuleInterpreter(String ruleExpression) {
    //TODO:由你来完善
  }

  //<String, Long> apiStat = new HashMap<>();
  //apiStat.put("key1", 103);
  //apiStat.put("key2", 987);
  public boolean interpret(Map<String, Long> stats) {
    //TODO:由你来完善
  }

}

public class DemoTest {
  public static void main(String[] args) {
    String rule = "key1 > 100 && key2 < 30 || key3 < 100 || key4 == 88";
    AlertRuleInterpreter interpreter = new AlertRuleInterpreter(rule);
    Map<String, Long> stats = new HashMap<>();
    stats.put("key1", 101l);
    stats.put("key3", 121l);
    stats.put("key4", 88l);
    boolean alert = interpreter.interpret(stats);
    System.out.println(alert);
  }
}
2
3
4
5
6
7
8
9
10
11
12
13
14
15
16
17
18
19
20
21
22
23
24
25
26
27
28
实际上可以把自定义的告警规则,看作一种特殊“语言”的语法规则。实现一个解释器能够根据规则,针对用户输入的数据,判断是否触发告警。利用解释器模式,把解析表达式的逻辑拆分到各个小类中,避免大而复杂的大类的出现。按照这个实现思路,把刚刚的代码补全,如下所示:
public interface Expression {
  boolean interpret(Map<String, Long> stats);
}

public class GreaterExpression implements Expression {
  private String key;
  private long value;

  public GreaterExpression(String strExpression) {
    String[] elements = strExpression.trim().split("\\s+");
    if (elements.length != 3 || !elements[1].trim().equals(">")) {
      throw new RuntimeException("Expression is invalid: " + strExpression);
    }
    this.key = elements[0].trim();
    this.value = Long.parseLong(elements[2].trim());
  }

  public GreaterExpression(String key, long value) {
    this.key = key;
    this.value = value;
  }

  @Override
  public boolean interpret(Map<String, Long> stats) {
    if (!stats.containsKey(key)) {
      return false;
    }
    long statValue = stats.get(key);
    return statValue > value;
  }
}

// LessExpression/EqualExpression跟GreaterExpression代码类似,这里就省略了

public class AndExpression implements Expression {
  private List<Expression> expressions = new ArrayList<>();

  public AndExpression(String strAndExpression) {
    String[] strExpressions = strAndExpression.split("&&");
    for (String strExpr : strExpressions) {
      if (strExpr.contains(">")) {
        expressions.add(new GreaterExpression(strExpr));
      } else if (strExpr.contains("<")) {
        expressions.add(new LessExpression(strExpr));
      } else if (strExpr.contains("==")) {
        expressions.add(new EqualExpression(strExpr));
      } else {
        throw new RuntimeException("Expression is invalid: " + strAndExpression);
      }
    }
  }

  public AndExpression(List<Expression> expressions) {
    this.expressions.addAll(expressions);
  }

  @Override
  public boolean interpret(Map<String, Long> stats) {
    for (Expression expr : expressions) {
      if (!expr.interpret(stats)) {
        return false;
      }
    }
    return true;
  }

}

public class OrExpression implements Expression {
  private List<Expression> expressions = new ArrayList<>();

  public OrExpression(String strOrExpression) {
    String[] andExpressions = strOrExpression.split("\\|\\|");
    for (String andExpr : andExpressions) {
      expressions.add(new AndExpression(andExpr));
    }
  }

  public OrExpression(List<Expression> expressions) {
    this.expressions.addAll(expressions);
  }

  @Override
  public boolean interpret(Map<String, Long> stats) {
    for (Expression expr : expressions) {
      if (expr.interpret(stats)) {
        return true;
      }
    }
    return false;
  }
}

public class AlertRuleInterpreter {
  private Expression expression;

  public AlertRuleInterpreter(String ruleExpression) {
    this.expression = new OrExpression(ruleExpression);
  }

  public boolean interpret(Map<String, Long> stats) {
    return expression.interpret(stats);
  }
}
2
3
4
5
6
7
8
9
10
11
12
13
14
15
16
17
18
19
20
21
22
23
24
25
26
27
28
29
30
31
32
33
34
35
36
37
38
39
40
41
42
43
44
45
46
47
48
49
50
51
52
53
54
55
56
57
58
59
60
61
62
63
64
65
66
67
68
69
70
71
72
73
74
75
76
77
78
79
80
81
82
83
84
85
86
87
88
89
90
91
92
93
94
95
96
97
98
99
100
101
102
103
104
# 5. 中介模式
# 5.1 中介模式原理
中介模式的英文翻译是 Mediator Design Pattern。定义:中介模式定义了一个单独的(中介)对象,来封装一组对象之间的交互。将这组对象之间的交互委派给与中介对象交互,来避免对象之间的直接交互。
中介模式的设计思想跟中间层很像,通过引入中介这个中间层,将一组对象之间的交互关系(或者说依赖关系)从多对多(网状关系)转换为一对多(星状关系)。原来一个对象要跟 n 个对象交互,现在只需要跟一个中介对象交互,从而最小化对象之间的交互关系,降低了代码的复杂度,提高了代码的可读性和可维护性。
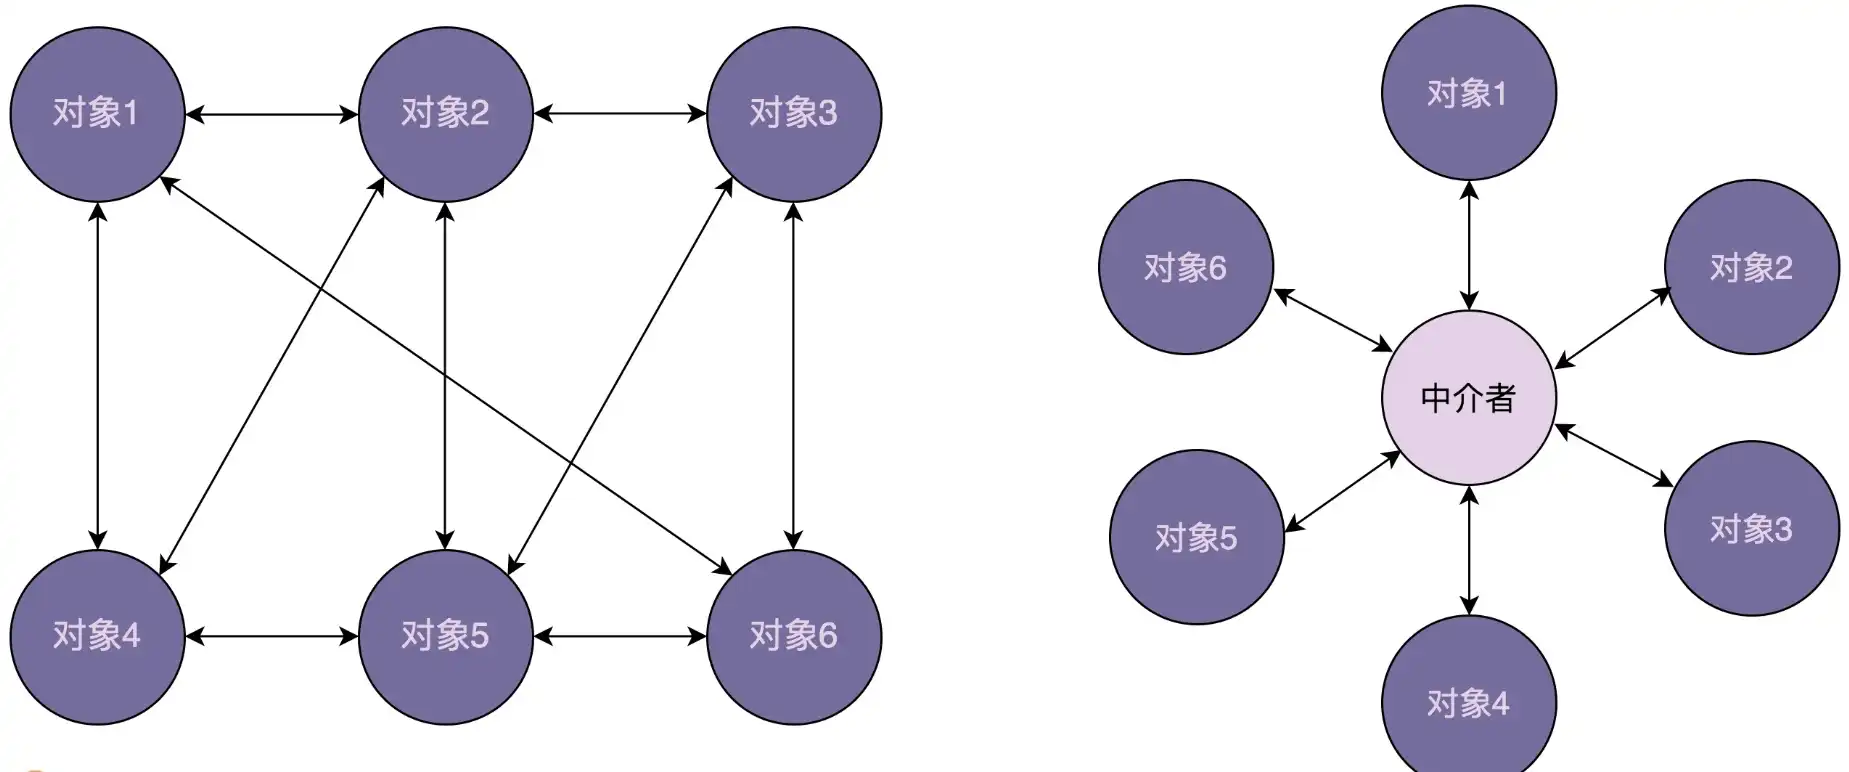
提到中介模式,有一个比较经典的例子不得不说,那就是航空管制。为了让飞机在飞行的时候互不干扰,每架飞机都需要知道其他飞机每时每刻的位置,这就需要时刻跟其他飞机通信。飞机通信形成的通信网络就会无比复杂。这个时候通过引入“塔台”这样一个中介,让每架飞机只跟塔台来通信,发送自己的位置给塔台,由塔台来负责每架飞机的航线调度。这样就大大简化了通信网络。
举例 UI 控件有关,算是中介模式比较经典的应用。
假设有一个比较复杂的对话框,对话框中有很多控件,比如按钮、文本框、下拉框等。当对某个控件进行操作的时候,其他控件会做出相应的反应,比如在下拉框中选择“注册”,注册相关的控件就会显示在对话框中。如果在下拉框中选择“登陆”,登陆相关的控件就会显示在对话框中。正常的实现方式:
public class UIControl {
  private static final String LOGIN_BTN_ID = "login_btn";
  private static final String REG_BTN_ID = "reg_btn";
  private static final String USERNAME_INPUT_ID = "username_input";
  private static final String PASSWORD_INPUT_ID = "pswd_input";
  private static final String REPEATED_PASSWORD_INPUT_ID = "repeated_pswd_input";
  private static final String HINT_TEXT_ID = "hint_text";
  private static final String SELECTION_ID = "selection";

  public static void main(String[] args) {
    Button loginButton = (Button)findViewById(LOGIN_BTN_ID);
    Button regButton = (Button)findViewById(REG_BTN_ID);
    Input usernameInput = (Input)findViewById(USERNAME_INPUT_ID);
    Input passwordInput = (Input)findViewById(PASSWORD_INPUT_ID);
    Input repeatedPswdInput = (Input)findViewById(REPEATED_PASSWORD_INPUT_ID);
    Text hintText = (Text)findViewById(HINT_TEXT_ID);
    Selection selection = (Selection)findViewById(SELECTION_ID);

    loginButton.setOnClickListener(new OnClickListener() {
      @Override
      public void onClick(View v) {
        String username = usernameInput.text();
        String password = passwordInput.text();
        //校验数据...
        //做业务处理...
      }
    });

    regButton.setOnClickListener(new OnClickListener() {
      @Override
      public void onClick(View v) {
      //获取usernameInput、passwordInput、repeatedPswdInput数据...
      //校验数据...
      //做业务处理...
      }
    });

    //...省略selection下拉选择框相关代码....
  }
}
2
3
4
5
6
7
8
9
10
11
12
13
14
15
16
17
18
19
20
21
22
23
24
25
26
27
28
29
30
31
32
33
34
35
36
37
38
39
40
按照中介模式,将上面的代码重新实现一下。在新的代码实现中,各个控件只跟中介对象交互,中介对象负责所有业务逻辑的处理。
public interface Mediator {
  void handleEvent(Component component, String event);
}

public class LandingPageDialog implements Mediator {
  private Button loginButton;
  private Button regButton;
  private Selection selection;
  private Input usernameInput;
  private Input passwordInput;
  private Input repeatedPswdInput;
  private Text hintText;

  @Override
  public void handleEvent(Component component, String event) {
    if (component.equals(loginButton)) {
      String username = usernameInput.text();
      String password = passwordInput.text();
      //校验数据...
      //做业务处理...
    } else if (component.equals(regButton)) {
      //获取usernameInput、passwordInput、repeatedPswdInput数据...
      //校验数据...
      //做业务处理...
    } else if (component.equals(selection)) {
      String selectedItem = selection.select();
      if (selectedItem.equals("login")) {
        usernameInput.show();
        passwordInput.show();
        repeatedPswdInput.hide();
        hintText.hide();
        //...省略其他代码
      } else if (selectedItem.equals("register")) {
        //....
      }
    }
  }
}

public class UIControl {
  private static final String LOGIN_BTN_ID = "login_btn";
  private static final String REG_BTN_ID = "reg_btn";
  private static final String USERNAME_INPUT_ID = "username_input";
  private static final String PASSWORD_INPUT_ID = "pswd_input";
  private static final String REPEATED_PASSWORD_INPUT_ID = "repeated_pswd_input";
  private static final String HINT_TEXT_ID = "hint_text";
  private static final String SELECTION_ID = "selection";

  public static void main(String[] args) {
    Button loginButton = (Button)findViewById(LOGIN_BTN_ID);
    Button regButton = (Button)findViewById(REG_BTN_ID);
    Input usernameInput = (Input)findViewById(USERNAME_INPUT_ID);
    Input passwordInput = (Input)findViewById(PASSWORD_INPUT_ID);
    Input repeatedPswdInput = (Input)findViewById(REPEATED_PASSWORD_INPUT_ID);
    Text hintText = (Text)findViewById(HINT_TEXT_ID);
    Selection selection = (Selection)findViewById(SELECTION_ID);

    Mediator dialog = new LandingPageDialog();
    dialog.setLoginButton(loginButton);
    dialog.setRegButton(regButton);
    dialog.setUsernameInput(usernameInput);
    dialog.setPasswordInput(passwordInput);
    dialog.setRepeatedPswdInput(repeatedPswdInput);
    dialog.setHintText(hintText);
    dialog.setSelection(selection);

    loginButton.setOnClickListener(new OnClickListener() {
      @Override
      public void onClick(View v) {
        dialog.handleEvent(loginButton, "click");
      }
    });

    regButton.setOnClickListener(new OnClickListener() {
      @Override
      public void onClick(View v) {
        dialog.handleEvent(regButton, "click");
      }
    });

    //....
  }
}
2
3
4
5
6
7
8
9
10
11
12
13
14
15
16
17
18
19
20
21
22
23
24
25
26
27
28
29
30
31
32
33
34
35
36
37
38
39
40
41
42
43
44
45
46
47
48
49
50
51
52
53
54
55
56
57
58
59
60
61
62
63
64
65
66
67
68
69
70
71
72
73
74
75
76
77
78
79
80
81
82
83
从代码中我们可以看出,原本业务逻辑会分散在各个控件中,现在都集中到了中介类中。实际上,这样做既有好处也有坏处。好处是简化了控件之间的交互,坏处是中介类有可能会变成大而复杂的“上帝类”(God Class)。所以,在使用中介模式的时候,要根据实际的情况,平衡对象之间交互的复杂度和中介类本身的复杂度。
# 5.2 中介模式 VS 观察者模式
观察者模式有多种实现方式。虽然经典的实现方式没法彻底解耦观察者和被观察者,观察者需要注册到被观察者中,被观察者状态更新需要调用观察者的 update() 方法。但是在跨进程的实现方式中,可以利用消息队列实现彻底解耦,观察者和被观察者都只需要跟消息队列交互,观察者完全不知道被观察者的存在,被观察者也完全不知道观察者的存在。
中介模式也是为了解耦对象之间的交互,所有的参与者都只与中介进行交互。而观察者模式中的消息队列,就有点类似中介模式中的“中介”,观察者模式的中观察者和被观察者,就有点类似中介模式中的“参与者”。
区别如下:
在观察者模式中,尽管一个参与者既可以是观察者,同时也可以是被观察者,但大部分情况下,交互关系往往都是单向的,一个参与者要么是观察者,要么是被观察者,不会兼具两种身份。也就是说,在观察者模式的应用场景中,参与者之间的交互关系比较有条理。
而中介模式正好相反。只有当参与者之间的交互关系错综复杂,维护成本很高的时候才考虑使用中介模式。毕竟中介模式的应用会带来一定的副作用,它有可能会产生大而复杂的上帝类。除此之外,如果一个参与者状态的改变,其他参与者执行的操作有一定先后顺序的要求,这个时候中介模式就可以利用中介类,通过先后调用不同参与者的方法,来实现顺序的控制,而观察者模式是无法实现这样的顺序要求的。