 Java 业务开发常见错误(四)
# Java 业务开发常见错误(四)
# 反射、注解和泛型
用好反射、注解和泛型这些高级特性,可以开发出更简洁易读的代码,而且几乎所有的框架都使用了这三大高级特性。比如,要减少重复代码,就得用到反射和注解。
# 反射调用方法不是以传参决定重载
反射的功能包括,在运行时动态获取类和类成员定义,以及动态读取属性调用方法。也就是说,针对类动态调用方法,不管类中字段和方法怎么变动,我们都可以用相同的规则来读取信息和执行方法。因此,几乎所有的 ORM(对象关系映射)、对象映射、MVC 框架都使用了反射。
反射的起点是 Class 类,Class 类提供了各种方法帮我们查询它的信息。
接下来,我们先看一个反射调用方法遇到重载的坑:有两个叫 age 的方法,入参分别是基本类型 int 和包装类型 Integer。
@Slf4j
public class ReflectionIssueApplication {
  private void age(int age) {
      log.info("int age = {}", age);
  }

  private void age(Integer age) {
      log.info("Integer age = {}", age);
  }
}
2
3
4
5
6
7
8
9
10
如果不通过反射调用,走哪个重载方法很清晰,比如传入 36 走 int 参数的重载方法,传入 Integer.valueOf(“36”) 走 Integer 重载:
ReflectionIssueApplication application = new ReflectionIssueApplication();
application.age(36);
application.age(Integer.valueOf("36"));
2
3
但使用反射时的误区是,认为反射调用方法还是根据入参确定方法重载。比如,使用 getDeclaredMethod 来获取 age 方法,然后传入 Integer.valueOf(“36”):
getClass().getDeclaredMethod("age", Integer.TYPE).invoke(this, Integer.valueOf("36"));
输出的日志证明,走的是 int 重载方法:
14:23:09.801 [main] INFO org.geekbang.time.commonmistakes.advancedfeatures.demo1.ReflectionIssueApplication - int age = 36
其实,要通过反射进行方法调用,第一步就是通过方法签名来确定方法。具体到这个案例,getDeclaredMethod 传入的参数类型 Integer.TYPE 代表的是 int,所以实际执行方法时无论传的是包装类型还是基本类型,都会调用 int 入参的 age 方法。
把 Integer.TYPE 改为 Integer.class,执行的参数类型就是包装类型的 Integer。这时,无论传入的是 Integer.valueOf(“36”) 还是基本类型的 36:
getClass().getDeclaredMethod("age", Integer.class).invoke(this, Integer.valueOf("36"));
getClass().getDeclaredMethod("age", Integer.class).invoke(this, 36);
2
都会调用 Integer 为入参的 age 方法:
14:25:18.028 [main] INFO org.geekbang.time.commonmistakes.advancedfeatures.demo1.ReflectionIssueApplication - Integer age = 36
14:25:18.029 [main] INFO org.geekbang.time.commonmistakes.advancedfeatures.demo1.ReflectionIssueApplication - Integer age = 36
2
现在我们非常清楚了,反射调用方法,是以反射获取方法时传入的方法名称和参数类型来确定调用方法的。接下来,我们再来看一下反射、泛型擦除和继承结合在一起会碰撞出什么坑。
# 泛型经类型擦除多出桥接方法的坑
泛型是一种风格或范式,一般用于强类型程序设计语言,允许开发者使用类型参数替代明确的类型,实例化时再指明具体的类型。它是代码重用的有效手段,允许把一套代码应用到多种数据类型上,避免针对每一种数据类型实现重复的代码。
Java 编译器对泛型应用了强大的类型检测,如果代码违反了类型安全就会报错,可以在编译时暴露大多数泛型的编码错误。但总有一部分编码错误,比如泛型类型擦除的坑,在运行时才会暴露。接下来就和你分享一个案例吧。
有一个项目希望在类字段内容变动时记录日志,于是开发同学就想到定义一个泛型父类,并在父类中定义一个统一的日志记录方法,子类可以通过继承重用这个方法。代码上线后业务没啥问题,但总是出现日志重复记录的问题。开始时,我们怀疑是日志框架的问题,排查到最后才发现是泛型的问题,反复修改多次才解决了这个问题。
父类是这样的:有一个泛型占位符 T;有一个 AtomicInteger 计数器,用来记录 value 字段更新的次数,其中 value 字段是泛型 T 类型的,setValue 方法每次为 value 赋值时对计数器进行 +1 操作。这里重写了 toString 方法,输出 value 字段的值和计数器的值:
class Parent<T> {
    //用于记录value更新的次数,模拟日志记录的逻辑
    AtomicInteger updateCount = new AtomicInteger();
    private T value;
    //重写toString,输出值和值更新次数
    @Override
    public String toString() {
        return String.format("value: %s updateCount: %d", value, updateCount.get());
    }
    //设置值
    public void setValue(T value) {
        this.value = value;
        updateCount.incrementAndGet();
    }
}
2
3
4
5
6
7
8
9
10
11
12
13
14
15
子类 Child1 的实现是这样的:继承父类,但没有提供父类泛型参数;定义了一个参数为 String 的 setValue 方法,通过 super.setValue 调用父类方法实现日志记录。我们也能明白,开发同学这么设计是希望覆盖父类的 setValue 实现:
class Child1 extends Parent {
    public void setValue(String value) {
        System.out.println("Child1.setValue called");
        super.setValue(value);
    }
}
2
3
4
5
6
在实现的时候,子类方法的调用是通过反射进行的。实例化 Child1 类型后,通过 getClass().getMethods 方法获得所有的方法;然后按照方法名过滤出 setValue 方法进行调用,传入字符串 test 作为参数:
Child1 child1 = new Child1();
Arrays.stream(child1.getClass().getMethods())
        .filter(method -> method.getName().equals("setValue"))
        .forEach(method -> {
            try {
                method.invoke(child1, "test");
            } catch (Exception e) {
                e.printStackTrace();
            }
        });
System.out.println(child1.toString());
2
3
4
5
6
7
8
9
10
11
运行代码后可以看到,虽然 Parent 的 value 字段正确设置了 test,但父类的 setValue 方法调用了两次,计数器也显示 2 而不是 1:
Child1.setValue called
Parent.setValue called
Parent.setValue called
value: test updateCount: 2
2
3
4
显然,两次 Parent 的 setValue 方法调用,是因为 getMethods 方法找到了两个名为 setValue 的方法,分别是父类和子类的 setValue 方法。
这个案例中,子类方法重写父类方法失败的原因,包括两方面:
- 一是,子类没有指定 String 泛型参数,父类的泛型方法 setValue(T value) 在泛型擦除后是 setValue(Object value),子类中入参是 String 的 setValue 方法被当作了新方法;
- 二是,子类的 setValue 方法没有增加 @Override 注解,因此编译器没能检测到重写失败的问题。这就说明,重写子类方法时,标记 @Override 是一个好习惯。
但是,开发同学认为问题出在反射 API 使用不当,却没意识到重写失败。他查文档后发现,getMethods 方法能获得当前类和父类的所有 public 方法,而 getDeclaredMethods 只能获得当前类所有的 public、protected、package 和 private 方法。
于是,他就用 getDeclaredMethods 替代了 getMethods:
Arrays.stream(child1.getClass().getDeclaredMethods())
    .filter(method -> method.getName().equals("setValue"))
    .forEach(method -> {
        try {
            method.invoke(child1, "test");
        } catch (Exception e) {
            e.printStackTrace();
        }
    });
2
3
4
5
6
7
8
9
这样虽然能解决重复记录日志的问题,但没有解决子类方法重写父类方法失败的问题,得到如下输出:
Child1.setValue called
Parent.setValue called
value: test updateCount: 1
2
3
其实这治标不治本,其他人使用 Child1 时还是会发现有两个 setValue 方法,非常容易让人困惑。
幸好,架构师在修复上线前发现了这个问题,让开发同学重新实现了 Child2,继承 Parent 的时候提供了 String 作为泛型 T 类型,并使用 @Override 关键字注释了 setValue 方法,实现了真正有效的方法重写:
class Child2 extends Parent<String> {
    @Override
    public void setValue(String value) {
        System.out.println("Child2.setValue called");
        super.setValue(value);
    }
}
2
3
4
5
6
7
但很可惜,修复代码上线后,还是出现了日志重复记录:
Child2.setValue called
Parent.setValue called
Child2.setValue called
Parent.setValue called
value: test updateCount: 2
2
3
4
5
可以看到,这次是 Child2 类的 setValue 方法被调用了两次。开发同学惊讶地说,肯定是反射出 Bug 了,通过 getDeclaredMethods 查找到的方法一定是来自 Child2 类本身;而且,怎么看 Child2 类中也只有一个 setValue 方法,为什么还会重复呢?
调试一下可以发现,Child2 类其实有 2 个 setValue 方法,入参分别是 String 和 Object。
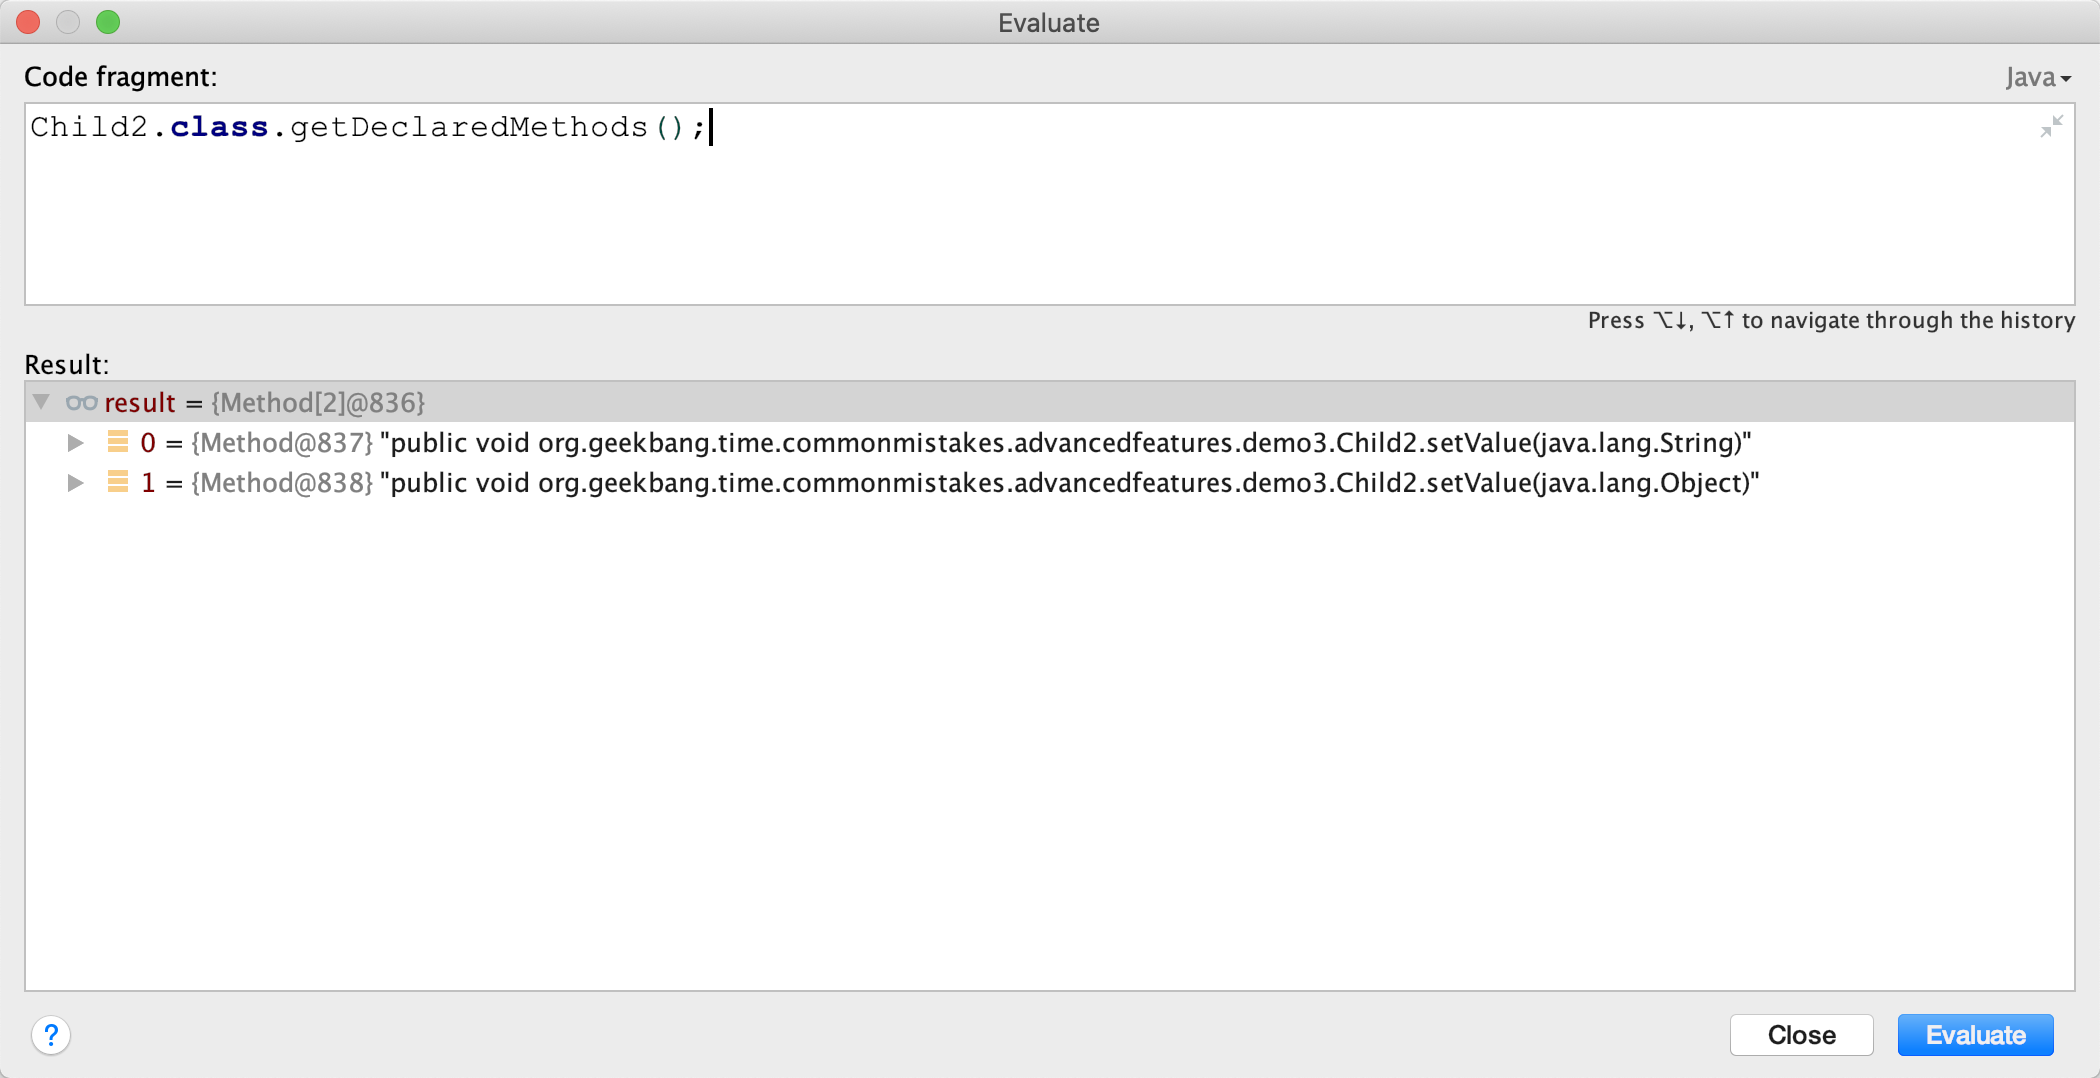
如果不通过反射来调用方法,我们确实很难发现这个问题。其实,这就是泛型类型擦除导致的问题。我们来分析一下。
我们知道,Java 的泛型类型在编译后擦除为 Object。虽然子类指定了父类泛型 T 类型是 String,但编译后 T 会被擦除成为 Object,所以父类 setValue 方法的入参是 Object,value 也是 Object。如果子类 Child2 的 setValue 方法要覆盖父类的 setValue 方法,那入参也必须是 Object。所以,编译器会为我们生成一个所谓的 bridge 桥接方法,你可以使用 javap 命令来反编译编译后的 Child2 类的 class 字节码:
javap -c /Users/zhuye/Documents/common-mistakes/target/classes/org/geekbang/time/commonmistakes/advancedfeatures/demo3/Child2.class
Compiled from "GenericAndInheritanceApplication.java"
class org.geekbang.time.commonmistakes.advancedfeatures.demo3.Child2 extends org.geekbang.time.commonmistakes.advancedfeatures.demo3.Parent<java.lang.String> {
  org.geekbang.time.commonmistakes.advancedfeatures.demo3.Child2();
    Code:
       0: aload_0
       1: invokespecial #1                  // Method org/geekbang/time/commonmistakes/advancedfeatures/demo3/Parent."<init>":()V
       4: return


  public void setValue(java.lang.String);
    Code:
       0: getstatic     #2                  // Field java/lang/System.out:Ljava/io/PrintStream;
       3: ldc           #3                  // String Child2.setValue called
       5: invokevirtual #4                  // Method java/io/PrintStream.println:(Ljava/lang/String;)V
       8: aload_0
       9: aload_1
      10: invokespecial #5                  // Method org/geekbang/time/commonmistakes/advancedfeatures/demo3/Parent.setValue:(Ljava/lang/Object;)V
      13: return


  public void setValue(java.lang.Object);
    Code:
       0: aload_0
       1: aload_1
       2: checkcast     #6                  // class java/lang/String
       5: invokevirtual #7                  // Method setValue:(Ljava/lang/String;)V
       8: return
}
2
3
4
5
6
7
8
9
10
11
12
13
14
15
16
17
18
19
20
21
22
23
24
25
26
27
28
29
可以看到,入参为 Object 的 setValue 方法在内部调用了入参为 String 的 setValue 方法(第 27 行),也就是代码里实现的那个方法。如果编译器没有帮我们实现这个桥接方法,那么 Child2 子类重写的是父类经过泛型类型擦除后、入参是 Object 的 setValue 方法。这两个方法的参数,一个是 String 一个是 Object,明显不符合 Java 的语义:
class Parent {
    AtomicInteger updateCount = new AtomicInteger();
    private Object value;
    public void setValue(Object value) {
        System.out.println("Parent.setValue called");
        this.value = value;
        updateCount.incrementAndGet();
    }
}

class Child2 extends Parent {
    @Override
    public void setValue(String value) {
        System.out.println("Child2.setValue called");
        super.setValue(value);
    }
}
2
3
4
5
6
7
8
9
10
11
12
13
14
15
16
17
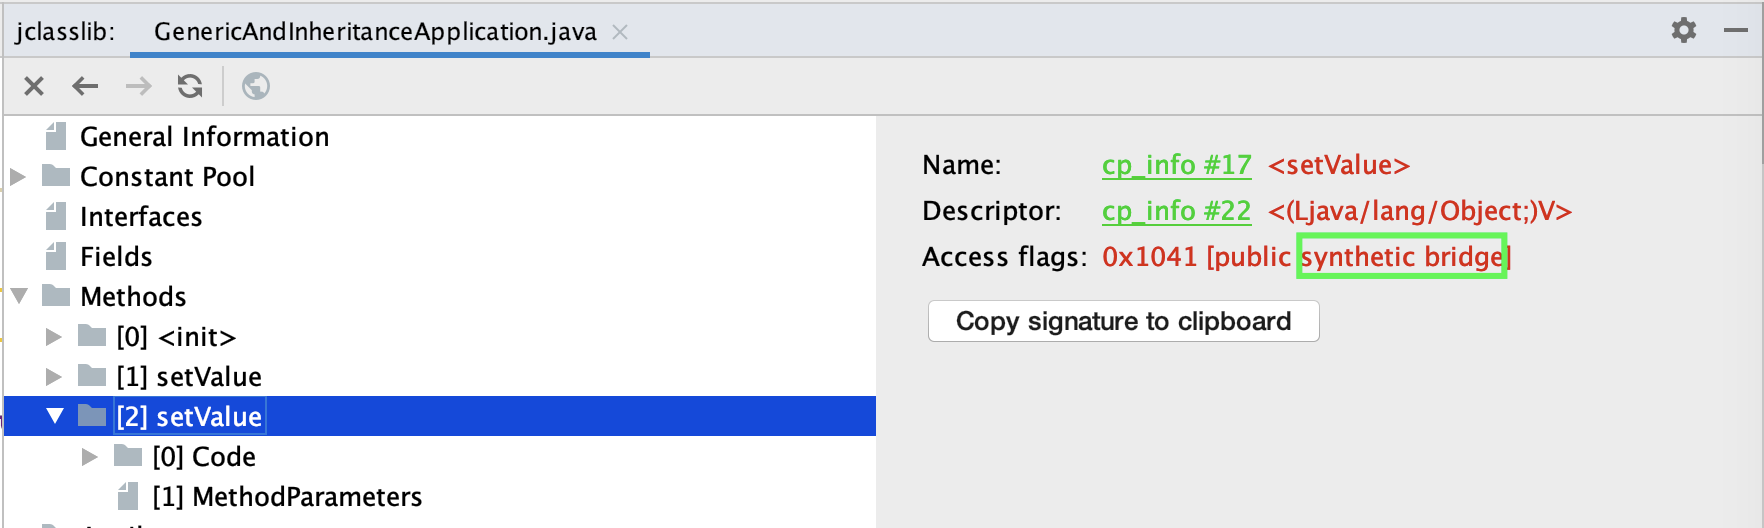
使用 jclasslib 工具打开 Child2 类,同样可以看到入参为 Object 的桥接方法上标记了 public + synthetic + bridge 三个属性。synthetic 代表由编译器生成的不可见代码,bridge 代表这是泛型类型擦除后生成的桥接代码:
知道这个问题之后,修改方式就明朗了,可以使用 method 的 isBridge 方法,来判断方法是不是桥接方法:
- 通过 getDeclaredMethods 方法获取到所有方法后,必须同时根据方法名 setValue 和非 isBridge 两个条件过滤,才能实现唯一过滤;
- 使用 Stream 时,如果希望只匹配 0 或 1 项的话,可以考虑配合 ifPresent 来使用 findFirst 方法。
修复代码如下:
Arrays.stream(child2.getClass().getDeclaredMethods())
        .filter(method -> method.getName().equals("setValue") && !method.isBridge())
        .findFirst().ifPresent(method -> {
    try {
        method.invoke(chi2, "test");
    } catch (Exception e) {
        e.printStackTrace();
    }
});
2
3
4
5
6
7
8
9
这样就可以得到正确输出了:
Child2.setValue called
Parent.setValue called
value: test updateCount: 1
2
3
最后小结下,使用反射查询类方法清单时,我们要注意两点:
- getMethods 和 getDeclaredMethods 是有区别的,前者可以查询到父类方法,后者只能查询到当前类。
- 反射进行方法调用要注意过滤桥接方法。
# 注解可以继承吗?
注解可以为 Java 代码提供元数据,各种框架也都会利用注解来暴露功能,比如 Spring 框架中的 @Service、@Controller、@Bean 注解,Spring Boot 的 @SpringBootApplication 注解。
框架可以通过类或方法等元素上标记的注解,来了解它们的功能或特性,并以此来启用或执行相应的功能。通过注解而不是 API 调用来配置框架,属于声明式交互,可以简化框架的配置工作,也可以和框架解耦。
开发同学可能会认为,类继承后,类的注解也可以继承,子类重写父类方法后,父类方法上的注解也能作用于子类,但这些观点其实是错误或者说是不全面的。我们来验证下吧。
首先,定义一个包含 value 属性的 MyAnnotation 注解,可以标记在方法或类上:
@Target({ElementType.METHOD, ElementType.TYPE})
@Retention(RetentionPolicy.RUNTIME)
public @interface MyAnnotation {
    String value();
}
2
3
4
5
然后,定义一个标记了 @MyAnnotation 注解的父类 Parent,设置 value 为 Class 字符串;同时这个类的 foo 方法也标记了 @MyAnnotation 注解,设置 value 为 Method 字符串。接下来,定义一个子类 Child 继承 Parent 父类,并重写父类的 foo 方法,子类的 foo 方法和类上都没有 @MyAnnotation 注解。
@MyAnnotation(value = "Class")
@Slf4j
static class Parent {

    @MyAnnotation(value = "Method")
    public void foo() {
    }
}

@Slf4j
static class Child extends Parent {
    @Override
    public void foo() {
    }
}
2
3
4
5
6
7
8
9
10
11
12
13
14
15
再接下来,通过反射分别获取 Parent 和 Child 的类和方法的注解信息,并输出注解的 value 属性的值(如果注解不存在则输出空字符串):
private static String getAnnotationValue(MyAnnotation annotation) {
    if (annotation == null) return "";
    return annotation.value();
}


public static void wrong() throws NoSuchMethodException {
    //获取父类的类和方法上的注解
    Parent parent = new Parent();
    log.info("ParentClass:{}", getAnnotationValue(parent.getClass().getAnnotation(MyAnnotation.class)));
    log.info("ParentMethod:{}", getAnnotationValue(parent.getClass().getMethod("foo").getAnnotation(MyAnnotation.class)));

    //获取子类的类和方法上的注解
    Child child = new Child();
    log.info("ChildClass:{}", getAnnotationValue(child.getClass().getAnnotation(MyAnnotation.class)));
    log.info("ChildMethod:{}", getAnnotationValue(child.getClass().getMethod("foo").getAnnotation(MyAnnotation.class)));
}
2
3
4
5
6
7
8
9
10
11
12
13
14
15
16
17
输出如下:
17:34:25.495 [main] INFO org.geekbang.time.commonmistakes.advancedfeatures.demo2.AnnotationInheritanceApplication - ParentClass:Class
17:34:25.501 [main] INFO org.geekbang.time.commonmistakes.advancedfeatures.demo2.AnnotationInheritanceApplication - ParentMethod:Method
17:34:25.504 [main] INFO org.geekbang.time.commonmistakes.advancedfeatures.demo2.AnnotationInheritanceApplication - ChildClass:
17:34:25.504 [main] INFO org.geekbang.time.commonmistakes.advancedfeatures.demo2.AnnotationInheritanceApplication - ChildMethod:
2
3
4
可以看到,父类的类和方法上的注解都可以正确获得,但是子类的类和方法却不能。这说明,子类以及子类的方法,无法自动继承父类和父类方法上的注解。
如果你详细了解过注解应该知道,在注解上标记 @Inherited 元注解可以实现注解的继承。那么,把 @MyAnnotation 注解标记了 @Inherited,就可以一键解决问题了吗?
@Target({ElementType.METHOD, ElementType.TYPE})
@Retention(RetentionPolicy.RUNTIME)
@Inherited
public @interface MyAnnotation {
    String value();
}
2
3
4
5
6
重新运行代码输出如下:
17:44:54.831 [main] INFO org.geekbang.time.commonmistakes.advancedfeatures.demo2.AnnotationInheritanceApplication - ParentClass:Class
17:44:54.837 [main] INFO org.geekbang.time.commonmistakes.advancedfeatures.demo2.AnnotationInheritanceApplication - ParentMethod:Method
17:44:54.838 [main] INFO org.geekbang.time.commonmistakes.advancedfeatures.demo2.AnnotationInheritanceApplication - ChildClass:Class
17:44:54.838 [main] INFO org.geekbang.time.commonmistakes.advancedfeatures.demo2.AnnotationInheritanceApplication - ChildMethod:
2
3
4
可以看到,子类可以获得父类上的注解;子类 foo 方法虽然是重写父类方法,并且注解本身也支持继承,但还是无法获得方法上的注解。
如果你再仔细阅读一下@Inherited 的文档就会发现,@Inherited 只能实现类上的注解继承。要想实现方法上注解的继承,你可以通过反射在继承链上找到方法上的注解。但这样实现起来很繁琐,而且需要考虑桥接方法。
好在 Spring 提供了 AnnotatedElementUtils 类,来方便我们处理注解的继承问题。这个类的 findMergedAnnotation 工具方法,可以帮助我们找出父类和接口、父类方法和接口方法上的注解,并可以处理桥接方法,实现一键找到继承链的注解:
Child child = new Child();
log.info("ChildClass:{}", getAnnotationValue(AnnotatedElementUtils.findMergedAnnotation(child.getClass(), MyAnnotation.class)));
log.info("ChildMethod:{}", getAnnotationValue(AnnotatedElementUtils.findMergedAnnotation(child.getClass().getMethod("foo"), MyAnnotation.class)));
2
3
修改后,可以得到如下输出:
17:47:30.058 [main] INFO org.geekbang.time.commonmistakes.advancedfeatures.demo2.AnnotationInheritanceApplication - ChildClass:Class
17:47:30.059 [main] INFO org.geekbang.time.commonmistakes.advancedfeatures.demo2.AnnotationInheritanceApplication - ChildMethod:Method
2
可以看到,子类 foo 方法也获得了父类方法上的注解。
# OOM 问题
Java 的垃圾收集器已经非常成熟了。有了自动垃圾收集器,绝大多数情况下我们写程序时可以专注于业务逻辑,无需过多考虑对象的分配和释放,一般也不会出现 OOM
但内存空间始终是有限的,Java 的几大内存区域始终都有 OOM 的可能。相应地,Java 程序的常见 OOM 类型,可以分为堆内存的 OOM、栈 OOM、元空间 OOM、直接内存 OOM 等。几乎每一种 OOM 都可以使用几行代码模拟,市面上也有很多资料在堆、元空间、直接内存中分配超大对象或是无限分配对象,尝试创建无限个线程或是进行方法无限递归调用来模拟。
但值得注意的是,我们的业务代码并不会这么干。所以这里会从内存分配意识的角度通过一些案例,展示业务代码中可能导致 OOM 的一些坑。这些坑,或是因为我们意识不到对象的分配,或是因为不合理的资源使用,或是没有控制缓存的数据量等。
在线程池问题已经看到了两种 OOM 的情况,一是因为使用无界队列导致的堆 OOM,二是因为使用没有最大线程数量限制的线程池导致无限创建线程的 OOM。接下来,我们再一起看看,在写业务代码的过程中,还有哪些意识上的疏忽可能会导致 OOM。
# 太多份相同的对象导致 OOM
案例:有一个项目在内存中缓存了全量用户数据,在搜索用户时可以直接从缓存中返回用户信息。现在为了改善用户体验,需要实现输入部分用户名自动在下拉框提示补全用户名的功能(也就是所谓的自动完成功能)。
为实现这个功能,我们需要一个 HashMap 来存放这些用户数据,Key 是用户姓名索引,Value 是索引下对应的用户列表。举一个例子,如果有两个用户 aa 和 ab,那么 Key 就有三个,分别是 a、aa 和 ab。用户输入字母 a 时,就能从 Value 这个 List 中拿到所有字母 a 开头的用户,即 aa 和 ab。
在代码中,在数据库中存入 1 万个测试用户,用户名由 a~j 这 6 个字母随机构成,然后把每一个用户名的前 1 个字母、前 2 个字母以此类推直到完整用户名作为 Key 存入缓存中,缓存的 Value 是一个 UserDTO 的 List,存放的是所有相同的用户名索引,以及对应的用户信息:
//自动完成的索引,Key是用户输入的部分用户名,Value是对应的用户数据
private ConcurrentHashMap<String, List<UserDTO>> autoCompleteIndex = new ConcurrentHashMap<>();

@Autowired
private UserRepository userRepository;

@PostConstruct
public void wrong() {
    //先保存10000个用户名随机的用户到数据库中
    userRepository.saveAll(LongStream.rangeClosed(1, 10000).mapToObj(i -> new UserEntity(i, randomName())).collect(Collectors.toList()));

    //从数据库加载所有用户
    userRepository.findAll().forEach(userEntity -> {
        int len = userEntity.getName().length();
        //对于每一个用户,对其用户名的前N位进行索引,N可能是1~6六种长度类型
        for (int i = 0; i < len; i++) {
            String key = userEntity.getName().substring(0, i + 1);
            autoCompleteIndex.computeIfAbsent(key, s -> new ArrayList<>())
                    .add(new UserDTO(userEntity.getName()));
        }
    });
    log.info("autoCompleteIndex size:{} count:{}", autoCompleteIndex.size(),
            autoCompleteIndex.entrySet().stream().map(item -> item.getValue().size()).reduce(0, Integer::sum));
}
2
3
4
5
6
7
8
9
10
11
12
13
14
15
16
17
18
19
20
21
22
23
24
对于每一个用户对象 UserDTO,除了有用户名,我们还加入了 10K 左右的数据模拟其用户信息:
@Data
public class UserDTO {
    private String name;
    @EqualsAndHashCode.Exclude
    private String payload;

    public UserDTO(String name) {
        this.name = name;
        this.payload = IntStream.rangeClosed(1, 10_000)
                .mapToObj(__ -> "a")
                .collect(Collectors.joining(""));
    }
}
2
3
4
5
6
7
8
9
10
11
12
13
运行程序后,日志输出如下:
[11:11:22.982] [main] [INFO ] [.t.c.o.d.UsernameAutoCompleteService:37 ] - autoCompleteIndex size:26838 count:60000
可以看到,一共有 26838 个索引(也就是所有用户名的 1 位、2 位一直到 6 位有 26838 个组合),HashMap 的 Value,也就是 List一共有 1 万个用户 *6=6 万个 UserDTO 对象。
使用内存分析工具 MAT 打开堆 dump 发现,6 万个 UserDTO 占用了约 1.2GB 的内存:
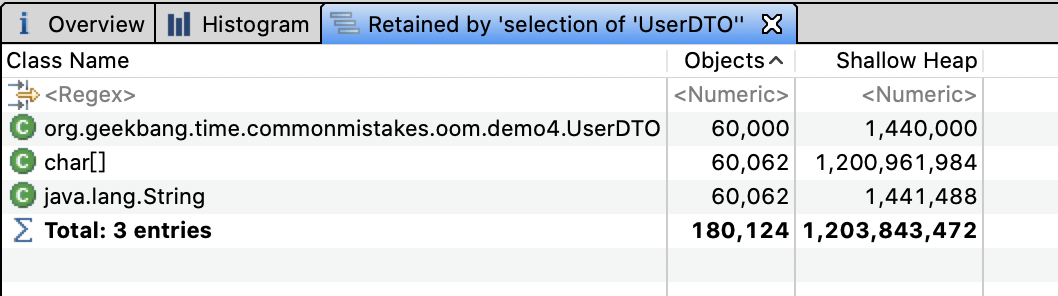
看到这里发现,虽然真正的用户只有 1 万个,但因为使用部分用户名作为索引的 Key,导致缓存的 Key 有 26838 个,缓存的用户信息多达 6 万个。如果我们的用户名不是 6 位而是 10 位、20 位,那么缓存的用户信息可能就是 10 万、20 万个,必然会产生堆 OOM。
尝试调大用户名的最大长度,重启程序可以看到类似如下的错误:
[17:30:29.858] [main] [ERROR] [ringframework.boot.SpringApplication:826 ] - Application run failed
org.springframework.beans.factory.BeanCreationException: Error creating bean with name 'usernameAutoCompleteService': Invocation of init method failed; nested exception is java.lang.OutOfMemoryError: Java heap space
2
我们可能会想当然地认为,数据库中有 1 万个用户,内存中也应该只有 1 万个 UserDTO 对象,但实现的时候每次都会 new 出来 UserDTO 加入缓存,当然在内存中都是新对象。在实际的项目中,用户信息的缓存可能是随着用户输入增量缓存的,而不是像这个案例一样在程序初始化的时候全量缓存,所以问题暴露得不会这么早。
知道原因后,解决起来就比较简单了。把所有 UserDTO 先加入 HashSet 中,因为 UserDTO 以 name 来标识唯一性,所以重复用户名会被过滤掉,最终加入 HashSet 的 UserDTO 就不足 1 万个。
有了 HashSet 来缓存所有可能的 UserDTO 信息,我们再构建自动完成索引 autoCompleteIndex 这个 HashMap 时,就可以直接从 HashSet 获取所有用户信息来构建了。这样一来,同一个用户名前缀的不同组合(比如用户名为 abc 的用户,a、ab 和 abc 三个 Key)关联到 UserDTO 是同一份:
@PostConstruct
public void right() {
    ...

    HashSet<UserDTO> cache = userRepository.findAll().stream()
            .map(item -> new UserDTO(item.getName()))
            .collect(Collectors.toCollection(HashSet::new));


    cache.stream().forEach(userDTO -> {
        int len = userDTO.getName().length();
        for (int i = 0; i < len; i++) {
            String key = userDTO.getName().substring(0, i + 1);
            autoCompleteIndex.computeIfAbsent(key, s -> new ArrayList<>())
                    .add(userDTO);
        }
    });
    ...
}
2
3
4
5
6
7
8
9
10
11
12
13
14
15
16
17
18
19
再次分析堆内存,可以看到 UserDTO 只有 9945 份,总共占用的内存不到 200M。这才是我们真正想要的结果。
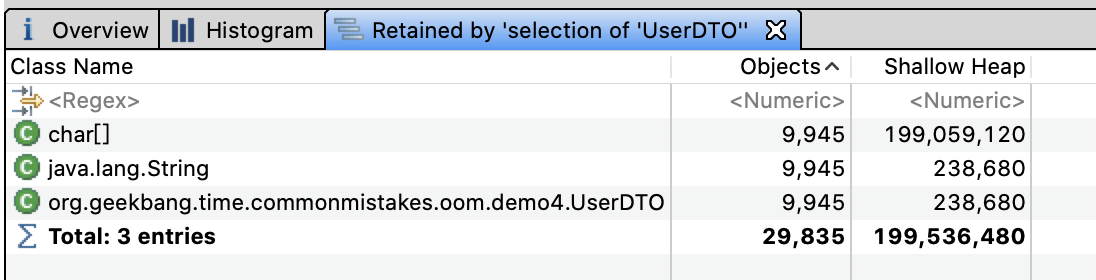
修复后的程序,不仅相同的 UserDTO 只有一份,总副本数变为了原来的六分之一;而且因为 HashSet 的去重特性,双重节约了内存。
值得注意的是,我们虽然清楚数据总量,但却忽略了每一份数据在内存中可能有多份。还有一个案例,一个后台程序需要从数据库加载大量信息用于数据导出,这些数据在数据库中占用 100M 内存,但是 1GB 的 JVM 堆却无法完成导出操作。
分析下原因吧。100M 的数据加载到程序内存中,变为 Java 的数据结构就已经占用了 200M 堆内存;这些数据经过 JDBC、MyBatis 等框架其实是加载了 2 份,然后领域模型、DTO 再进行转换可能又加载了 2 次;最终,占用的内存达到了 200M*4=800M。
所以,在进行容量评估时,我们不能认为一份数据在程序内存中也是一份。
# 使用 WeakHashMap 不等于不会 OOM
对于上一节实现快速检索的案例,为了防止缓存中堆积大量数据导致 OOM,一些同学可能会想到使用 WeakHashMap 作为缓存容器。实际中对于 autoComplete 的场景使用 Trie树 更适合一些。
WeakHashMap 的特点是 Key 在哈希表内部是弱引用的,当没有强引用指向这个 Key 之后,Entry 会被 GC,即使我们无限往 WeakHashMap 加入数据,只要 Key 不再使用,也就不会 OOM。
说到了强引用和弱引用,先回顾下 Java 中引用类型和垃圾回收的关系:
- 垃圾回收器不会回收有强引用的对象;
- 在内存充足时,垃圾回收器不会回收具有软引用的对象;
- 垃圾回收器只要扫描到了具有弱引用的对象就会回收,WeakHashMap 就是利用了这个特点。
案例:一个使用 WeakHashMap 却最终 OOM 的案例。我们暂且不论使用 WeakHashMap 作为缓存是否合适,先分析一下这个 OOM 问题。
声明一个 Key 是 User 类型、Value 是 UserProfile 类型的 WeakHashMap,作为用户数据缓存,往其中添加 200 万个 Entry,然后使用 ScheduledThreadPoolExecutor 发起一个定时任务,每隔 1 秒输出缓存中的 Entry 个数:
private Map<User, UserProfile> cache = new WeakHashMap<>();

@GetMapping("wrong")
public void wrong() {
    String userName = "zhuye";
    //间隔1秒定时输出缓存中的条目数
    Executors.newSingleThreadScheduledExecutor().scheduleAtFixedRate(
            () -> log.info("cache size:{}", cache.size()), 1, 1, TimeUnit.SECONDS);
    LongStream.rangeClosed(1, 2000000).forEach(i -> {
        User user = new User(userName + i);
        cache.put(user, new UserProfile(user, "location" + i));
    });
}
2
3
4
5
6
7
8
9
10
11
12
13
执行程序后日志如下:
[10:30:28.509] [pool-3-thread-1] [INFO ] [t.c.o.demo3.WeakHashMapOOMController:29  ] - cache size:2000000
[10:30:29.507] [pool-3-thread-1] [INFO ] [t.c.o.demo3.WeakHashMapOOMController:29  ] - cache size:2000000
[10:30:30.509] [pool-3-thread-1] [INFO ] [t.c.o.demo3.WeakHashMapOOMController:29  ] - cache size:2000000
2
3
可以看到,输出的 cache size 始终是 200 万,即使我们通过 jvisualvm 进行手动 GC 还是这样。这就说明,这些 Entry 无法通过 GC 回收。如果你把 200 万改为 1000 万,就可以在日志中看到如下的 OOM 错误:
Exception in thread "http-nio-45678-exec-1" java.lang.OutOfMemoryError: GC overhead limit exceeded
Exception in thread "Catalina-utility-2" java.lang.OutOfMemoryError: GC overhead limit exceeded
2
我们来分析一下这个问题。进行堆转储后可以看到,堆内存中有 200 万个 UserProfie 和 User:

如下是 User 和 UserProfile 类的定义,需要注意的是,WeakHashMap 的 Key 是 User 对象,而其 Value 是 UserProfile 对象,持有了 User 的引用:
@Data
@AllArgsConstructor
@NoArgsConstructor
class User {
    private String name;
}


@Data
@AllArgsConstructor
@NoArgsConstructor
public class UserProfile {
    private User user;
    private String location;
}
2
3
4
5
6
7
8
9
10
11
12
13
14
15
没错,这就是问题的所在。分析一下 WeakHashMap 的源码,你会发现 WeakHashMap 和 HashMap 的最大区别,是 Entry 对象的实现。接下来,我们暂且忽略 HashMap 的实现,来看下 Entry 对象:
private static class Entry<K,V> extends WeakReference<Object> ...
/**
 * Creates new entry.
 */
Entry(Object key, V value,
      ReferenceQueue<Object> queue,
      int hash, Entry<K,V> next) {
    super(key, queue);
    this.value = value;
    this.hash  = hash;
    this.next  = next;
}
2
3
4
5
6
7
8
9
10
11
12
Entry 对象继承了 WeakReference,Entry 的构造函数调用了 super (key,queue),这是父类的构造函数。其中,key 是我们执行 put 方法时的 key;queue 是一个 ReferenceQueue。如果你了解 Java 的引用就会知道,被 GC 的对象会被丢进这个 queue 里面。
再来看看对象被丢进 queue 后是如何被销毁的:
public V get(Object key) {
    Object k = maskNull(key);
    int h = hash(k);
    Entry<K,V>[] tab = getTable();
    int index = indexFor(h, tab.length);
    Entry<K,V> e = tab[index];
    while (e != null) {
        if (e.hash == h && eq(k, e.get()))
            return e.value;
        e = e.next;
    }
    return null;
}

private Entry<K,V>[] getTable() {
    expungeStaleEntries();
    return table;
}

/**
 * Expunges stale entries from the table.
 */
private void expungeStaleEntries() {
    for (Object x; (x = queue.poll()) != null; ) {
        synchronized (queue) {
            @SuppressWarnings("unchecked")
                Entry<K,V> e = (Entry<K,V>) x;
            int i = indexFor(e.hash, table.length);

            Entry<K,V> prev = table[i];
            Entry<K,V> p = prev;
            while (p != null) {
                Entry<K,V> next = p.next;
                if (p == e) {
                    if (prev == e)
                        table[i] = next;
                    else
                        prev.next = next;
                    // Must not null out e.next;
                    // stale entries may be in use by a HashIterator
                    e.value = null; // Help GC
                    size--;
                    break;
                }
                prev = p;
    ``            p = next;
            }
        }
    }
}
2
3
4
5
6
7
8
9
10
11
12
13
14
15
16
17
18
19
20
21
22
23
24
25
26
27
28
29
30
31
32
33
34
35
36
37
38
39
40
41
42
43
44
45
46
47
48
49
50
从源码中可以看到,每次调用 get、put、size 等方法时,都会从 queue 里拿出所有已经被 GC 掉的 key 并删除对应的 Entry 对象。我们再来回顾下这个逻辑:
- put 一个对象进 Map 时,它的 key 会被封装成弱引用对象;
- 发生 GC 时,弱引用的 key 被发现并放入 queue;
- 调用 get 等方法时,扫描 queue 删除 key,以及包含 key 和 value 的 Entry 对象。
WeakHashMap 的 Key 虽然是弱引用,但是其 Value 却持有 Key 中对象的强引用,Value 被 Entry 引用,Entry 被 WeakHashMap 引用,最终导致 Key 无法回收。解决方案就是让 Value 变为弱引用,使用 WeakReference 来包装 UserProfile 即可:
private Map<User, WeakReference<UserProfile>> cache2 = new WeakHashMap<>();

@GetMapping("right")
public void right() {
    String userName = "zhuye";
    //间隔1秒定时输出缓存中的条目数
    Executors.newSingleThreadScheduledExecutor().scheduleAtFixedRate(
            () -> log.info("cache size:{}", cache2.size()), 1, 1, TimeUnit.SECONDS);
    LongStream.rangeClosed(1, 2000000).forEach(i -> {
        User user = new User(userName + i);
        //这次,我们使用弱引用来包装UserProfile
        cache2.put(user, new WeakReference(new UserProfile(user, "location" + i)));
    });
}
2
3
4
5
6
7
8
9
10
11
12
13
14
重新运行程序,从日志中观察到 cache size 不再是固定的 200 万,而是在不断减少,甚至在手动 GC 后所有的 Entry 都被回收了:
[10:40:05.792] [pool-3-thread-1] [INFO ] [t.c.o.demo3.WeakHashMapOOMController:40  ] - cache size:1367402
[10:40:05.795] [pool-3-thread-1] [INFO ] [t.c.o.demo3.WeakHashMapOOMController:40  ] - cache size:1367846
[10:40:06.773] [pool-3-thread-1] [INFO ] [t.c.o.demo3.WeakHashMapOOMController:40  ] - cache size:549551
...
[10:40:20.742] [pool-3-thread-1] [INFO ] [t.c.o.demo3.WeakHashMapOOMController:40  ] - cache size:549551
[10:40:22.862] [pool-3-thread-1] [INFO ] [t.c.o.demo3.WeakHashMapOOMController:40  ] - cache size:547937
[10:40:22.865] [pool-3-thread-1] [INFO ] [t.c.o.demo3.WeakHashMapOOMController:40  ] - cache size:542134
[10:40:23.779] [pool-3-thread-1] [INFO ]
//手动进行GC
[t.c.o.demo3.WeakHashMapOOMController:40  ] - cache size:0
2
3
4
5
6
7
8
9
10
当然,还有一种办法就是,让 Value 也就是 UserProfile 不再引用 Key,而是重新 new 出一个新的 User 对象赋值给 UserProfile:
@GetMapping("right2")
public void right2() {
    String userName = "zhuye";
    ...
        User user = new User(userName + i);
        cache.put(user, new UserProfile(new User(user.getName()), "location" + i));
    });
}
2
3
4
5
6
7
8
此外,Spring 提供的 ConcurrentReferenceHashMap 类可以使用弱引用、软引用做缓存,Key 和 Value 同时被软引用或弱引用包装,也能解决相互引用导致的数据不能释放问题。与 WeakHashMap 相比,ConcurrentReferenceHashMap 不但性能更好,还可以确保线程安全。你可以自己做实验测试下。
# Tomcat 参数配置不合理导致 OOM
我们再来看看第三个案例。有一次运维同学反馈,有个应用在业务量大的情况下会出现假死,日志中也有大量 OOM 异常:
[13:18:17.597] [http-nio-45678-exec-70] [ERROR] [ache.coyote.http11.Http11NioProtocol:175 ] - Failed to complete processing of a request
java.lang.OutOfMemoryError: Java heap space
2
于是运维同学进行生产堆 Dump。通过 MAT 打开 dump 文件后,我们一眼就看到 OOM 的原因是,有接近 1.7GB 的 byte 数组分配,而 JVM 进程的最大堆内存我们只配置了 2GB:

通过查看引用可以发现,大量引用都是 Tomcat 的工作线程。大部分工作线程都分配了两个 10M 左右的数组,100 个左右工作线程吃满了内存。第一个红框是 Http11InputBuffer,其 buffer 大小是 10008192 字节;而第二个红框的 Http11OutputBuffer 的 buffer,正好占用 10000000 字节:
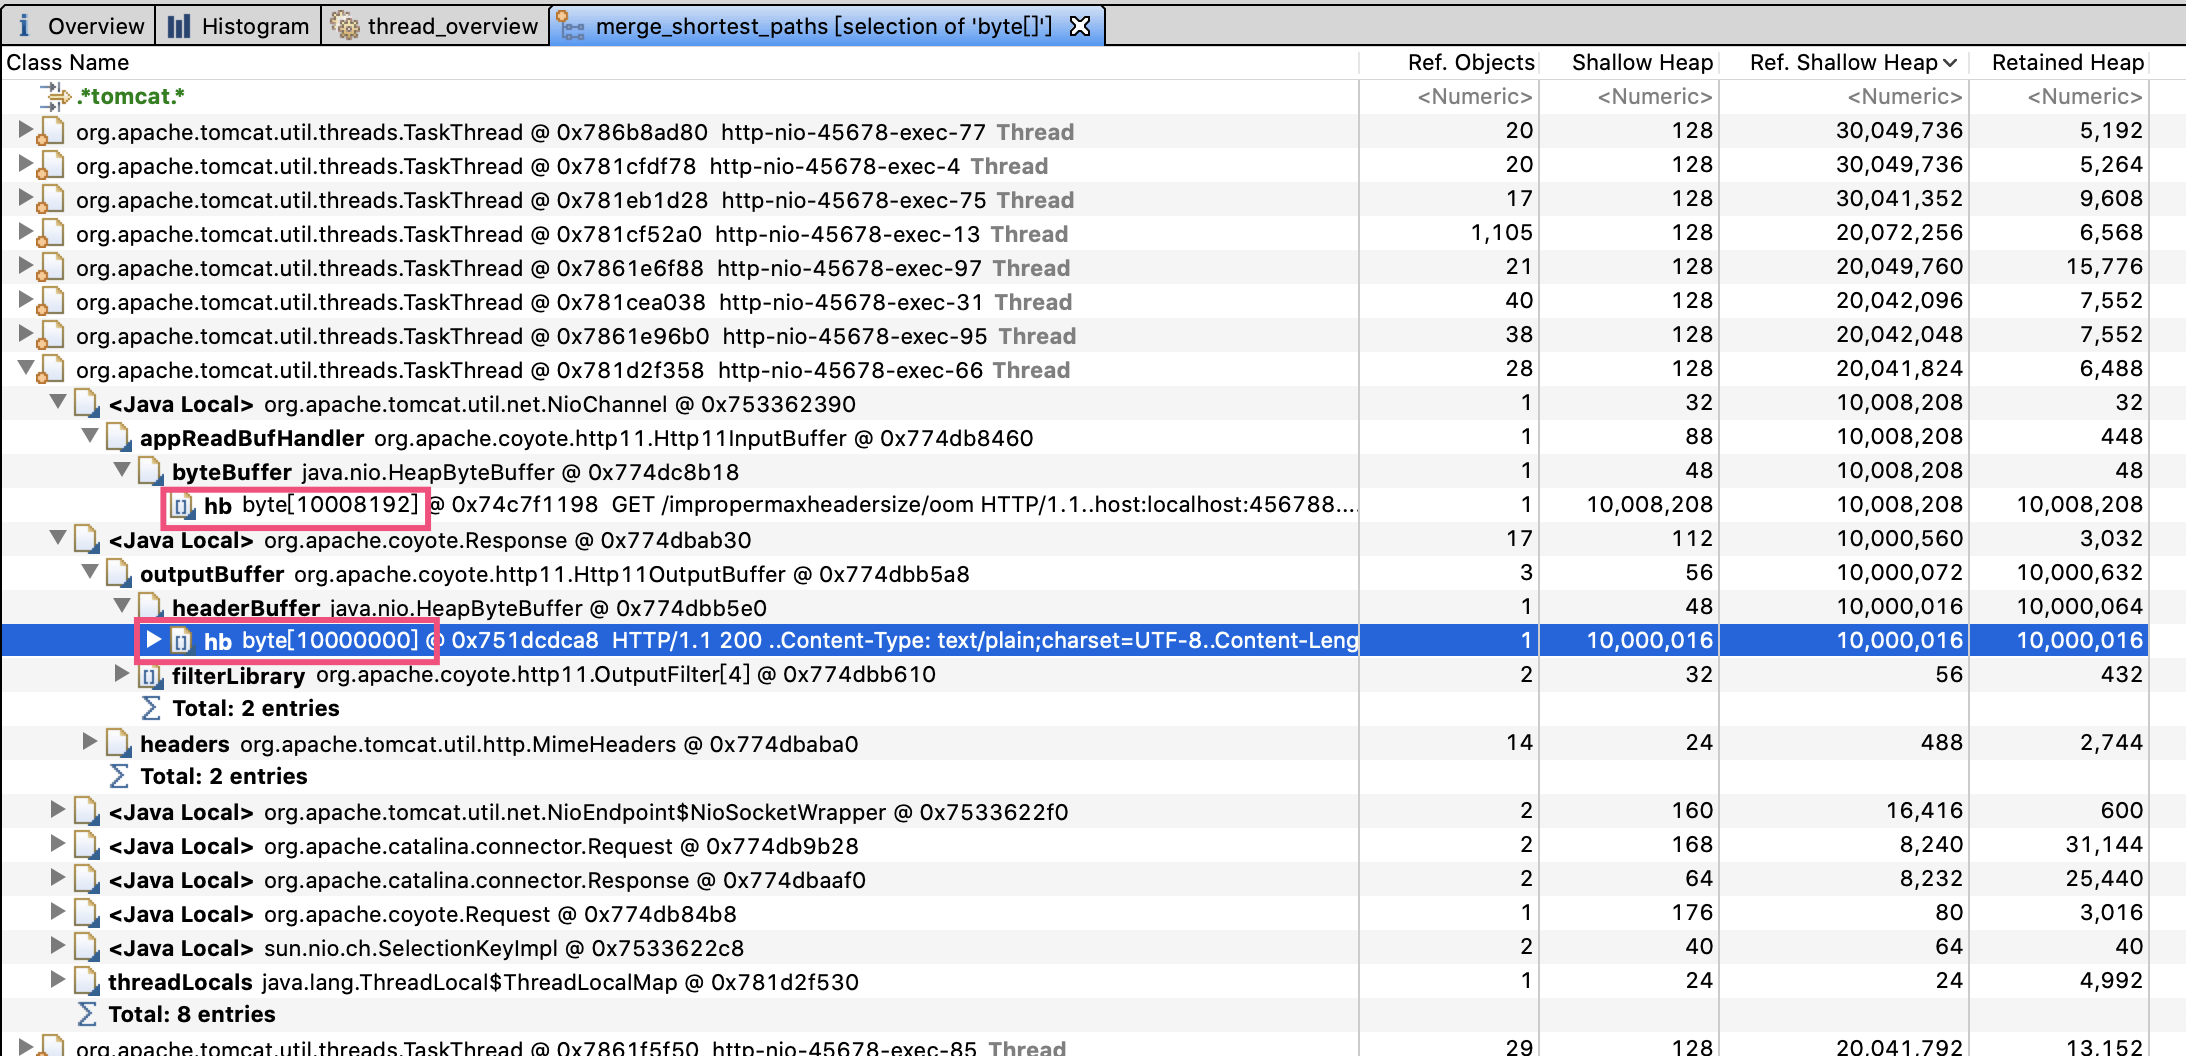
我们先来看看第一个 Http11InputBuffer 为什么会占用这么多内存。查看 Http11InputBuffer 类的 init 方法注意到,其中一个初始化方法会分配 headerBufferSize+readBuffer 大小的内存:
void init(SocketWrapperBase<?> socketWrapper) {

    wrapper = socketWrapper;
    wrapper.setAppReadBufHandler(this);

    int bufLength = headerBufferSize +
            wrapper.getSocketBufferHandler().getReadBuffer().capacity();
    if (byteBuffer == null || byteBuffer.capacity() < bufLength) {
        byteBuffer = ByteBuffer.allocate(bufLength);
        byteBuffer.position(0).limit(0);
    }
}
2
3
4
5
6
7
8
9
10
11
12
在 Tomcat 文档中有提到,这个 Socket 的读缓冲,也就是 readBuffer 默认是 8192 字节。显然,问题出在了 headerBufferSize 上:

向上追溯初始化 Http11InputBuffer 的 Http11Processor 类,可以看到,传入的 headerBufferSize 配置的是 MaxHttpHeaderSize:
inputBuffer = new Http11InputBuffer(request, protocol.getMaxHttpHeaderSize(),
        protocol.getRejectIllegalHeaderName(), httpParser);
2
Http11OutputBuffer 中的 buffer 正好占用了 10000000 字节,这又是为什么?通过 Http11OutputBuffer 的构造方法,可以看到它是直接根据 headerBufferSize 分配了固定大小的 headerBuffer:
protected Http11OutputBuffer(Response response, int headerBufferSize){
...
   headerBuffer = ByteBuffer.allocate(headerBufferSize);
}
2
3
4
那么我们就可以想到,一定是应用把 Tomcat 头相关的参数配置为 10000000 了,使得每一个请求对于 Request 和 Response 都占用了 20M 内存,最终在并发较多的情况下引起了 OOM。
果不其然,查看项目代码发现配置文件中有这样的配置项:
server.max-http-header-size=10000000
翻看源码提交记录可以看到,当时开发同学遇到了这样的异常:
java.lang.IllegalArgumentException: Request header is too large
于是他就到网上搜索了一下解决方案,随意将 server.max-http-header-size 修改为了一个超大值,期望永远不会再出现类似问题。但没想到这个修改却引起了这么大的问题。把这个参数改为比较合适的 20000 再进行压测,我们就可以发现应用的各项指标都比较稳定。
这个案例告诉我们,一定要根据实际需求来修改参数配置,可以考虑预留 2 到 5 倍的量。容量类的参数背后往往代表了资源,设置超大的参数就有可能占用不必要的资源,在并发量大的时候因为资源大量分配导致 OOM。
在出现 OOM 之后,我们可以根据错误日志中的异常信息,再结合 jstat 等命令行工具观察内存使用情况,以及程序的 GC 日志,来大致定位出现 OOM 的内存区块和类型。其实,我们遇到的 90% 的 OOM 都是堆 OOM,对 JVM 进程进行堆内存 Dump,或使用 jmap 命令分析对象内存占用排行,一般都可以很容易定位到问题。
这里建议为生产系统的程序配置 JVM 参数启用详细的 GC 日志,方便观察垃圾收集器的行为,并开启 HeapDumpOnOutOfMemoryError,以便在出现 OOM 时能自动 Dump 留下第一问题现场。对于 JDK8,你可以这么设置:
XX:+HeapDumpOnOutOfMemoryError -XX:HeapDumpPath=. -XX:+PrintGCDateStamps -XX:+PrintGCDetails -Xloggc:gc.log -XX:+UseGCLogFileRotation -XX:NumberOfGCLogFiles=10 -XX:GCLogFileSize=100M
# 数据库索引
MySQL 等关系型数据库因为满足 ACID、可靠性高、对开发友好等特点,仍然最常被用于存储重要数据。在关系型数据库中,索引是优化查询性能的重要手段。
# InnoDB 是如何存储数据的?
MySQL 把数据存储和查询操作抽象成了存储引擎,不同的存储引擎,对数据的存储和读取方式各不相同。MySQL 支持多种存储引擎,并且可以以表为粒度设置存储引擎。因为支持事务,我们最常使用的是 InnoDB。为方便理解下面的内容,简单说说 InnoDB 是如何存储数据的。
虽然数据保存在磁盘中,但其处理是在内存中进行的。为了减少磁盘随机读取次数,InnoDB 采用页而不是行的粒度来保存数据,即数据被分成若干页,以页为单位保存在磁盘中。InnoDB 的页大小,一般是 16KB。
各个数据页组成一个双向链表,每个数据页中的记录按照主键顺序组成单向链表;每一个数据页中有一个页目录,方便按照主键查询记录。数据页的结构如下:
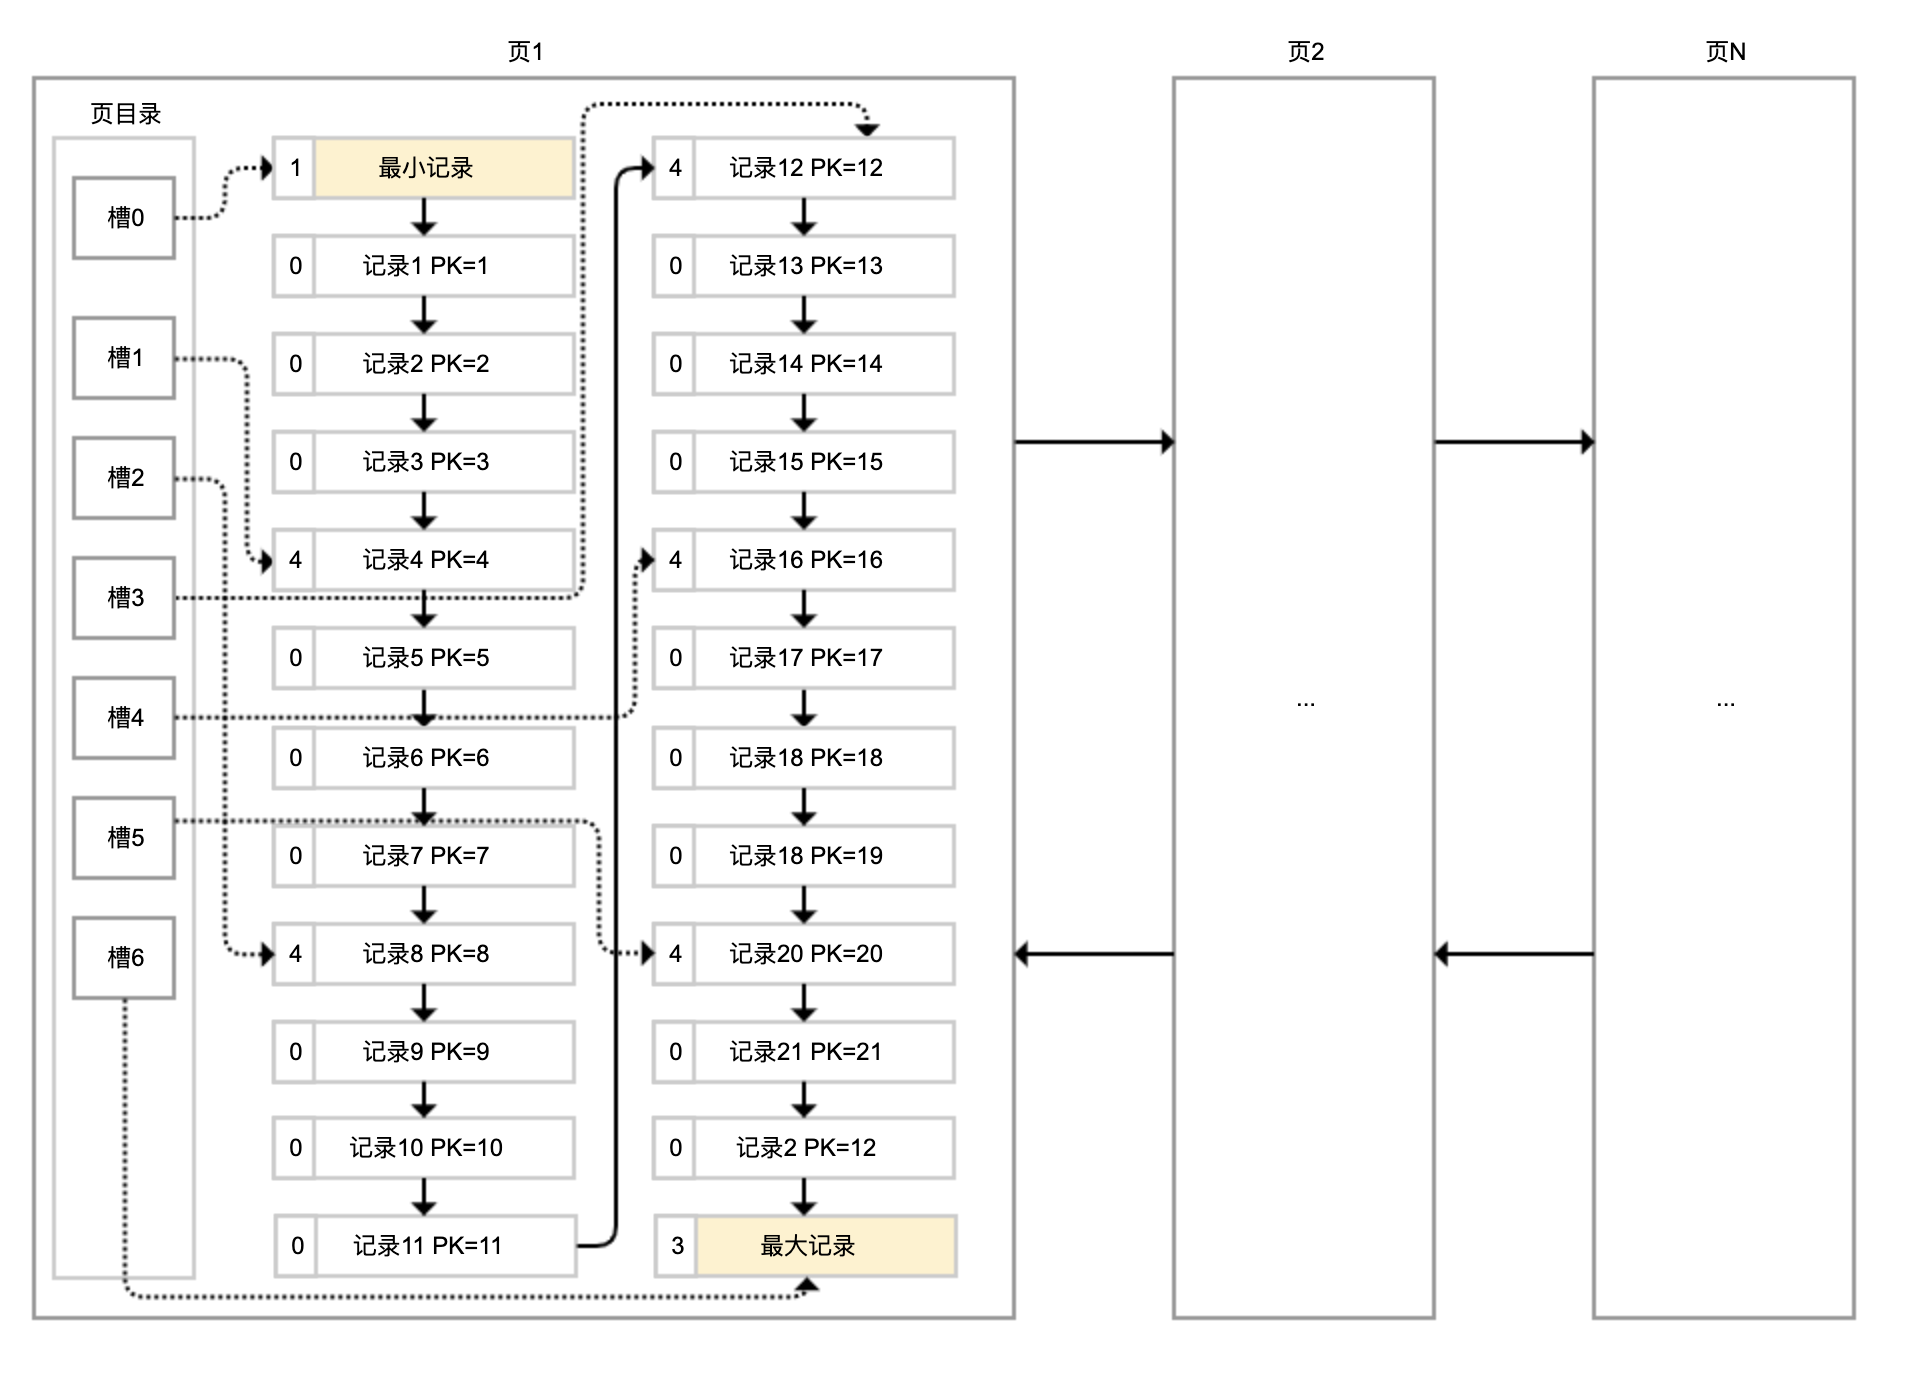
页目录通过槽把记录分成不同的小组,每个小组有若干条记录。如图所示,记录中最前面的小方块中的数字,代表的是当前分组的记录条数,最小和最大的槽指向 2 个特殊的伪记录。有了槽之后,我们按照主键搜索页中记录时,就可以采用二分法快速搜索,无需从最小记录开始遍历整个页中的记录链表。
举一个例子,如果要搜索主键(PK)=15 的记录:
- 先二分得出槽中间位是 (0+6)/2=3,看到其指向的记录是 12<15,所以需要从 #3 槽后继续搜索记录;
- 再使用二分搜索出 #3 槽和 #6 槽的中间位是 (3+6)/2=4.5 取整 4,#4 槽对应的记录是 16>15,所以记录一定在 #4 槽中;
- 再从 #4 槽指向的 12 号记录开始向下搜索 3 次,定位到 15 号记录。
理解了 InnoDB 存储数据的原理后,我们就可以继续学习 MySQL 索引相关的原理和坑了。
# 聚簇索引和二级索引
说到索引,页目录就是最简单的索引,是通过对记录进行一级分组来降低搜索的时间复杂度。但这样能够降低的时间复杂度数量级,非常有限。当有无数个数据页来存储表数据的时候,我们就需要考虑如何建立合适的索引,才能方便定位记录所在的页。
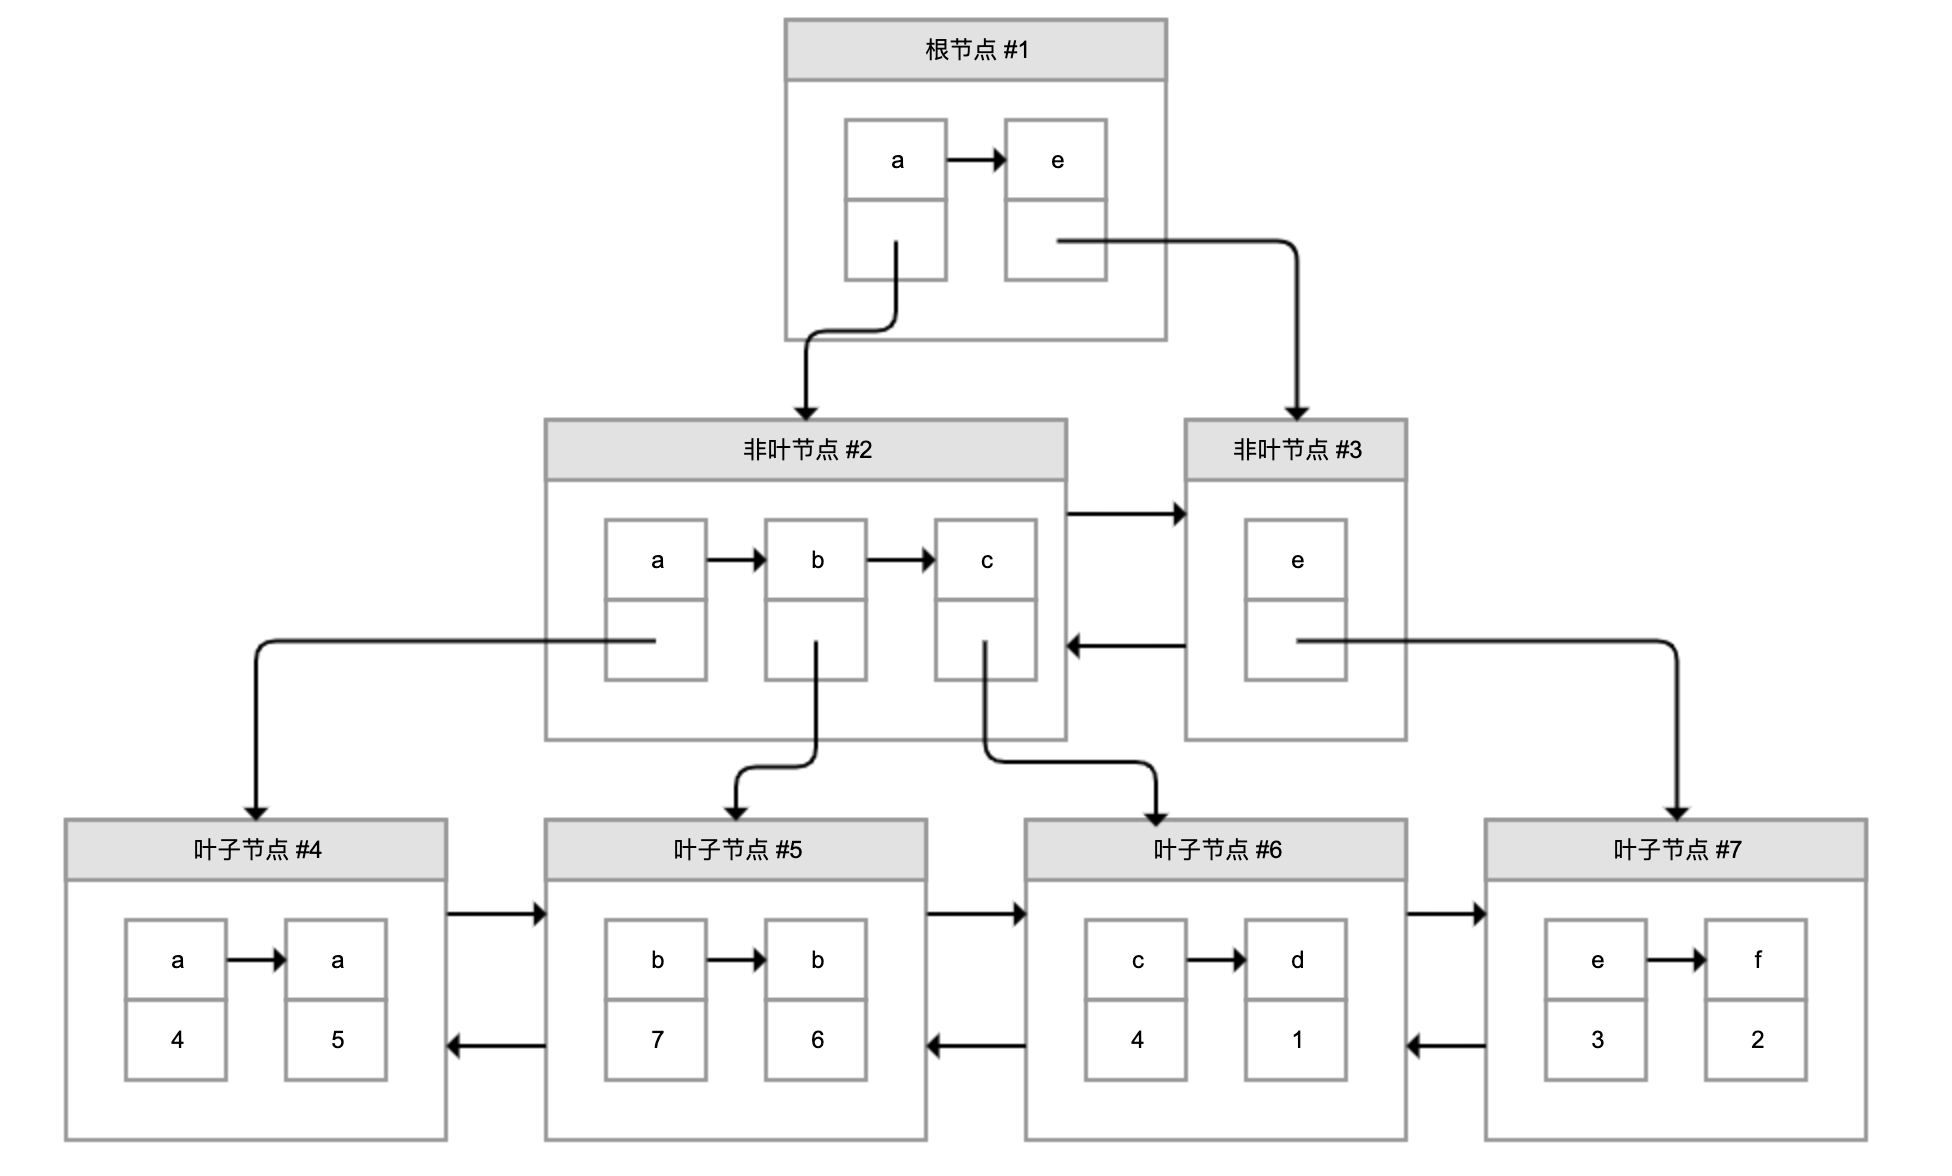
为了解决这个问题,InnoDB 引入了 B+ 树。如下图所示,B+ 树是一棵倒过来的树:

B+ 树的特点包括:
- 最底层的节点叫作叶子节点,用来存放数据;
- 其他上层节点叫作非叶子节点,仅用来存放目录项,作为索引;
- 非叶子节点分为不同层次,通过分层来降低每一层的搜索量;
- 所有节点按照索引键大小排序,构成一个双向链表,加速范围查找。
因此,InnoDB 使用 B+ 树,既可以保存实际数据,也可以加速数据搜索,这就是聚簇索引。如果把上图叶子节点下面方块中的省略号看作实际数据的话,那么它就是聚簇索引的示意图。由于数据在物理上只会保存一份,所以包含实际数据的聚簇索引只能有一个。
InnoDB 会自动使用主键(唯一定义一条记录的单个或多个字段)作为聚簇索引的索引键(如果没有主键,就选择第一个不包含 NULL 值的唯一列)。上图方框中的数字代表了索引键的值,对聚簇索引而言一般就是主键。
我们再看看 B+ 树如何实现快速查找主键。比如,我们要搜索 PK=4 的数据,通过根节点中的索引可以知道数据在第一个记录指向的 2 号页中,通过 2 号页的索引又可以知道数据在 5 号页,5 号页就是实际的数据页,然后再通过二分法查找页目录马上可以找到记录的指针。
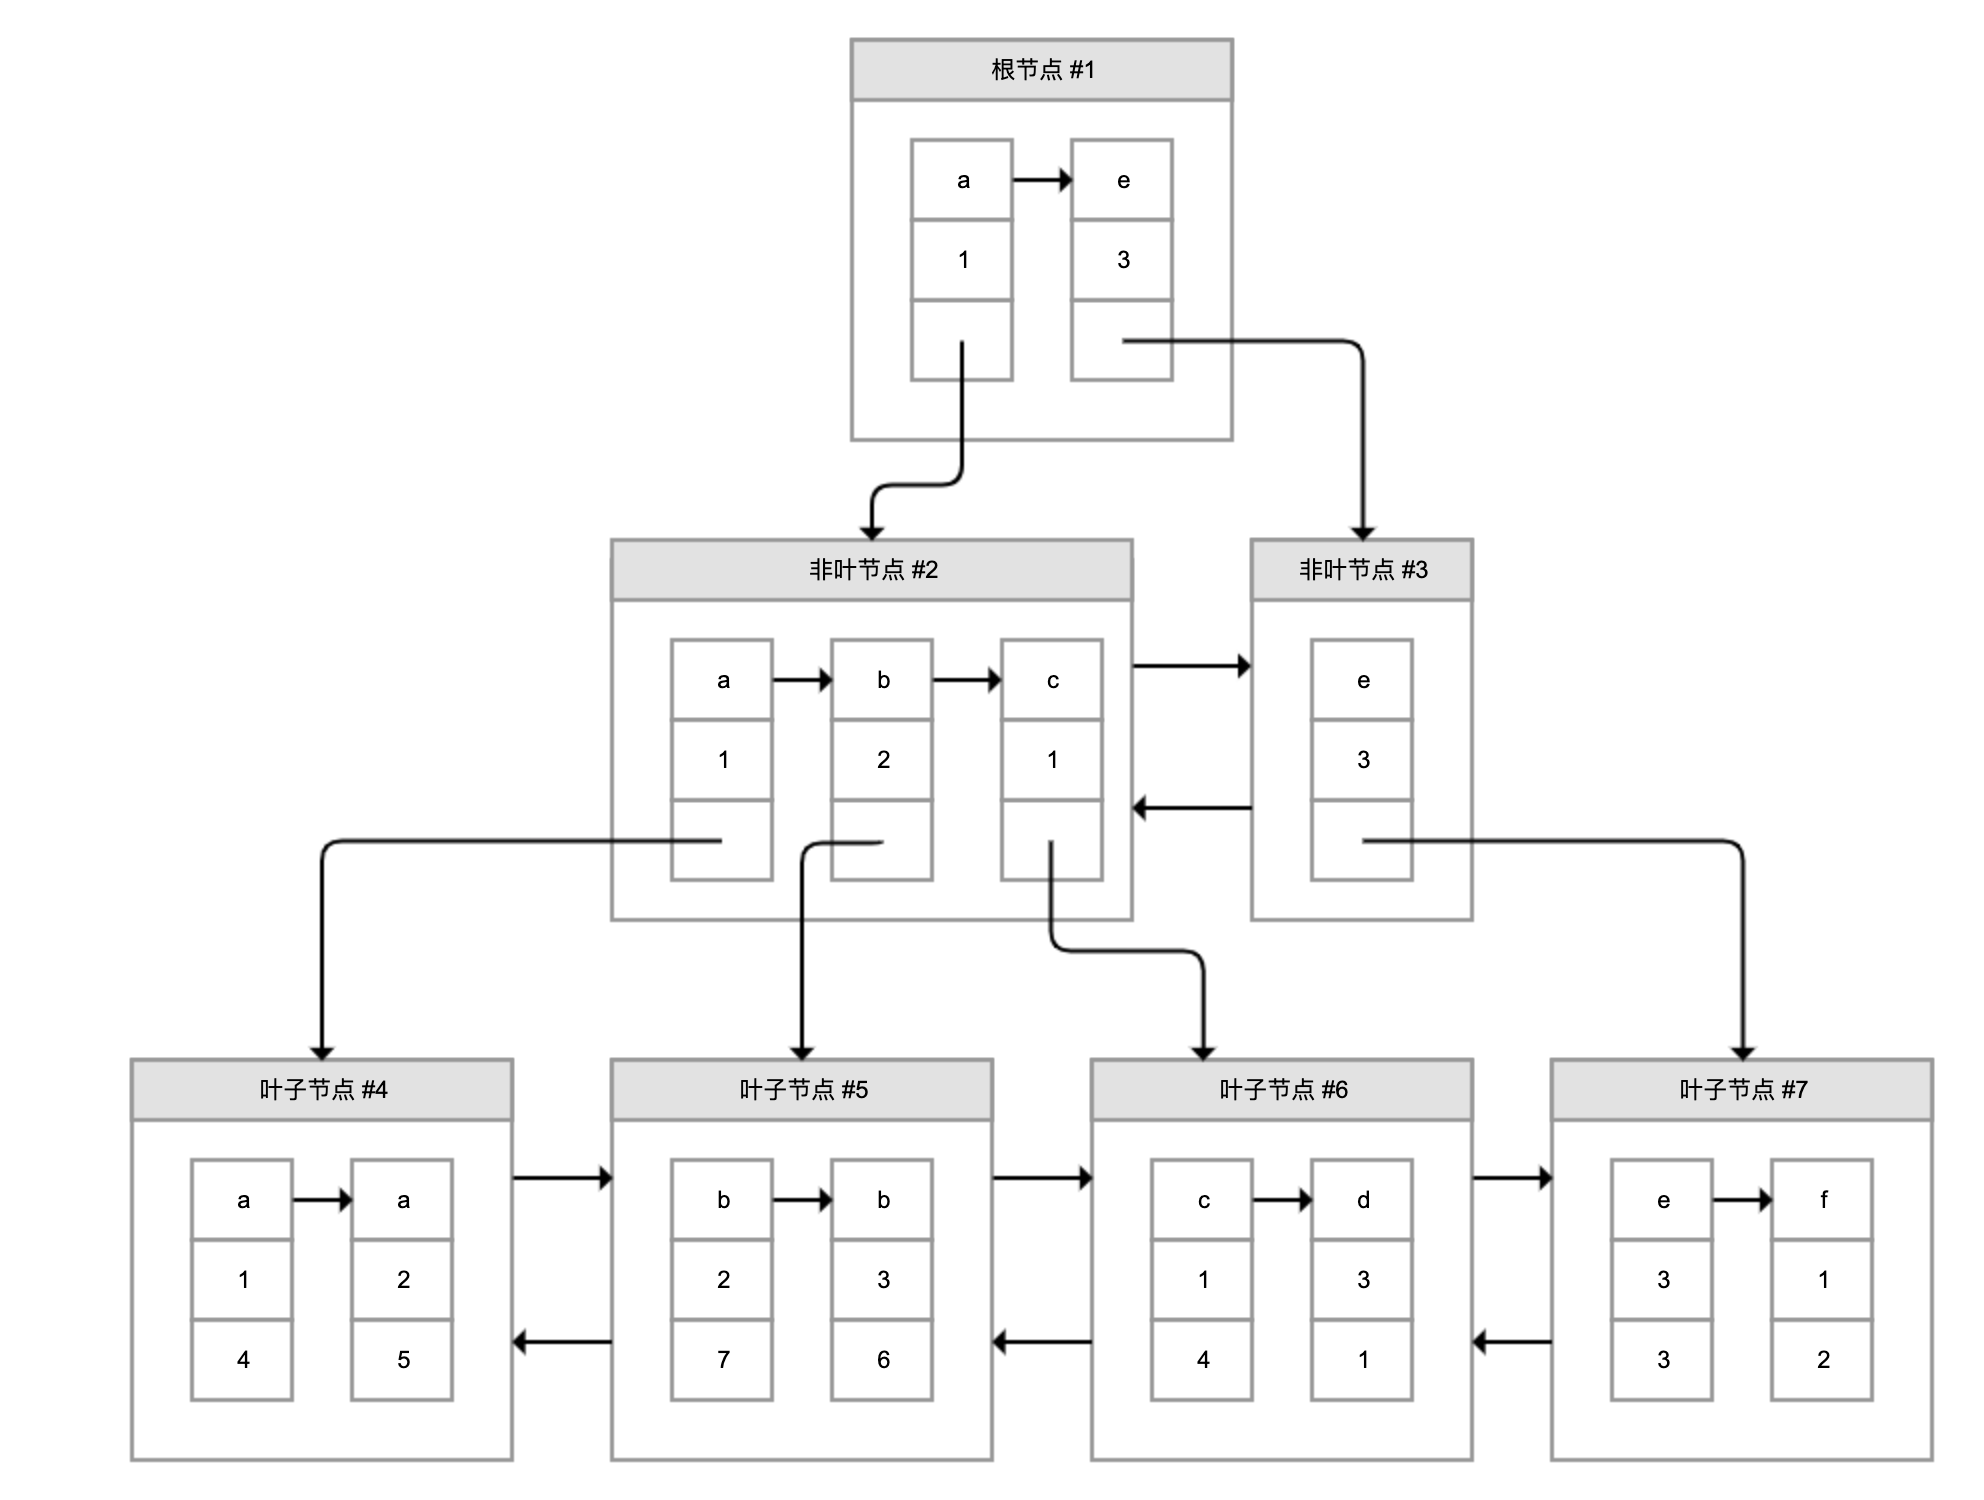
为了实现非主键字段的快速搜索,就引出了二级索引,也叫作非聚簇索引、辅助索引。二级索引,也是利用的 B+ 树的数据结构,如下图所示:
这次二级索引的叶子节点中保存的不是实际数据,而是主键,获得主键值后去聚簇索引中获得数据行。这个过程就叫作回表。
举个例子,有个索引是针对用户名字段创建的,索引记录上面方块中的字母是用户名,按照顺序形成链表。如果我们要搜索用户名为 b 的数据,经过两次定位可以得出在 #5 数据页中,查出所有的主键为 7 和 6,再拿着这两个主键继续使用聚簇索引进行两次回表得到完整数据。
# 考虑额外创建二级索引的代价
创建二级索引的代价,主要表现在维护代价、空间代价和回表代价三个方面。接下来仔细分析下吧。
首先是维护代价。创建 N 个二级索引,就需要再创建 N 棵 B+ 树,新增数据时不仅要修改聚簇索引,还需要修改这 N 个二级索引。
我们通过实验测试一下创建索引的代价。假设有一个 person 表,有主键 ID,以及 name、score、create_time 三个字段:
CREATE TABLE `person` (
  `id` bigint(20) NOT NULL AUTO_INCREMENT,
  `name` varchar(255) NOT NULL,
  `score` int(11) NOT NULL,
  `create_time` timestamp NOT NULL,
  PRIMARY KEY (`id`)
) ENGINE=InnoDB DEFAULT CHARSET=utf8mb4;
2
3
4
5
6
7
通过下面的存储过程循环创建 10 万条测试数据,我的机器的耗时是 140 秒(本文的例子均在 MySQL 5.7.26 中执行):
CREATE DEFINER=`root`@`%` PROCEDURE `insert_person`()
begin
    declare c_id integer default 1;
    while c_id<=100000 do
    insert into person values(c_id, concat('name',c_id), c_id+100, date_sub(NOW(), interval c_id second));
    set c_id=c_id+1;
    end while;
end
2
3
4
5
6
7
8
如果再创建两个索引,一个是 name 和 score 构成的联合索引,另一个是单一列 create_time 的索引,那么创建 10 万条记录的耗时提高到 154 秒:
KEY `name_score` (`name`,`score`) USING BTREE,
KEY `create_time` (`create_time`) USING BTREE
2
这里再额外提一下,页中的记录都是按照索引值从小到大的顺序存放的,新增记录就需要往页中插入数据,现有的页满了就需要新创建一个页,把现有页的部分数据移过去,这就是页分裂;如果删除了许多数据使得页比较空闲,还需要进行页合并。页分裂和合并,都会有 IO 代价,并且可能在操作过程中产生死锁。
可以查看这个文档 (opens new window),以进一步了解如何设置合理的合并阈值,来平衡页的空闲率和因为再次页分裂产生的代价。
其次是空间代价。虽然二级索引不保存原始数据,但要保存索引列的数据,所以会占用更多的空间。比如,person 表创建了两个索引后,使用下面的 SQL 查看数据和索引占用的磁盘:
SELECT DATA_LENGTH, INDEX_LENGTH FROM information_schema.TABLES WHERE TABLE_NAME='person'
结果显示,数据本身只占用了 4.7M,而索引占用了 8.4M。
最后是回表的代价。二级索引不保存原始数据,通过索引找到主键后需要再查询聚簇索引,才能得到我们要的数据。比如,使用 SELECT * 按照 name 字段查询用户,使用 EXPLAIN 查看执行计划:
EXPLAIN SELECT * FROM person WHERE NAME='name1'
执行计划如下,可以发现:

- key 字段代表实际走的是哪个索引,其值是 name_score,说明走的是 name_score 这个索引。
- type 字段代表了访问表的方式,其值 ref 说明是二级索引等值匹配,符合我们的查询。
把 SQL 中的 * 修改为 NAME 和 SCORE,也就是 SELECT name_score 联合索引包含的两列:
EXPLAIN SELECT NAME,SCORE FROM person WHERE NAME='name1'
再来看看执行计划:

可以看到,Extra 列多了一行 Using index 的提示,证明这次查询直接查的是二级索引,免去了回表。
原因很简单,联合索引中其实保存了多个索引列的值,对于页中的记录先按照字段 1 排序,如果相同再按照字段 2 排序,如图所示:
图中,叶子节点每一条记录的第一和第二个方块是索引列的数据,第三个方块是记录的主键。如果我们需要查询的是索引列索引或联合索引能覆盖的数据,那么查询索引本身已经“覆盖”了需要的数据,不再需要回表查询。因此,这种情况也叫作索引覆盖。
总结下关于索引开销的最佳实践:
- 无需一开始就建立索引,可以等到业务场景明确后,或者是数据量超过 1 万、查询变慢后,再针对需要查询、排序或分组的字段创建索引。创建索引后可以使用 EXPLAIN 命令,确认查询是否可以使用索引。
- 尽量索引轻量级的字段,比如能索引 int 字段就不要索引 varchar 字段。索引字段也可以是部分前缀,在创建的时候指定字段索引长度。针对长文本的搜索,可以考虑使用 Elasticsearch 等专门用于文本搜索的索引数据库。
- 尽量不要在 SQL 语句中 SELECT *,而是 SELECT 必要的字段,甚至可以考虑使用联合索引来包含我们要搜索的字段,既能实现索引加速,又可以避免回表的开销。
# 不是所有针对索引列的查询都能用上索引
在上一个案例中创建了一个 name+score 的联合索引,仅搜索 name 时就能够用上这个联合索引。这就引出两个问题:
- 是不是建了索引一定可以用上?
- 怎么选择创建联合索引还是多个独立索引?
首先,我们通过几个案例来分析一下索引失效的情况。
第一,索引只能匹配列前缀。比如下面的 LIKE 语句,搜索 name 后缀为 name123 的用户无法走索引,执行计划的 type=ALL 代表了全表扫描:
EXPLAIN SELECT * FROM person WHERE NAME LIKE '%name123' LIMIT 100

把百分号放到后面走前缀匹配,type=range 表示走索引扫描,key=name_score 看到实际走了 name_score 索引:
EXPLAIN SELECT * FROM person WHERE NAME LIKE 'name123%' LIMIT 100

原因很简单,索引 B+ 树中行数据按照索引值排序,只能根据前缀进行比较。如果要按照后缀搜索也希望走索引的话,并且永远只是按照后缀搜索的话,可以把数据反过来存,用的时候再倒过来。
第二,条件涉及函数操作无法走索引。比如搜索条件用到了 LENGTH 函数,肯定无法走索引:
EXPLAIN SELECT * FROM person WHERE LENGTH(NAME)=7

同样的原因,索引保存的是索引列的原始值,而不是经过函数计算后的值。如果需要针对函数调用走数据库索引的话,只能保存一份函数变换后的值,然后重新针对这个计算列做索引。
第三,联合索引只能匹配左边的列。也就是说,虽然对 name 和 score 建了联合索引,但是仅按照 score 列搜索无法走索引:
EXPLAIN SELECT * FROM person WHERE SCORE>45678

原因也很简单,在联合索引的情况下,数据是按照索引第一列排序,第一列数据相同时才会按照第二列排序。也就是说,如果我们想使用联合索引中尽可能多的列,查询条件中的各个列必须是联合索引中从最左边开始连续的列。如果我们仅仅按照第二列搜索,肯定无法走索引。尝试把搜索条件加入 name 列,可以看到走了 name_score 索引:
EXPLAIN SELECT * FROM person WHERE SCORE>45678 AND NAME LIKE 'NAME45%'

需要注意的是,因为有查询优化器,所以 name 作为 WHERE 子句的第几个条件并不是很重要。
现在回到最开始的两个问题。
- 是不是建了索引一定可以用上?并不是,只有当查询能符合索引存储的实际结构时,才能用上。这里只给出了三个肯定用不上索引的反例。其实有的时候即使可以走索引,MySQL 也不一定会选择使用索引。
- 怎么选择建联合索引还是多个独立索引?如果你的搜索条件经常会使用多个字段进行搜索,那么可以考虑针对这几个字段建联合索引;同时,针对多字段建立联合索引,使用索引覆盖的可能更大。如果只会查询单个字段,可以考虑建单独的索引,毕竟联合索引保存了不必要字段也有成本。
# 数据库基于成本决定是否走索引
通过前面的案例,我们可以看到,查询数据可以直接在聚簇索引上进行全表扫描,也可以走二级索引扫描后到聚簇索引回表。看到这里,你不禁要问了,MySQL 到底是怎么确定走哪种方案的呢。
其实,MySQL 在查询数据之前,会先对可能的方案做执行计划,然后依据成本决定走哪个执行计划。
这里的成本,包括 IO 成本和 CPU 成本:
- IO 成本,是从磁盘把数据加载到内存的成本。默认情况下,读取数据页的 IO 成本常数是 1(也就是读取 1 个页成本是 1)。
- CPU 成本,是检测数据是否满足条件和排序等 CPU 操作的成本。默认情况下,检测记录的成本是 0.2。
基于此,我们分析下全表扫描的成本。
全表扫描,就是把聚簇索引中的记录依次和给定的搜索条件做比较,把符合搜索条件的记录加入结果集的过程。那么,要计算全表扫描的代价需要两个信息:
- 聚簇索引占用的页面数,用来计算读取数据的 IO 成本;
- 表中的记录数,用来计算搜索的 CPU 成本。
那么 MySQL 是实时统计这些信息的吗?其实并不是,MySQL 维护了表的统计信息,可以使用下面的命令查看:
SHOW TABLE STATUS LIKE 'person'
输出如下:
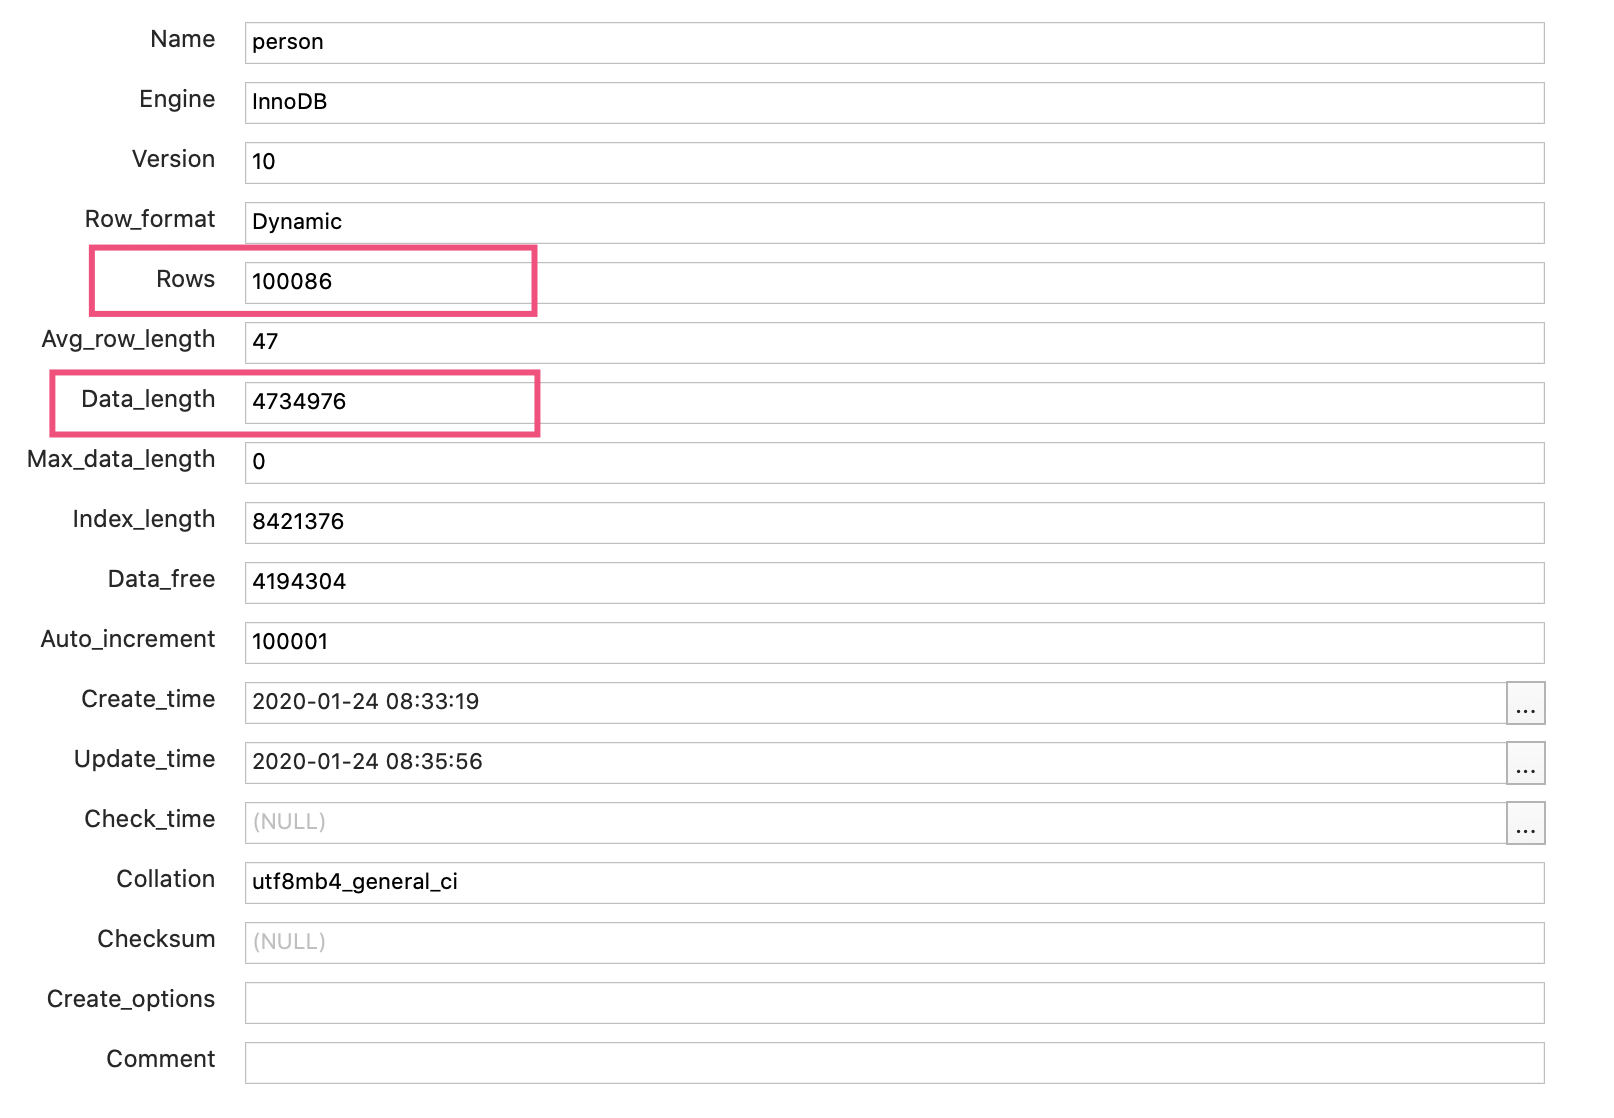
可以看到:
- 总行数是 100086 行(之前 EXPLAIN 时,也看到 rows 为 100086)。你可能说,person 表不是有 10 万行记录吗,为什么这里多了 86 行?其实,MySQL 的统计信息是一个估算,其统计方式比较复杂就不再展开了。但不妨碍我们根据这个值估算 CPU 成本,是 100086*0.2=20017 左右。
- 数据长度是 4734976 字节。对于 InnoDB 来说,这就是聚簇索引占用的空间,等于聚簇索引的页面数量 * 每个页面的大小。InnoDB 每个页面的大小是 16KB,大概计算出页面数量是 289,因此 IO 成本是 289 左右。
所以,全表扫描的总成本是 20306 左右。
接下来还是用 person 表这个例子,和你分析下 MySQL 如何基于成本来制定执行计划。现在要用下面的 SQL 查询 name>‘name84059’ AND create_time>‘2020-01-24 05:00:00’
EXPLAIN SELECT * FROM person WHERE NAME >'name84059' AND create_time>'2020-01-24 05:00:00'
其执行计划是全表扫描:

只要把 create_time 条件中的 5 点改为 6 点就变为走索引,并且走的是 create_time 索引而不是 name_score 联合索引:

我们可以得到两个结论:
- MySQL 选择索引,并不是按照 WHERE 条件中列的顺序进行的;
- 即便列有索引,甚至有多个可能的索引方案,MySQL 也可能不走索引。
其原因就是,MySQL 并不是猜拳决定是否走索引的,而是根据成本来判断的。虽然表的统计信息不完全准确,但足够用于策略的判断了。
不过,有时会因为统计信息的不准确或成本估算的问题,实际开销会和 MySQL 统计出来的差距较大,导致 MySQL 选择错误的索引或是直接选择走全表扫描,这个时候就需要人工干预,使用强制索引了。比如,像这样强制走 name_score 索引:
EXPLAIN SELECT * FROM person FORCE INDEX(name_score) WHERE NAME >'name84059' AND create_time>'2020-01-24 05:00:00'
我们介绍了 MySQL 会根据成本选择执行计划,也通过 EXPLAIN 知道了优化器最终会选择怎样的执行计划,但 MySQL 如何制定执行计划始终是一个黑盒。那么,有没有什么办法可以了解各种执行计划的成本,以及 MySQL 做出选择的依据呢?
在 MySQL 5.6 及之后的版本中,我们可以使用 optimizer trace 功能查看优化器生成执行计划的整个过程。有了这个功能,我们不仅可以了解优化器的选择过程,更可以了解每一个执行环节的成本,然后依靠这些信息进一步优化查询。
如下代码所示,打开 optimizer_trace 后,再执行 SQL 就可以查询 information_schema.OPTIMIZER_TRACE 表查看执行计划了,最后可以关闭 optimizer_trace 功能:
SET optimizer_trace="enabled=on";
SELECT * FROM person WHERE NAME >'name84059' AND create_time>'2020-01-24 05:00:00';
SELECT * FROM information_schema.OPTIMIZER_TRACE;
SET optimizer_trace="enabled=off";
2
3
4
对于按照 create_time>'2020-01-24 05:00:00’条件走全表扫描的 SQL,从 OPTIMIZER_TRACE 的执行结果中,摘出了几个重要片段来重点分析:
使用 name_score 对 name84059 < name 条件进行索引扫描需要扫描 25362 行,成本是 30435,因此最终没有选择这个方案。这里的 30435 是查询二级索引的 IO 成本和 CPU 成本之和,再加上回表查询聚簇索引的 IO 成本和 CPU 成本之和,就不再具体分析了:
{
  "index": "name_score",
  "ranges": [
    "name84059 < name"
  ],
  "rows": 25362,
  "cost": 30435,
  "chosen": false,
  "cause": "cost"
},
1
2
3
4
5
6
7
8
9
10使用 create_time 进行索引扫描需要扫描 23758 行,成本是 28511,同样因为成本原因没有选择这个方案:
{
  "index": "create_time",
  "ranges": [
    "0x5e2a79d0 < create_time"
  ],
  "rows": 23758,
  "cost": 28511,
  "chosen": false,
  "cause": "cost"
}
1
2
3
4
5
6
7
8
9
10最终选择了全表扫描方式作为执行计划。可以看到,全表扫描 100086 条记录的成本是 20306,和我们之前计算的一致,显然是小于其他两个方案的 28511 和 30435:
{
  "considered_execution_plans": [{
    "table": "`person`",
    "best_access_path": {
      "considered_access_paths": [{
        "rows_to_scan": 100086,
        "access_type": "scan",
        "resulting_rows": 100086,
        "cost": 20306,
        "chosen": true
      }]
    },
    "rows_for_plan": 100086,
    "cost_for_plan": 20306,
    "chosen": true
  }]
},
1
2
3
4
5
6
7
8
9
10
11
12
13
14
15
16
17
把 SQL 中的 create_time 条件从 05:00 改为 06:00,再次分析 OPTIMIZER_TRACE 可以看到,这次执行计划选择的是走 create_time 索引。因为是查询更晚时间的数据,走 create_time 索引需要扫描的行数从 23758 减少到了 16588。这次走这个索引的成本 19907 小于全表扫描的 20306,更小于走 name_score 索引的 30435:
{
  "index": "create_time",
  "ranges": [
    "0x5e2a87e0 < create_time"
  ],
  "rows": 16588,
  "cost": 19907,
  "chosen": true
}
2
3
4
5
6
7
8
9
# Spring 声明式事务
Spring 针对 Java Transaction API (JTA)、JDBC、Hibernate 和 Java Persistence API (JPA) 等事务 API,实现了一致的编程模型,而 Spring 的声明式事务功能更是提供了极其方便的事务配置方式,配合 Spring Boot 的自动配置,大多数 Spring Boot 项目只需要在方法上标记 @Transactional 注解,即可一键开启方法的事务性配置。
而大多数业务开发同学都有事务的概念,也知道如果整体考虑多个数据库操作要么成功要么失败时,需要通过数据库事务来实现多个操作的一致性和原子性。但在使用上大多仅限于为方法标记 @Transactional,不会去关注事务是否有效、出错后事务是否正确回滚,也不会考虑复杂的业务代码中涉及多个子业务逻辑时,怎么正确处理事务。
事务没有被正确处理,一般来说不会过于影响正常流程,也不容易在测试阶段被发现。但当系统越来越复杂、压力越来越大之后,就会带来大量的数据不一致问题,随后就是大量的人工介入查看和修复数据。
所以说,一个成熟的业务系统和一个基本可用能完成功能的业务系统,在事务处理细节上的差异非常大。要确保事务的配置符合业务功能的需求,往往不仅仅是技术问题,还涉及产品流程和架构设计的问题。
# 小心 Spring 的事务可能没有生效
在使用 @Transactional 注解开启声明式事务时, 第一个最容易忽略的问题是,很可能事务并没有生效。
实现下面的 Demo 需要一些基础类,首先定义一个具有 ID 和姓名属性的 UserEntity,也就是一个包含两个字段的用户表:
@Entity
@Data
public class UserEntity {
    @Id
    @GeneratedValue(strategy = AUTO)
    private Long id;
    private String name;

    public UserEntity() { }

    public UserEntity(String name) {
        this.name = name;
    }
}
2
3
4
5
6
7
8
9
10
11
12
13
14
为了方便理解,使用 Spring JPA 做数据库访问,实现这样一个 Repository,新增一个根据用户名查询所有数据的方法:
@Repository
public interface UserRepository extends JpaRepository<UserEntity, Long> {
    List<UserEntity> findByName(String name);
}
2
3
4
定义一个 UserService 类,负责业务逻辑处理。如果不清楚 @Transactional 的实现方式,只考虑代码逻辑的话,这段代码看起来没有问题。
定义一个入口方法 createUserWrong1 来调用另一个私有方法 createUserPrivate,私有方法上标记了 @Transactional 注解。当传入的用户名包含 test 关键字时判断为用户名不合法,抛出异常,让用户创建操作失败,期望事务可以回滚:
@Service
@Slf4j
public class UserService {
    @Autowired
    private UserRepository userRepository;

    //一个公共方法供Controller调用,内部调用事务性的私有方法
    public int createUserWrong1(String name) {
        try {
            this.createUserPrivate(new UserEntity(name));
        } catch (Exception ex) {
            log.error("create user failed because {}", ex.getMessage());
        }
        return userRepository.findByName(name).size();
    }

    //标记了@Transactional的private方法
    @Transactional
    private void createUserPrivate(UserEntity entity) {
        userRepository.save(entity);
        if (entity.getName().contains("test"))
            throw new RuntimeException("invalid username!");
    }

    //根据用户名查询用户数
    public int getUserCount(String name) {
        return userRepository.findByName(name).size();
    }
}
2
3
4
5
6
7
8
9
10
11
12
13
14
15
16
17
18
19
20
21
22
23
24
25
26
27
28
29
下面是 Controller 的实现,只是调用一下刚才定义的 UserService 中的入口方法 createUserWrong1。
@Autowired
private UserService userService;

@GetMapping("wrong1")
public int wrong1(@RequestParam("name") String name) {
    return userService.createUserWrong1(name);
}
2
3
4
5
6
7
调用接口后发现,即便用户名不合法,用户也能创建成功。刷新浏览器,多次发现有十几个的非法用户注册。
这里给出 @Transactional 生效原则 1,除非特殊配置(比如使用 AspectJ 静态织入实现 AOP),否则只有定义在 public 方法上的 @Transactional 才能生效。原因是,Spring 默认通过动态代理的方式实现 AOP,对目标方法进行增强,private 方法无法代理到,Spring 自然也无法动态增强事务处理逻辑。
你可能会说,修复方式很简单,把标记了事务注解的 createUserPrivate 方法改为 public 即可。在 UserService 中再建一个入口方法 createUserWrong2,来调用这个 public 方法再次尝试:
public int createUserWrong2(String name) {
    try {
        this.createUserPublic(new UserEntity(name));
    } catch (Exception ex) {
        log.error("create user failed because {}", ex.getMessage());
    }
  return userRepository.findByName(name).size();
}

//标记了@Transactional的public方法
@Transactional
public void createUserPublic(UserEntity entity) {
    userRepository.save(entity);
    if (entity.getName().contains("test"))
        throw new RuntimeException("invalid username!");
}
2
3
4
5
6
7
8
9
10
11
12
13
14
15
16
测试发现,调用新的 createUserWrong2 方法事务同样不生效。这里给出 @Transactional 生效原则 2,必须通过代理过的类从外部调用目标方法才能生效。
Spring 通过 AOP 技术对方法进行增强,要调用增强过的方法必然是调用代理后的对象。我们尝试修改下 UserService 的代码,注入一个 self,然后再通过 self 实例调用标记有 @Transactional 注解的 createUserPublic 方法。设置断点可以看到,self 是由 Spring 通过 CGLIB 方式增强过的类:
CGLIB 通过继承方式实现代理类,private 方法在子类不可见,自然也就无法进行事务增强;
this 指针代表对象自己,Spring 不可能注入 this,所以通过 this 访问方法必然不是代理。
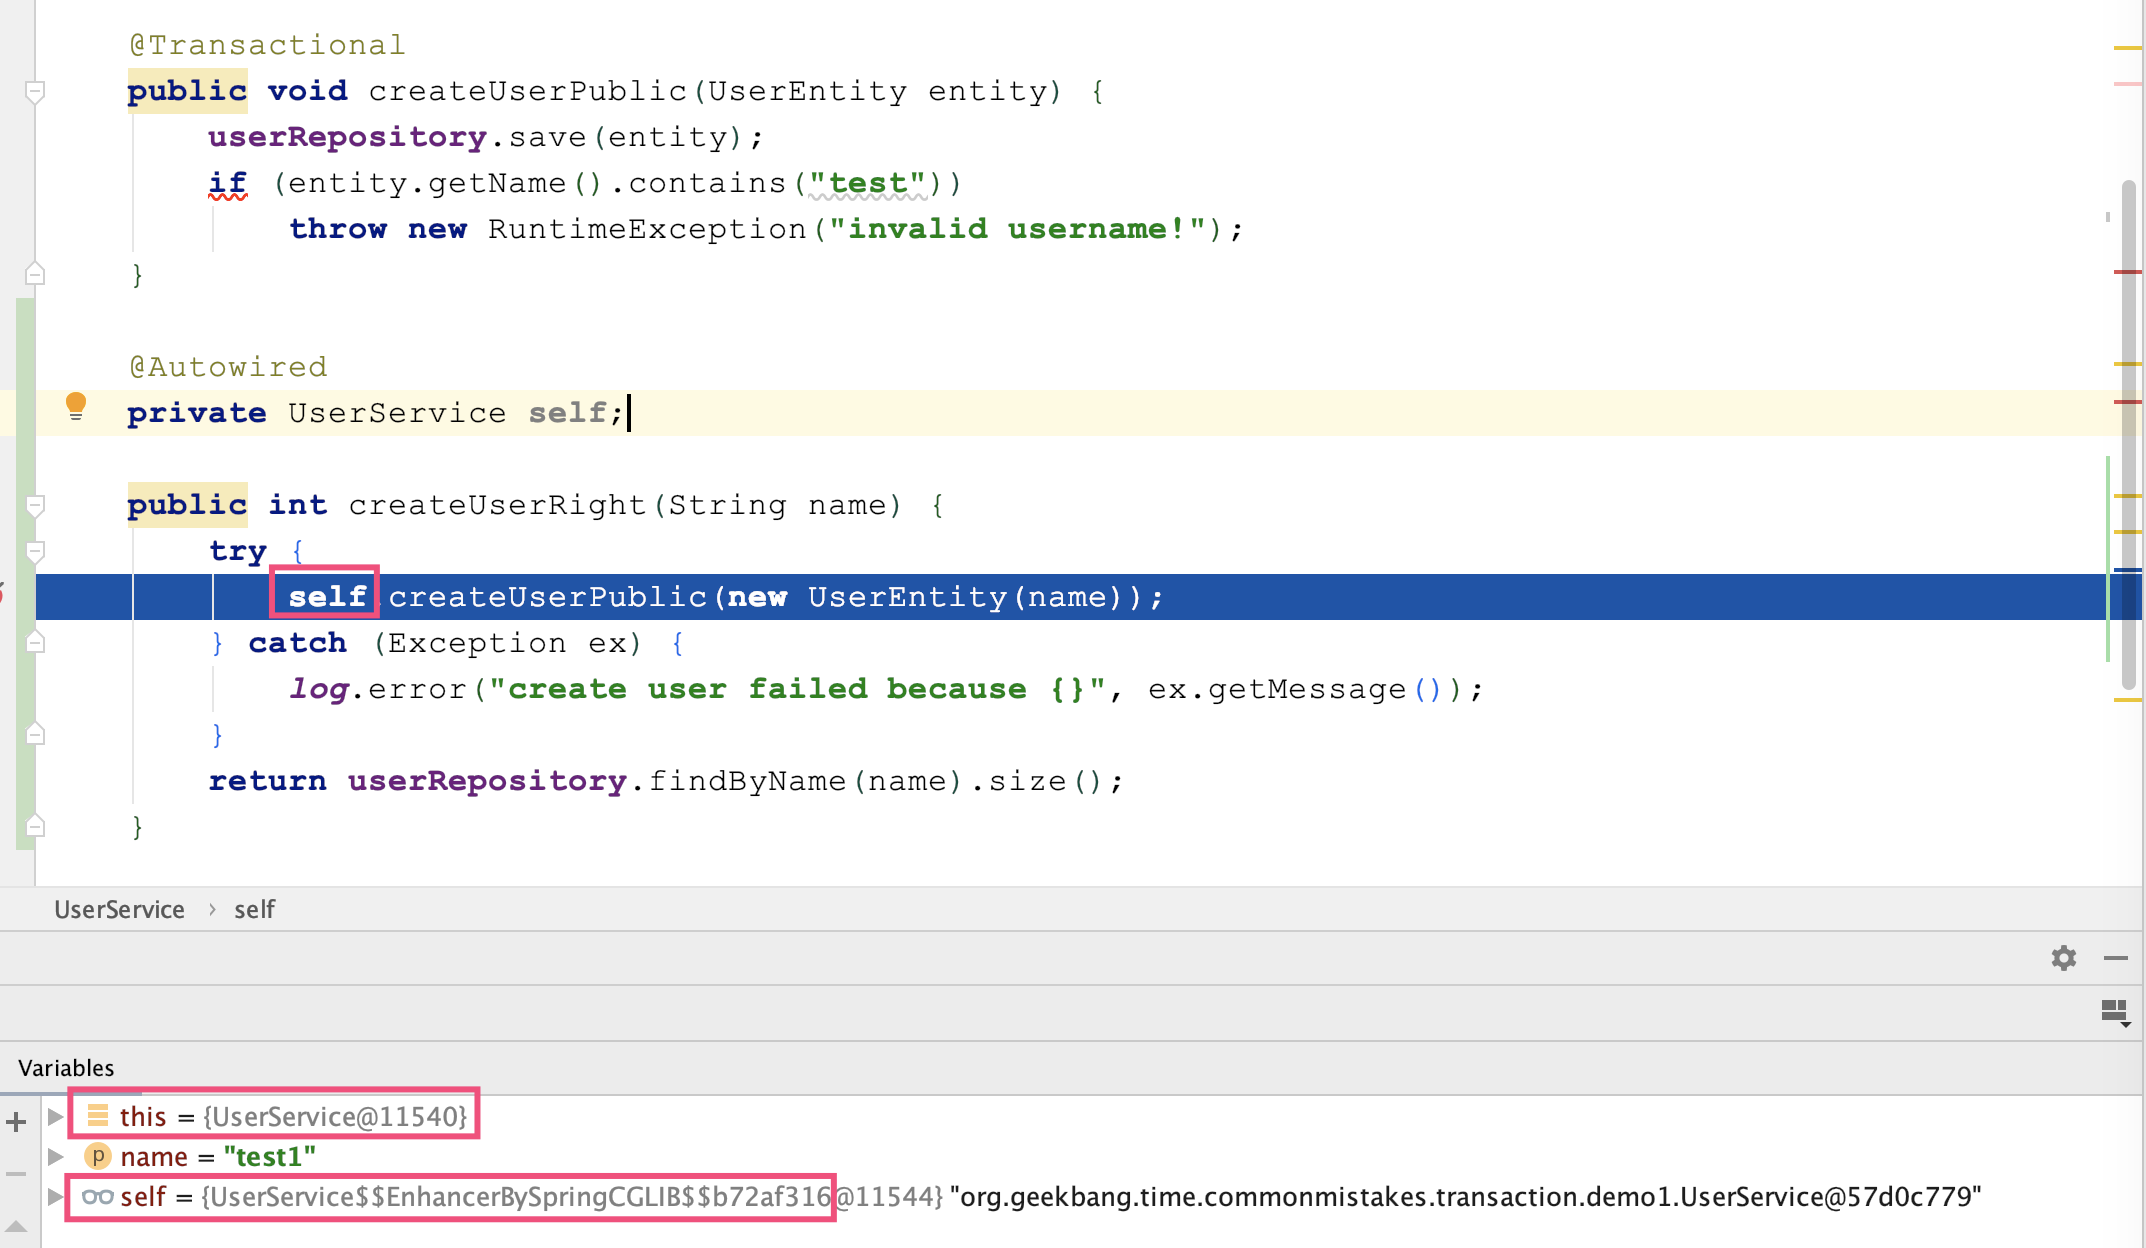
把 this 改为 self 后测试发现,在 Controller 中调用 createUserRight 方法可以验证事务是生效的,非法的用户注册操作可以回滚。
虽然在 UserService 内部注入自己调用自己的 createUserPublic 可以正确实现事务,但更合理的实现方式是,让 Controller 直接调用之前定义的 UserService 的 createUserPublic 方法,因为注入自己调用自己很奇怪,也不符合分层实现的规范:
@GetMapping("right2")
public int right2(@RequestParam("name") String name) {
    try {
        userService.createUserPublic(new UserEntity(name));
    } catch (Exception ex) {
        log.error("create user failed because {}", ex.getMessage());
    }
    return userService.getUserCount(name);
}
2
3
4
5
6
7
8
9
我们再通过一张图来回顾下 this 自调用、通过 self 调用,以及在 Controller 中调用 UserService 三种实现的区别:
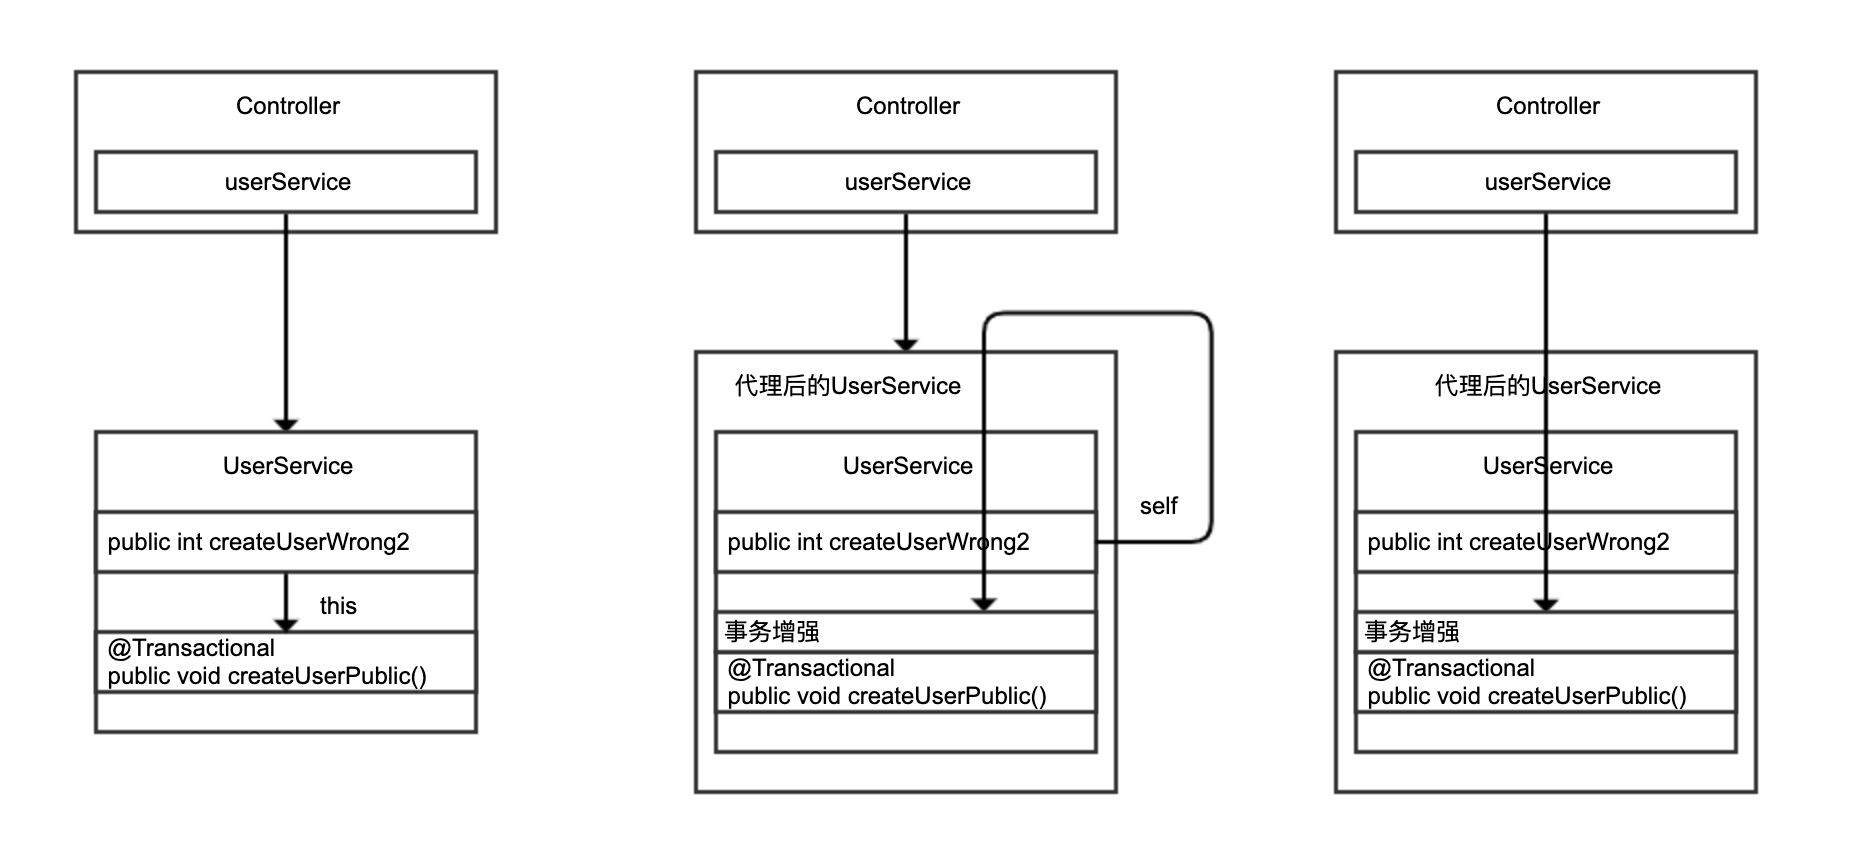
通过 this 自调用,没有机会走到 Spring 的代理类;后两种改进方案调用的是 Spring 注入的 UserService,通过代理调用才有机会对 createUserPublic 方法进行动态增强。
这里还有一个小技巧,强烈建议你在开发时打开相关的 Debug 日志,以方便了解 Spring 事务实现的细节,并及时判断事务的执行情况。
我们的 Demo 代码使用 JPA 进行数据库访问,可以这么开启 Debug 日志:
logging.level.org.springframework.orm.jpa=DEBUG
开启日志后,我们再比较下在 UserService 中通过 this 调用和在 Controller 中通过注入的 UserService Bean 调用 createUserPublic 区别。很明显,this 调用因为没有走代理,事务没有在 createUserPublic 方法上生效,只在 Repository 的 save 方法层面生效:
//在UserService中通过this调用public的createUserPublic
[10:10:19.913] [http-nio-45678-exec-1] [DEBUG] [o.s.orm.jpa.JpaTransactionManager       :370 ] - Creating new transaction with name [org.springframework.data.jpa.repository.support.SimpleJpaRepository.save]: PROPAGATION_REQUIRED,ISOLATION_DEFAULT
//在Controller中通过注入的UserService Bean调用createUserPublic
[10:10:47.750] [http-nio-45678-exec-6] [DEBUG] [o.s.orm.jpa.JpaTransactionManager       :370 ] - Creating new transaction with name [org.geekbang.time.commonmistakes.transaction.demo1.UserService.createUserPublic]: PROPAGATION_REQUIRED,ISOLATION_DEFAULT
2
3
4
你可能还会考虑一个问题,这种实现在 Controller 里处理了异常显得有点繁琐,还不如直接把 createUserWrong2 方法加上 @Transactional 注解,然后在 Controller 中直接调用这个方法。这样一来,既能从外部(Controller 中)调用 UserService 中的方法,方法又是 public 的能够被动态代理 AOP 增强。
你可以试一下这种方法,但很容易就会踩第二个坑,即因为没有正确处理异常,导致事务即便生效也不一定能回滚。
# 事务即便生效也不一定能回滚
通过 AOP 实现事务处理可以理解为,使用 try…catch…来包裹标记了 @Transactional 注解的方法,当方法出现了异常并且满足一定条件的时候,在 catch 里面我们可以设置事务回滚,没有异常则直接提交事务。
这里的“一定条件”,主要包括两点。
第一,只有异常传播出了标记了 @Transactional 注解的方法,事务才能回滚。在 Spring 的 TransactionAspectSupport 里有个 invokeWithinTransaction 方法,里面就是处理事务的逻辑。可以看到,只有捕获到异常才能进行后续事务处理:
try {
   // This is an around advice: Invoke the next interceptor in the chain.
   // This will normally result in a target object being invoked.
   retVal = invocation.proceedWithInvocation();
}
catch (Throwable ex) {
   // target invocation exception
   completeTransactionAfterThrowing(txInfo, ex);
   throw ex;
}
finally {
   cleanupTransactionInfo(txInfo);
}
2
3
4
5
6
7
8
9
10
11
12
13
第二,默认情况下,出现 RuntimeException(非受检异常)或 Error 的时候,Spring 才会回滚事务。
打开 Spring 的 DefaultTransactionAttribute 类能看到如下代码块,可以发现相关证据,通过注释也能看到 Spring 这么做的原因,大概的意思是受检异常一般是业务异常,或者说是类似另一种方法的返回值,出现这样的异常可能业务还能完成,所以不会主动回滚;而 Error 或 RuntimeException 代表了非预期的结果,应该回滚:
/**
 * The default behavior is as with EJB: rollback on unchecked exception
 * ({@link RuntimeException}), assuming an unexpected outcome outside of any
 * business rules. Additionally, we also attempt to rollback on {@link Error} which
 * is clearly an unexpected outcome as well. By contrast, a checked exception is
 * considered a business exception and therefore a regular expected outcome of the
 * transactional business method, i.e. a kind of alternative return value which
 * still allows for regular completion of resource operations.
 * <p>This is largely consistent with TransactionTemplate's default behavior,
 * except that TransactionTemplate also rolls back on undeclared checked exceptions
 * (a corner case). For declarative transactions, we expect checked exceptions to be
 * intentionally declared as business exceptions, leading to a commit by default.
 * @see org.springframework.transaction.support.TransactionTemplate#execute
 */
@Override
public boolean rollbackOn(Throwable ex) {
   return (ex instanceof RuntimeException || ex instanceof Error);
}
2
3
4
5
6
7
8
9
10
11
12
13
14
15
16
17
18
接下来和你分享 2 个反例。重新实现一下 UserService 中的注册用户操作:
- 在 createUserWrong1 方法中会抛出一个 RuntimeException,但由于方法内 catch 了所有异常,异常无法从方法传播出去,事务自然无法回滚。
- 在 createUserWrong2 方法中,注册用户的同时会有一次 otherTask 文件读取操作,如果文件读取失败,我们希望用户注册的数据库操作回滚。虽然这里没有捕获异常,但因为 otherTask 方法抛出的是受检异常,createUserWrong2 传播出去的也是受检异常,事务同样不会回滚。
@Service
@Slf4j
public class UserService {
    @Autowired
    private UserRepository userRepository;

    //异常无法传播出方法,导致事务无法回滚
    @Transactional
    public void createUserWrong1(String name) {
        try {
            userRepository.save(new UserEntity(name));
            throw new RuntimeException("error");
        } catch (Exception ex) {
            log.error("create user failed", ex);
        }
    }

    //即使出了受检异常也无法让事务回滚
    @Transactional
    public void createUserWrong2(String name) throws IOException {
        userRepository.save(new UserEntity(name));
        otherTask();
    }

    //因为文件不存在,一定会抛出一个IOException
    private void otherTask() throws IOException {
        Files.readAllLines(Paths.get("file-that-not-exist"));
    }
}
2
3
4
5
6
7
8
9
10
11
12
13
14
15
16
17
18
19
20
21
22
23
24
25
26
27
28
29
Controller 中的实现,仅仅是调用 UserService 的 createUserWrong1 和 createUserWrong2 方法,这里就贴出实现了。这 2 个方法的实现和调用,虽然完全避开了事务不生效的坑,但因为异常处理不当,导致程序没有如我们期望的文件操作出现异常时回滚事务。
现在,我们来看下修复方式,以及如何通过日志来验证是否修复成功。针对这 2 种情况,对应的修复方法如下。
第一,如果你希望自己捕获异常进行处理的话,也没关系,可以手动设置让当前事务处于回滚状态:
@Transactional
public void createUserRight1(String name) {
    try {
        userRepository.save(new UserEntity(name));
        throw new RuntimeException("error");
    } catch (Exception ex) {
        log.error("create user failed", ex);
        TransactionAspectSupport.currentTransactionStatus().setRollbackOnly();
    }
}
2
3
4
5
6
7
8
9
10
运行后可以在日志中看到 Rolling back 字样,确认事务回滚了。同时,我们还注意到“Transactional code has requested rollback”的提示,表明手动请求回滚:
[22:14:49.352] [http-nio-45678-exec-4] [DEBUG] [o.s.orm.jpa.JpaTransactionManager       :698 ] - Transactional code has requested rollback
[22:14:49.353] [http-nio-45678-exec-4] [DEBUG] [o.s.orm.jpa.JpaTransactionManager       :834 ] - Initiating transaction rollback
[22:14:49.353] [http-nio-45678-exec-4] [DEBUG] [o.s.orm.jpa.JpaTransactionManager       :555 ] - Rolling back JPA transaction on EntityManager [SessionImpl(1906719643<open>)]
2
3
第二,在注解中声明,期望遇到所有的 Exception 都回滚事务(来突破默认不回滚受检异常的限制):
@Transactional(rollbackFor = Exception.class)
public void createUserRight2(String name) throws IOException {
    userRepository.save(new UserEntity(name));
    otherTask();
}
2
3
4
5
运行后,同样可以在日志中看到回滚的提示:
[22:10:47.980] [http-nio-45678-exec-4] [DEBUG] [o.s.orm.jpa.JpaTransactionManager       :834 ] - Initiating transaction rollback
[22:10:47.981] [http-nio-45678-exec-4] [DEBUG] [o.s.orm.jpa.JpaTransactionManager       :555 ] - Rolling back JPA transaction on EntityManager [SessionImpl(1419329213<open>)]
2
在这个例子中,我们展现的是一个复杂的业务逻辑,其中有数据库操作、IO 操作,在 IO 操作出现问题时希望让数据库事务也回滚,以确保逻辑的一致性。在有些业务逻辑中,可能会包含多次数据库操作,我们不一定希望将两次操作作为一个事务来处理,这时候就需要仔细考虑事务传播的配置了,否则也可能踩坑。
# 请确认事务传播配置是否符合自己的业务逻辑
有这么一个场景:一个用户注册的操作,会插入一个主用户到用户表,还会注册一个关联的子用户。我们希望将子用户注册的数据库操作作为一个独立事务来处理,即使失败也不会影响主流程,即不影响主用户的注册。
接下来,我们模拟一个实现类似业务逻辑的 UserService:
@Autowired
private UserRepository userRepository;

@Autowired
private SubUserService subUserService;

@Transactional
public void createUserWrong(UserEntity entity) {
    createMainUser(entity);
    subUserService.createSubUserWithExceptionWrong(entity);
}

private void createMainUser(UserEntity entity) {
    userRepository.save(entity);
    log.info("createMainUser finish");
}
2
3
4
5
6
7
8
9
10
11
12
13
14
15
16
SubUserService 的 createSubUserWithExceptionWrong 实现正如其名,因为最后我们抛出了一个运行时异常,错误原因是用户状态无效,所以子用户的注册肯定是失败的。我们期望子用户的注册作为一个事务单独回滚,不影响主用户的注册,这样的逻辑可以实现吗?
@Service
@Slf4j
public class SubUserService {

    @Autowired
    private UserRepository userRepository;

    @Transactional
    public void createSubUserWithExceptionWrong(UserEntity entity) {
        log.info("createSubUserWithExceptionWrong start");
        userRepository.save(entity);
        throw new RuntimeException("invalid status");
    }
}
2
3
4
5
6
7
8
9
10
11
12
13
14
我们在 Controller 里实现一段测试代码,调用 UserService:
@GetMapping("wrong")
public int wrong(@RequestParam("name") String name) {
    try {
        userService.createUserWrong(new UserEntity(name));
    } catch (Exception ex) {
        log.error("createUserWrong failed, reason:{}", ex.getMessage());
    }
    return userService.getUserCount(name);
}
2
3
4
5
6
7
8
9
调用后可以在日志中发现如下信息,很明显事务回滚了,最后 Controller 打出了创建子用户抛出的运行时异常:
[22:50:42.866] [http-nio-45678-exec-8] [DEBUG] [o.s.orm.jpa.JpaTransactionManager       :555 ] - Rolling back JPA transaction on EntityManager [SessionImpl(103972212<open>)]
[22:50:42.869] [http-nio-45678-exec-8] [DEBUG] [o.s.orm.jpa.JpaTransactionManager       :620 ] - Closing JPA EntityManager [SessionImpl(103972212<open>)] after transaction
[22:50:42.869] [http-nio-45678-exec-8] [ERROR] [t.d.TransactionPropagationController:23  ] - createUserWrong failed, reason:invalid status
2
3
你马上就会意识到,不对呀,因为运行时异常逃出了 @Transactional 注解标记的 createUserWrong 方法,Spring 当然会回滚事务了。如果我们希望主方法不回滚,应该把子方法抛出的异常捕获了。
@Transactional
public void createUserWrong2(UserEntity entity) {
    createMainUser(entity);
    try{
        subUserService.createSubUserWithExceptionWrong(entity);
    } catch (Exception ex) {
        // 虽然捕获了异常,但是因为没有开启新事务,而当前事务因为异常已经被标记为rollback了,所以最终还是会回滚。
        log.error("create sub user error:{}", ex.getMessage());
    }
}
2
3
4
5
6
7
8
9
10
运行程序后可以看到如下日志:
[22:57:21.722] [http-nio-45678-exec-3] [DEBUG] [o.s.orm.jpa.JpaTransactionManager       :370 ] - Creating new transaction with name [org.geekbang.time.commonmistakes.transaction.demo3.UserService.createUserWrong2]: PROPAGATION_REQUIRED,ISOLATION_DEFAULT
[22:57:21.739] [http-nio-45678-exec-3] [INFO ] [t.c.transaction.demo3.SubUserService:19  ] - createSubUserWithExceptionWrong start
[22:57:21.739] [http-nio-45678-exec-3] [DEBUG] [o.s.orm.jpa.JpaTransactionManager       :356 ] - Found thread-bound EntityManager [SessionImpl(1794007607<open>)] for JPA transaction
[22:57:21.739] [http-nio-45678-exec-3] [DEBUG] [o.s.orm.jpa.JpaTransactionManager       :471 ] - Participating in existing transaction
[22:57:21.740] [http-nio-45678-exec-3] [DEBUG] [o.s.orm.jpa.JpaTransactionManager       :843 ] - Participating transaction failed - marking existing transaction as rollback-only
[22:57:21.740] [http-nio-45678-exec-3] [DEBUG] [o.s.orm.jpa.JpaTransactionManager       :580 ] - Setting JPA transaction on EntityManager [SessionImpl(1794007607<open>)] rollback-only
[22:57:21.740] [http-nio-45678-exec-3] [ERROR] [.g.t.c.transaction.demo3.UserService:37  ] - create sub user error:invalid status
[22:57:21.740] [http-nio-45678-exec-3] [DEBUG] [o.s.orm.jpa.JpaTransactionManager       :741 ] - Initiating transaction commit
[22:57:21.740] [http-nio-45678-exec-3] [DEBUG] [o.s.orm.jpa.JpaTransactionManager       :529 ] - Committing JPA transaction on EntityManager [SessionImpl(1794007607<open>)]
[22:57:21.743] [http-nio-45678-exec-3] [DEBUG] [o.s.orm.jpa.JpaTransactionManager       :620 ] - Closing JPA EntityManager [SessionImpl(1794007607<open>)] after transaction
[22:57:21.743] [http-nio-45678-exec-3] [ERROR] [t.d.TransactionPropagationController:33  ] - createUserWrong2 failed, reason:Transaction silently rolled back because it has been marked as rollback-only
org.springframework.transaction.UnexpectedRollbackException: Transaction silently rolled back because it has been marked as rollback-only
...
2
3
4
5
6
7
8
9
10
11
12
13
需要注意以下几点:
- 如第 1 行所示,对 createUserWrong2 方法开启了异常处理;
- 如第 5 行所示,子方法因为出现了运行时异常,标记当前事务为回滚;
- 如第 7 行所示,主方法的确捕获了异常打印出了 create sub user error 字样;
- 如第 9 行所示,主方法提交了事务;
- 奇怪的是,如第 11 行和 12 行所示,Controller 里出现了一个 UnexpectedRollbackException,异常描述提示最终这个事务回滚了,而且是静默回滚的。之所以说是静默,是因为 createUserWrong2 方法本身并没有出异常,只不过提交后发现子方法已经把当前事务设置为了回滚,无法完成提交。
这挺反直觉的。我们之前说,出了异常事务不一定回滚,这里说的却是不出异常,事务也不一定可以提交。原因是,主方法注册主用户的逻辑和子方法注册子用户的逻辑是同一个事务,子逻辑标记了事务需要回滚,主逻辑自然也不能提交了。
看到这里,修复方式就很明确了,想办法让子逻辑在独立事务中运行,也就是改一下 SubUserService 注册子用户的方法,为注解加上 propagation = Propagation.REQUIRES_NEW 来设置 REQUIRES_NEW 方式的事务传播策略,也就是执行到这个方法时需要开启新的事务,并挂起当前事务:
@Transactional(propagation = Propagation.REQUIRES_NEW)
public void createSubUserWithExceptionRight(UserEntity entity) {
    log.info("createSubUserWithExceptionRight start");
    userRepository.save(entity);
    throw new RuntimeException("invalid status");
}
2
3
4
5
6
主方法没什么变化,同样需要捕获异常,防止异常漏出去导致主事务回滚,重新命名为 createUserRight:
@Transactional
public void createUserRight(UserEntity entity) {
    createMainUser(entity);
    try{
        subUserService.createSubUserWithExceptionRight(entity);
    } catch (Exception ex) {
        // 捕获异常,防止主方法回滚
        log.error("create sub user error:{}", ex.getMessage());
    }
}
2
3
4
5
6
7
8
9
10
改造后,重新运行程序可以看到如下的关键日志:
- 第 1 行日志提示我们针对 createUserRight 方法开启了主方法的事务;
- 第 2 行日志提示创建主用户完成;
- 第 3 行日志可以看到主事务挂起了,开启了一个新的事务,针对 createSubUserWithExceptionRight 方案,也就是我们的创建子用户的逻辑;
- 第 4 行日志提示子方法事务回滚;
- 第 5 行日志提示子方法事务完成,继续主方法之前挂起的事务;
- 第 6 行日志提示主方法捕获到了子方法的异常;
- 第 8 行日志提示主方法的事务提交了,随后我们在 Controller 里没看到静默回滚的异常。
[23:17:20.935] [http-nio-45678-exec-1] [DEBUG] [o.s.orm.jpa.JpaTransactionManager       :370 ] - Creating new transaction with name [org.geekbang.time.commonmistakes.transaction.demo3.UserService.createUserRight]: PROPAGATION_REQUIRED,ISOLATION_DEFAULT
[23:17:21.079] [http-nio-45678-exec-1] [INFO ] [.g.t.c.transaction.demo3.UserService:55  ] - createMainUser finish
[23:17:21.082] [http-nio-45678-exec-1] [DEBUG] [o.s.orm.jpa.JpaTransactionManager       :420 ] - Suspending current transaction, creating new transaction with name [org.geekbang.time.commonmistakes.transaction.demo3.SubUserService.createSubUserWithExceptionRight]
[23:17:21.153] [http-nio-45678-exec-1] [DEBUG] [o.s.orm.jpa.JpaTransactionManager       :834 ] - Initiating transaction rollback
[23:17:21.160] [http-nio-45678-exec-1] [DEBUG] [o.s.orm.jpa.JpaTransactionManager       :1009] - Resuming suspended transaction after completion of inner transaction
[23:17:21.161] [http-nio-45678-exec-1] [ERROR] [.g.t.c.transaction.demo3.UserService:49  ] - create sub user error:invalid status
[23:17:21.161] [http-nio-45678-exec-1] [DEBUG] [o.s.orm.jpa.JpaTransactionManager       :741 ] - Initiating transaction commit
[23:17:21.161] [http-nio-45678-exec-1] [DEBUG] [o.s.orm.jpa.JpaTransactionManager       :529 ] - Committing JPA transaction on EntityManager [SessionImpl(396441411<open>)]
2
3
4
5
6
7
8
运行测试程序看到如下结果,getUserCount 得到的用户数量为 1,代表只有一个用户也就是主用户注册完成了,符合预期。
# Spring 框架:IoC 和 AOP
熟悉 Java 的同学都知道,Spring 的家族庞大,常用的模块就有 Spring Data、Spring Security、Spring Boot、Spring Cloud 等。其实呢,Spring 体系虽然庞大,但都是围绕 Spring Core 展开的,而 Spring Core 中最核心的就是 IoC(控制反转)和 AOP(面向切面编程)。
概括地说,IoC 和 AOP 的初衷是解耦和扩展。理解这两个核心技术,就可以让你的代码变得更灵活、可随时替换,以及业务组件间更解耦。
IoC 其实就是一种设计思想。使用 Spring 来实现 IoC,意味着将你设计好的对象交给 Spring 容器控制,而不是直接在对象内部控制。那为什么要让容器来管理对象呢?或许你能想到的是,使用 IoC 方便、可以实现解耦。相比于这两个原因,更重要的是 IoC 带来了更多的可能性。
如果以容器为依托来管理所有的框架、业务对象,我们不仅可以无侵入地调整对象的关系,还可以无侵入地随时调整对象的属性,甚至是实现对象的替换。这就使得框架开发者在程序背后实现一些扩展不再是问题,带来的可能性是无限的。比如我们要监控的对象如果是 Bean,实现就会非常简单。所以,这套容器体系,不仅被 Spring Core 和 Spring Boot 大量依赖,还实现了一些外部框架和 Spring 的无缝整合。
AOP,体现了松耦合、高内聚的精髓,在切面集中实现横切关注点(缓存、权限、日志等),然后通过切点配置把代码注入合适的地方。切面、切点、增强、连接点,是 AOP 中非常重要的概念。
为方便理解,我们把 Spring AOP 技术看作为蛋糕做奶油夹层的工序。如果我们希望找到一个合适的地方把奶油注入蛋糕胚子中,那应该如何指导工人完成操作呢?
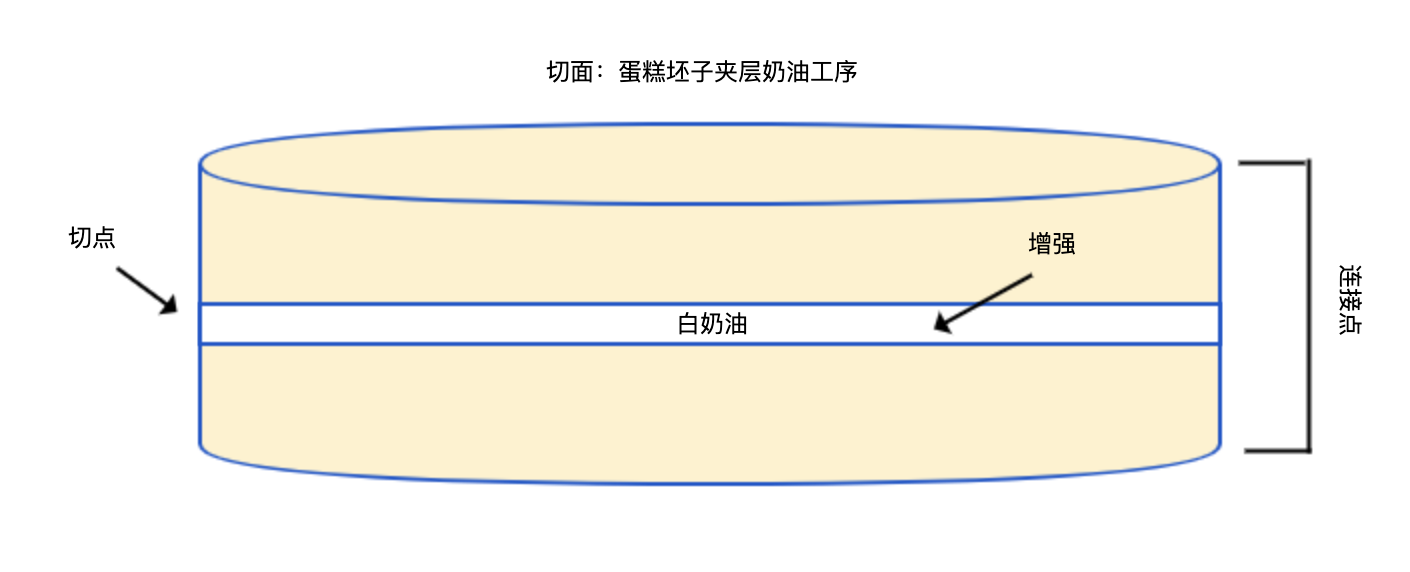
- 首先,我们要提醒他,只能往蛋糕胚子里面加奶油,而不能上面或下面加奶油。这就是连接点(Join point),对于 Spring AOP 来说,连接点就是方法执行。
- 然后,我们要告诉他,在什么点切开蛋糕加奶油。比如,可以在蛋糕坯子中间加入一层奶油,在中间切一次;也可以在中间加两层奶油,在 1/3 和 2/3 的地方切两次。这就是切点(Pointcut),Spring AOP 中默认使用 AspectJ 查询表达式,通过在连接点运行查询表达式来匹配切入点。
- 接下来也是最重要的,我们要告诉他,切开蛋糕后要做什么,也就是加入奶油。这就是增强(Advice),也叫作通知,定义了切入切点后增强的方式,包括前、后、环绕等。Spring AOP 中,把增强定义为拦截器。
- 最后,我们要告诉他,找到蛋糕胚子中要加奶油的地方并加入奶油。为蛋糕做奶油夹层的操作,对 Spring AOP 来说就是切面(Aspect),也叫作方面。切面 = 切点 + 增强。
Spring 相关问题的问题比较复杂,一方面是 Spring 提供的 IoC 和 AOP 本就灵活,另一方面 Spring Boot 的自动装配、Spring Cloud 复杂的模块会让问题排查变得更复杂。
# 单例的 Bean 如何注入 Prototype 的 Bean?
我们虽然知道 Spring 创建的 Bean 默认是单例的,但当 Bean 遇到继承的时候,可能会忽略这一点。为什么呢?忽略这一点又会造成什么影响呢?接下来就分享一个由单例引起内存泄露的案例。
架构师一开始定义了这么一个 SayService 抽象类,其中维护了一个类型是 ArrayList 的字段 data,用于保存方法处理的中间数据。每次调用 say 方法都会往 data 加入新数据,可以认为 SayService 是有状态,如果 SayService 是单例的话必然会 OOM:
@Slf4j
public abstract class SayService {
    List<String> data = new ArrayList<>();

    public void say() {
        data.add(IntStream.rangeClosed(1, 1000000)
                .mapToObj(__ -> "a")
                .collect(Collectors.joining("")) + UUID.randomUUID().toString());
        log.info("I'm {} size:{}", this, data.size());
    }
}
2
3
4
5
6
7
8
9
10
11
但实际开发的时候,开发同学没有过多思考就把 SayHello 和 SayBye 类加上了 @Service 注解,让它们成为了 Bean,也没有考虑到父类是有状态的:
@Service
@Slf4j
public class SayHello extends SayService {
    @Override
    public void say() {
        super.say();
        log.info("hello");
    }
}

@Service
@Slf4j
public class SayBye extends SayService {
    @Override
    public void say() {
        super.say();
        log.info("bye");
    }
}
2
3
4
5
6
7
8
9
10
11
12
13
14
15
16
17
18
19
许多开发同学认为,@Service 注解的意义在于,能通过 @Autowired 注解让 Spring 自动注入对象,就比如可以直接使用注入的 List 获取到 SayHello 和 SayBye,而没想过类的生命周期:
@Autowired
List<SayService> sayServiceList;

@GetMapping("test")
public void test() {
    log.info("====================");
    sayServiceList.forEach(SayService::say);
}
2
3
4
5
6
7
8
这一个点非常容易忽略。开发基类的架构师将基类设计为有状态的,但并不知道子类是怎么使用基类的;而开发子类的同学,没多想就直接标记了 @Service,让类成为了 Bean,通过 @Autowired 注解来注入这个服务。但这样设置后,有状态的基类就可能产生内存泄露或线程安全问题。
正确的方式是,在为类标记上 @Service 注解把类型交由容器管理前,首先评估一下类是否有状态,然后为 Bean 设置合适的 Scope。好在上线前,架构师发现了这个内存泄露问题,开发同学也做了修改,为 SayHello 和 SayBye 两个类都标记了 @Scope 注解,设置了 PROTOTYPE 的生命周期,也就是多例:
@Scope(value = ConfigurableBeanFactory.SCOPE_PROTOTYPE)
但,上线后还是出现了内存泄漏,证明修改是无效的。
从日志可以看到,第一次调用和第二次调用的时候,SayBye 对象都是 4c0bfe9e,SayHello 也是一样的问题。从日志第 7 到 10 行还可以看到,第二次调用后 List 的元素个数变为了 2,说明父类 SayService 维护的 List 在不断增长,不断调用必然出现 OOM:
[15:01:09.349] [http-nio-45678-exec-1] [INFO ] [.s.d.BeanSingletonAndOrderController:22  ] - ====================
[15:01:09.401] [http-nio-45678-exec-1] [INFO ] [o.g.t.c.spring.demo1.SayService         :19  ] - I'm org.geekbang.time.commonmistakes.spring.demo1.SayBye@4c0bfe9e size:1
[15:01:09.402] [http-nio-45678-exec-1] [INFO ] [t.commonmistakes.spring.demo1.SayBye:16  ] - bye
[15:01:09.469] [http-nio-45678-exec-1] [INFO ] [o.g.t.c.spring.demo1.SayService         :19  ] - I'm org.geekbang.time.commonmistakes.spring.demo1.SayHello@490fbeaa size:1
[15:01:09.469] [http-nio-45678-exec-1] [INFO ] [o.g.t.c.spring.demo1.SayHello           :17  ] - hello
[15:01:15.167] [http-nio-45678-exec-2] [INFO ] [.s.d.BeanSingletonAndOrderController:22  ] - ====================
[15:01:15.197] [http-nio-45678-exec-2] [INFO ] [o.g.t.c.spring.demo1.SayService         :19  ] - I'm org.geekbang.time.commonmistakes.spring.demo1.SayBye@4c0bfe9e size:2
[15:01:15.198] [http-nio-45678-exec-2] [INFO ] [t.commonmistakes.spring.demo1.SayBye:16  ] - bye
[15:01:15.224] [http-nio-45678-exec-2] [INFO ] [o.g.t.c.spring.demo1.SayService         :19  ] - I'm org.geekbang.time.commonmistakes.spring.demo1.SayHello@490fbeaa size:2
[15:01:15.224] [http-nio-45678-exec-2] [INFO ] [o.g.t.c.spring.demo1.SayHello           :17  ] - hello
2
3
4
5
6
7
8
9
10
这就引出了单例的 Bean 如何注入 Prototype 的 Bean 这个问题。Controller 标记了 @RestController 注解,而 @RestController 注解 = @Controller 注解 + @ResponseBody 注解,又因为 @Controller 标记了 @Component 元注解,所以 @RestController 注解其实也是一个 Spring Bean:
//@RestController注解=@Controller注解+@ResponseBody注解@Target(ElementType.TYPE)
@Retention(RetentionPolicy.RUNTIME)
@Documented
@Controller
@ResponseBody
public @interface RestController {}

//@Controller又标记了@Component元注解
@Target({ElementType.TYPE})
@Retention(RetentionPolicy.RUNTIME)
@Documented
@Component
public @interface Controller {}
2
3
4
5
6
7
8
9
10
11
12
13
Bean 默认是单例的,所以单例的 Controller 注入的 Service 也是一次性创建的,即使 Service 本身标识了 prototype 的范围也没用。
修复方式是,让 Service 以代理方式注入。这样虽然 Controller 本身是单例的,但每次都能从代理获取 Service。这样一来,prototype 范围的配置才能真正生效:
@Scope(value = ConfigurableBeanFactory.SCOPE_PROTOTYPE, proxyMode = ScopedProxyMode.TARGET_CLASS)
通过日志可以确认这种修复方式有效:
[15:08:42.649] [http-nio-45678-exec-1] [INFO ] [.s.d.BeanSingletonAndOrderController:22  ] - ====================
[15:08:42.747] [http-nio-45678-exec-1] [INFO ] [o.g.t.c.spring.demo1.SayService         :19  ] - I'm org.geekbang.time.commonmistakes.spring.demo1.SayBye@3fa64743 size:1
[15:08:42.747] [http-nio-45678-exec-1] [INFO ] [t.commonmistakes.spring.demo1.SayBye:17  ] - bye
[15:08:42.871] [http-nio-45678-exec-1] [INFO ] [o.g.t.c.spring.demo1.SayService         :19  ] - I'm org.geekbang.time.commonmistakes.spring.demo1.SayHello@2f0b779 size:1
[15:08:42.872] [http-nio-45678-exec-1] [INFO ] [o.g.t.c.spring.demo1.SayHello           :17  ] - hello
[15:08:42.932] [http-nio-45678-exec-2] [INFO ] [.s.d.BeanSingletonAndOrderController:22  ] - ====================
[15:08:42.991] [http-nio-45678-exec-2] [INFO ] [o.g.t.c.spring.demo1.SayService         :19  ] - I'm org.geekbang.time.commonmistakes.spring.demo1.SayBye@7319b18e size:1
[15:08:42.992] [http-nio-45678-exec-2] [INFO ] [t.commonmistakes.spring.demo1.SayBye:17  ] - bye
[15:08:43.046] [http-nio-45678-exec-2] [INFO ] [o.g.t.c.spring.demo1.SayService         :19  ] - I'm org.geekbang.time.commonmistakes.spring.demo1.SayHello@77262b35 size:1
[15:08:43.046] [http-nio-45678-exec-2] [INFO ] [o.g.t.c.spring.demo1.SayHello           :17  ] - hello
2
3
4
5
6
7
8
9
10
调试一下也可以发现,注入的 Service 都是 Spring 生成的代理类:

当然,如果不希望走代理的话还有一种方式是,每次直接从 ApplicationContext 中获取 Bean:
@Autowired
private ApplicationContext applicationContext;
@GetMapping("test2")
public void test2() {
applicationContext.getBeansOfType(SayService.class).values().forEach(SayService::say);
}
2
3
4
5
6
如果细心的话,你可以发现另一个潜在的问题。这里 Spring 注入的 SayService 的 List,第一个元素是 SayBye,第二个元素是 SayHello。但我们更希望的是先执行 Hello 再执行 Bye,所以注入一个 List Bean 时,需要进一步考虑 Bean 的顺序或者说优先级。
# 监控切面因为顺序问题导致 Spring 事务失效
实现横切关注点,是 AOP 非常常见的一个应用。一个不错的 AOP 实践:通过 AOP 实现了一个整合日志记录、异常处理和方法耗时打点为一体的统一切面。但后来发现,使用了 AOP 切面后,这个应用的声明式事务处理居然都是无效的。
现在我们来看下这个案例,分析下 AOP 实现的监控组件和事务失效有什么关系,以及通过 AOP 实现监控组件是否还有其他坑。
首先定义一个自定义注解 Metrics,打上了该注解的方法可以实现各种监控功能:
@Retention(RetentionPolicy.RUNTIME)
@Target({ElementType.METHOD, ElementType.TYPE})
public @interface Metrics {
    /**
     * 在方法成功执行后打点,记录方法的执行时间发送到指标系统,默认开启
     *
     * @return
     */
    boolean recordSuccessMetrics() default true;

    /**
     * 在方法成功失败后打点,记录方法的执行时间发送到指标系统,默认开启
     *
     * @return
     */
    boolean recordFailMetrics() default true;

    /**
     * 通过日志记录请求参数,默认开启
     *
     * @return
     */
    boolean logParameters() default true;

    /**
     * 通过日志记录方法返回值,默认开启
     *
     * @return
     */
    boolean logReturn() default true;

    /**
     * 出现异常后通过日志记录异常信息,默认开启
     *
     * @return
     */
    boolean logException() default true;

    /**
     * 出现异常后忽略异常返回默认值,默认关闭
     *
     * @return
     */
    boolean ignoreException() default false;
}
2
3
4
5
6
7
8
9
10
11
12
13
14
15
16
17
18
19
20
21
22
23
24
25
26
27
28
29
30
31
32
33
34
35
36
37
38
39
40
41
42
43
44
45
然后,实现一个切面完成 Metrics 注解提供的功能。这个切面可以实现标记了 @RestController 注解的 Web 控制器的自动切入,如果还需要对更多 Bean 进行切入的话,再自行标记 @Metrics 注解。
@Aspect
@Component
@Slf4j
public class MetricsAspect {
    //让Spring帮我们注入ObjectMapper,以方便通过JSON序列化来记录方法入参和出参

    @Autowired
    private ObjectMapper objectMapper;

    //实现一个返回Java基本类型默认值的工具。其实,你也可以逐一写很多if-else判断类型,然后手动设置其默认值。这里为了减少代码量用了一个小技巧,即通过初始化一个具有1个元素的数组,然后通过获取这个数组的值来获取基本类型默认值
    private static final Map<Class<?>, Object> DEFAULT_VALUES = Stream
            .of(boolean.class, byte.class, char.class, double.class, float.class, int.class, long.class, short.class)
            .collect(toMap(clazz -> (Class<?>) clazz, clazz -> Array.get(Array.newInstance(clazz, 1), 0)));
    public static <T> T getDefaultValue(Class<T> clazz) {
        return (T) DEFAULT_VALUES.get(clazz);
    }

    //@annotation指示器实现对标记了Metrics注解的方法进行匹配
   @Pointcut("within(@org.geekbang.time.commonmistakes.springpart1.aopmetrics.Metrics *)")
    public void withMetricsAnnotation() {
    }

    //within指示器实现了匹配那些类型上标记了@RestController注解的方法
    @Pointcut("within(@org.springframework.web.bind.annotation.RestController *)")
    public void controllerBean() {
    }

    @Around("controllerBean() || withMetricsAnnotation())")
    public Object metrics(ProceedingJoinPoint pjp) throws Throwable {
        //通过连接点获取方法签名和方法上Metrics注解,并根据方法签名生成日志中要输出的方法定义描述
        MethodSignature signature = (MethodSignature) pjp.getSignature();
        Metrics metrics = signature.getMethod().getAnnotation(Metrics.class);

        String name = String.format("【%s】【%s】", signature.getDeclaringType().toString(), signature.toLongString());
        //因为需要默认对所有@RestController标记的Web控制器实现@Metrics注解的功能,在这种情况下方法上必然是没有@Metrics注解的,我们需要获取一个默认注解。虽然可以手动实例化一个@Metrics注解的实例出来,但为了节省代码行数,我们通过在一个内部类上定义@Metrics注解方式,然后通过反射获取注解的小技巧,来获得一个默认的@Metrics注解的实例
        if (metrics == null) {
            @Metrics
            final class c {}
            metrics = c.class.getAnnotation(Metrics.class);
        }
        //尝试从请求上下文(如果有的话)获得请求URL,以方便定位问题
        RequestAttributes requestAttributes = RequestContextHolder.getRequestAttributes();
        if (requestAttributes != null) {
            HttpServletRequest request = ((ServletRequestAttributes) requestAttributes).getRequest();
            if (request != null)
                name += String.format("【%s】", request.getRequestURL().toString());
        }
        //实现的是入参的日志输出
        if (metrics.logParameters())
            log.info(String.format("【入参日志】调用 %s 的参数是:【%s】", name, objectMapper.writeValueAsString(pjp.getArgs())));
        //实现连接点方法的执行,以及成功失败的打点,出现异常的时候还会记录日志
        Object returnValue;
        Instant start = Instant.now();
        try {
            returnValue = pjp.proceed();
            if (metrics.recordSuccessMetrics())
                //在生产级代码中,我们应考虑使用类似Micrometer的指标框架,把打点信息记录到时间序列数据库中,实现通过图表来查看方法的调用次数和执行时间,在设计篇我们会重点介绍
                log.info(String.format("【成功打点】调用 %s 成功,耗时:%d ms", name, Duration.between(start, Instant.now()).toMillis()));
        } catch (Exception ex) {
            if (metrics.recordFailMetrics())
                log.info(String.format("【失败打点】调用 %s 失败,耗时:%d ms", name, Duration.between(start, Instant.now()).toMillis()));
            if (metrics.logException())
                log.error(String.format("【异常日志】调用 %s 出现异常!", name), ex);

            //忽略异常的时候,使用一开始定义的getDefaultValue方法,来获取基本类型的默认值
            if (metrics.ignoreException())
                returnValue = getDefaultValue(signature.getReturnType());
            else
                throw ex;
        }
        //实现了返回值的日志输出
        if (metrics.logReturn())
            log.info(String.format("【出参日志】调用 %s 的返回是:【%s】", name, returnValue));
        return returnValue;
    }
}
2
3
4
5
6
7
8
9
10
11
12
13
14
15
16
17
18
19
20
21
22
23
24
25
26
27
28
29
30
31
32
33
34
35
36
37
38
39
40
41
42
43
44
45
46
47
48
49
50
51
52
53
54
55
56
57
58
59
60
61
62
63
64
65
66
67
68
69
70
71
72
73
74
75
76
接下来,分别定义最简单的 Controller、Service 和 Repository,来测试 MetricsAspect 的功能。
其中,Service 中实现创建用户的时候做了事务处理,当用户名包含 test 字样时会抛出异常,导致事务回滚。同时,我们为 Service 中的 createUser 标记了 @Metrics 注解。这样一来,我们还可以手动为类或方法标记 @Metrics 注解,实现 Controller 之外的其他组件的自动监控。
@Slf4j
@RestController //自动进行监控
@RequestMapping("metricstest")
public class MetricsController {
    @Autowired
    private UserService userService;
    @GetMapping("transaction")
    public int transaction(@RequestParam("name") String name) {
        try {
            userService.createUser(new UserEntity(name));
        } catch (Exception ex) {
            log.error("create user failed because {}", ex.getMessage());
        }
        return userService.getUserCount(name);
    }
}

@Service
@Slf4j
public class UserService {
    @Autowired
    private UserRepository userRepository;
    @Transactional
    @Metrics //启用方法监控
    public void createUser(UserEntity entity) {
        userRepository.save(entity);
        if (entity.getName().contains("test"))
            throw new RuntimeException("invalid username!");
    }

    public int getUserCount(String name) {
        return userRepository.findByName(name).size();
    }
}

@Repository
public interface UserRepository extends JpaRepository<UserEntity, Long> {
    List<UserEntity> findByName(String name);
}
2
3
4
5
6
7
8
9
10
11
12
13
14
15
16
17
18
19
20
21
22
23
24
25
26
27
28
29
30
31
32
33
34
35
36
37
38
39
使用用户名“test”测试一下注册功能:
[16:27:52.586] [http-nio-45678-exec-3] [INFO ] [o.g.t.c.spring.demo2.MetricsAspect      :85  ] - 【入参日志】调用 【class org.geekbang.time.commonmistakes.spring.demo2.MetricsController】【public int org.geekbang.time.commonmistakes.spring.demo2.MetricsController.transaction(java.lang.String)】【http://localhost:45678/metricstest/transaction】 的参数是:【["test"]】
[16:27:52.590] [http-nio-45678-exec-3] [INFO ] [o.g.t.c.spring.demo2.MetricsAspect      :85  ] - 【入参日志】调用 【class org.geekbang.time.commonmistakes.spring.demo2.UserService】【public void org.geekbang.time.commonmistakes.spring.demo2.UserService.createUser(org.geekbang.time.commonmistakes.spring.demo2.UserEntity)】【http://localhost:45678/metricstest/transaction】 的参数是:【[{"id":null,"name":"test"}]】
[16:27:52.609] [http-nio-45678-exec-3] [INFO ] [o.g.t.c.spring.demo2.MetricsAspect      :96  ] - 【失败打点】调用 【class org.geekbang.time.commonmistakes.spring.demo2.UserService】【public void org.geekbang.time.commonmistakes.spring.demo2.UserService.createUser(org.geekbang.time.commonmistakes.spring.demo2.UserEntity)】【http://localhost:45678/metricstest/transaction】 失败,耗时:19 ms
[16:27:52.610] [http-nio-45678-exec-3] [ERROR] [o.g.t.c.spring.demo2.MetricsAspect      :98  ] - 【异常日志】调用 【class org.geekbang.time.commonmistakes.spring.demo2.UserService】【public void org.geekbang.time.commonmistakes.spring.demo2.UserService.createUser(org.geekbang.time.commonmistakes.spring.demo2.UserEntity)】【http://localhost:45678/metricstest/transaction】 出现异常!
java.lang.RuntimeException: invalid username!
  at org.geekbang.time.commonmistakes.spring.demo2.UserService.createUser(UserService.java:18)
  at org.geekbang.time.commonmistakes.spring.demo2.UserService$$FastClassBySpringCGLIB$$9eec91f.invoke(<generated>)
[16:27:52.614] [http-nio-45678-exec-3] [ERROR] [g.t.c.spring.demo2.MetricsController:21  ] - create user failed because invalid username!
[16:27:52.617] [http-nio-45678-exec-3] [INFO ] [o.g.t.c.spring.demo2.MetricsAspect      :93  ] - 【成功打点】调用 【class org.geekbang.time.commonmistakes.spring.demo2.MetricsController】【public int org.geekbang.time.commonmistakes.spring.demo2.MetricsController.transaction(java.lang.String)】【http://localhost:45678/metricstest/transaction】 成功,耗时:31 ms
[16:27:52.618] [http-nio-45678-exec-3] [INFO ] [o.g.t.c.spring.demo2.MetricsAspect      :108 ] - 【出参日志】调用 【class org.geekbang.time.commonmistakes.spring.demo2.MetricsController】【public int org.geekbang.time.commonmistakes.spring.demo2.MetricsController.transaction(java.lang.String)】【http://localhost:45678/metricstest/transaction】 的返回是:【0】
2
3
4
5
6
7
8
9
10
看起来这个切面很不错,日志中打出了整个调用的出入参、方法耗时:
- 第 1、8、9 和 10 行分别是 Controller 方法的入参日志、调用 Service 方法出错后记录的错误信息、成功执行的打点和出参日志。因为 Controller 方法内部进行了 try-catch 处理,所以其方法最终是成功执行的。出参日志中显示最后查询到的用户数量是 0,表示用户创建实际是失败的。
- 第 2、3 和 4~7 行分别是 Service 方法的入参日志、失败打点和异常日志。正是因为 Service 方法的异常抛到了 Controller,所以整个方法才能被 @Transactional 声明式事务回滚。在这里,MetricsAspect 捕获了异常又重新抛出,记录了异常的同时又不影响事务回滚。
一段时间后,开发同学觉得默认的 @Metrics 配置有点不合适,希望进行两个调整:
- 对于 Controller 的自动打点,不要自动记录入参和出参日志,否则日志量太大;
- 对于 Service 中的方法,最好可以自动捕获异常。
于是,他就为 MetricsController 手动加上了 @Metrics 注解,设置 logParameters 和 logReturn 为 false;然后为 Service 中的 createUser 方法的 @Metrics 注解,设置了 ignoreException 属性为 true:
@Metrics(logParameters = false, logReturn = false) //改动点1
public class MetricsController {

@Service
@Slf4j
public class UserService {
    @Transactional
    @Metrics(ignoreException = true) //改动点2
    public void createUser(UserEntity entity) {
    ...
2
3
4
5
6
7
8
9
10
代码上线后发现日志量并没有减少,更要命的是事务回滚失效了,从输出看到最后查询到了名为 test 的用户:
[17:01:16.549] [http-nio-45678-exec-1] [INFO ] [o.g.t.c.spring.demo2.MetricsAspect      :75  ] - 【入参日志】调用 【class org.geekbang.time.commonmistakes.spring.demo2.MetricsController】【public int org.geekbang.time.commonmistakes.spring.demo2.MetricsController.transaction(java.lang.String)】【http://localhost:45678/metricstest/transaction】 的参数是:【["test"]】
[17:01:16.670] [http-nio-45678-exec-1] [INFO ] [o.g.t.c.spring.demo2.MetricsAspect      :75  ] - 【入参日志】调用 【class org.geekbang.time.commonmistakes.spring.demo2.UserService】【public void org.geekbang.time.commonmistakes.spring.demo2.UserService.createUser(org.geekbang.time.commonmistakes.spring.demo2.UserEntity)】【http://localhost:45678/metricstest/transaction】 的参数是:【[{"id":null,"name":"test"}]】
[17:01:16.885] [http-nio-45678-exec-1] [INFO ] [o.g.t.c.spring.demo2.MetricsAspect      :86  ] - 【失败打点】调用 【class org.geekbang.time.commonmistakes.spring.demo2.UserService】【public void org.geekbang.time.commonmistakes.spring.demo2.UserService.createUser(org.geekbang.time.commonmistakes.spring.demo2.UserEntity)】【http://localhost:45678/metricstest/transaction】 失败,耗时:211 ms
[17:01:16.899] [http-nio-45678-exec-1] [ERROR] [o.g.t.c.spring.demo2.MetricsAspect      :88  ] - 【异常日志】调用 【class org.geekbang.time.commonmistakes.spring.demo2.UserService】【public void org.geekbang.time.commonmistakes.spring.demo2.UserService.createUser(org.geekbang.time.commonmistakes.spring.demo2.UserEntity)】【http://localhost:45678/metricstest/transaction】 出现异常!
java.lang.RuntimeException: invalid username!
  at org.geekbang.time.commonmistakes.spring.demo2.UserService.createUser(UserService.java:18)
  at org.geekbang.time.commonmistakes.spring.demo2.UserService$$FastClassBySpringCGLIB$$9eec91f.invoke(<generated>)
[17:01:16.902] [http-nio-45678-exec-1] [INFO ] [o.g.t.c.spring.demo2.MetricsAspect      :98  ] - 【出参日志】调用 【class org.geekbang.time.commonmistakes.spring.demo2.UserService】【public void org.geekbang.time.commonmistakes.spring.demo2.UserService.createUser(org.geekbang.time.commonmistakes.spring.demo2.UserEntity)】【http://localhost:45678/metricstest/transaction】 的返回是:【null】
[17:01:17.466] [http-nio-45678-exec-1] [INFO ] [o.g.t.c.spring.demo2.MetricsAspect      :83  ] - 【成功打点】调用 【class org.geekbang.time.commonmistakes.spring.demo2.MetricsController】【public int org.geekbang.time.commonmistakes.spring.demo2.MetricsController.transaction(java.lang.String)】【http://localhost:45678/metricstest/transaction】 成功,耗时:915 ms
[17:01:17.467] [http-nio-45678-exec-1] [INFO ] [o.g.t.c.spring.demo2.MetricsAspect      :98  ] - 【出参日志】调用 【class org.geekbang.time.commonmistakes.spring.demo2.MetricsController】【public int org.geekbang.time.commonmistakes.spring.demo2.MetricsController.transaction(java.lang.String)】【http://localhost:45678/metricstest/transaction】 的返回是:【1】
2
3
4
5
6
7
8
9
10
在介绍数据库事务时,我们分析了 Spring 通过 TransactionAspectSupport 类实现事务。在 invokeWithinTransaction 方法中设置断点可以发现,在执行 Service 的 createUser 方法时,TransactionAspectSupport 并没有捕获到异常,所以自然无法回滚事务。原因就是,异常被 MetricsAspect 吃掉了。
我们知道,切面本身是一个 Bean,Spring 对不同切面增强的执行顺序是由 Bean 优先级决定的,具体规则是:
- 入操作(Around(连接点执行前)、Before),切面优先级越高,越先执行。一个切面的入操作执行完,才轮到下一切面,所有切面入操作执行完,才开始执行连接点(方法)。
- 出操作(Around(连接点执行后)、After、AfterReturning、AfterThrowing),切面优先级越低,越先执行。一个切面的出操作执行完,才轮到下一切面,直到返回到调用点。
- 同一切面的 Around 比 After、Before 先执行。
对于 Bean 可以通过 @Order 注解来设置优先级,查看 @Order 注解和 Ordered 接口源码可以发现,默认情况下 Bean 的优先级为最低优先级,其值是 Integer 的最大值。其实,值越大优先级反而越低,这点比较反直觉:
@Retention(RetentionPolicy.RUNTIME)
@Target({ElementType.TYPE, ElementType.METHOD, ElementType.FIELD})
@Documented
public @interface Order {

   int value() default Ordered.LOWEST_PRECEDENCE;

}
public interface Ordered {
   int HIGHEST_PRECEDENCE = Integer.MIN_VALUE;
   int LOWEST_PRECEDENCE = Integer.MAX_VALUE;
   int getOrder();
}
2
3
4
5
6
7
8
9
10
11
12
13
我们再通过一个例子,来理解下增强的执行顺序。新建一个 TestAspectWithOrder10 切面,通过 @Order 注解设置优先级为 10,在内部定义 @Before、@After、@Around 三类增强,三个增强的逻辑只是简单的日志输出,切点是 TestController 所有方法;然后再定义一个类似的 TestAspectWithOrder20 切面,设置优先级为 20:
@Aspect
@Component
@Order(10)
@Slf4j
public class TestAspectWithOrder10 {
    @Before("execution(* org.geekbang.time.commonmistakes.springpart1.aopmetrics.TestController.*(..))")
    public void before(JoinPoint joinPoint) throws Throwable {
        log.info("TestAspectWithOrder10 @Before");
    }
    @After("execution(* org.geekbang.time.commonmistakes.springpart1.aopmetrics.TestController.*(..))")
    public void after(JoinPoint joinPoint) throws Throwable {
        log.info("TestAspectWithOrder10 @After");
    }
    @Around("execution(* org.geekbang.time.commonmistakes.springpart1.aopmetrics.TestController.*(..))")
    public Object around(ProceedingJoinPoint pjp) throws Throwable {
        log.info("TestAspectWithOrder10 @Around before");
        Object o = pjp.proceed();
        log.info("TestAspectWithOrder10 @Around after");
        return o;
    }
}

@Aspect
@Component
@Order(20)
@Slf4j
public class TestAspectWithOrder20 {
  ...
}
2
3
4
5
6
7
8
9
10
11
12
13
14
15
16
17
18
19
20
21
22
23
24
25
26
27
28
29
调用 TestController 的方法后,通过日志输出可以看到,增强执行顺序符合切面执行顺序的三个规则:
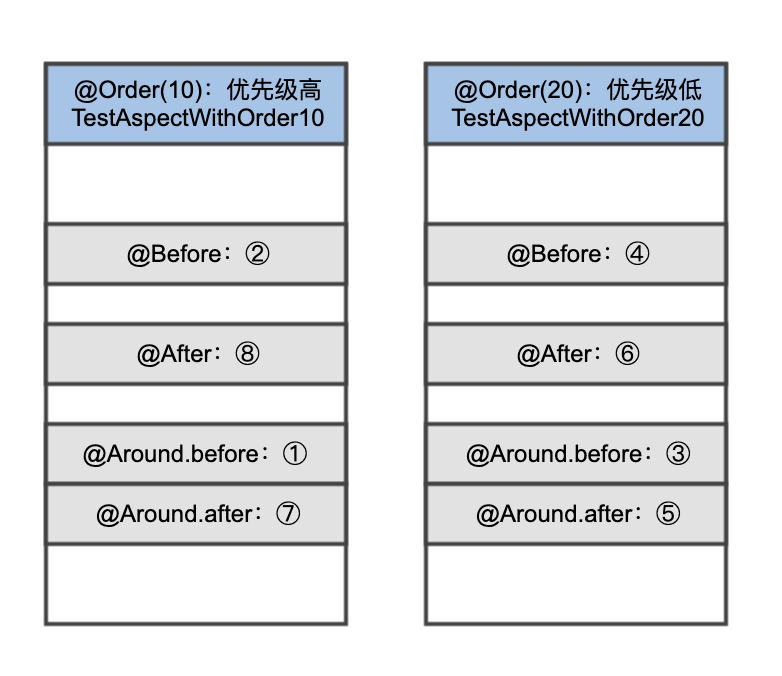
因为 Spring 的事务管理也是基于 AOP 的,默认情况下优先级最低也就是会先执行出操作,但是自定义切面 MetricsAspect 也同样是最低优先级,这个时候就可能出现问题:如果出操作先执行捕获了异常,那么 Spring 的事务处理就会因为无法捕获到异常导致无法回滚事务。
解决方式是,明确 MetricsAspect 的优先级,可以设置为最高优先级,也就是最先执行入操作最后执行出操作:
//将MetricsAspect这个Bean的优先级设置为最高
@Order(Ordered.HIGHEST_PRECEDENCE)
public class MetricsAspect {
    ...
}
2
3
4
5
此外,我们要知道切入的连接点是方法,注解定义在类上是无法直接从方法上获取到注解的。修复方式是,改为优先从方法获取,如果获取不到再从类获取,如果还是获取不到再使用默认的注解:
Metrics metrics = signature.getMethod().getAnnotation(Metrics.class);
if (metrics == null) {
    metrics = signature.getMethod().getDeclaringClass().getAnnotation(Metrics.class);
}
2
3
4
经过这 2 处修改,事务终于又可以回滚了,并且 Controller 的监控日志也不再出现入参、出参信息。
利用反射 + 注解 +Spring AOP 实现统一的横切日志关注点时,我们遇到的 Spring 事务失效问题,是由自定义的切面执行顺序引起的。这也让我们认识到,因为 Spring 内部大量利用 IoC 和 AOP 实现了各种组件,当使用 IoC 和 AOP 时,一定要考虑是否会影响其他内部组件。
# Spring 框架:带来复杂度
Spring 框架内部的复杂度主要表现为三点:
- 第一,Spring 框架借助 IoC 和 AOP 的功能,实现了修改、拦截 Bean 的定义和实例的灵活性,因此真正执行的代码流程并不是串行的。
- 第二,Spring Boot 根据当前依赖情况实现了自动配置,虽然省去了手动配置的麻烦,但也因此多了一些黑盒、提升了复杂度。
- 第三,Spring Cloud 模块多版本也多,Spring Boot 1.x 和 2.x 的区别也很大。如果要对 Spring Cloud 或 Spring Boot 进行二次开发的话,考虑兼容性的成本会很高。
# Feign AOP 切不到的诡异案例
案例:使用 Spring Cloud 做微服务调用,为方便统一处理 Feign,想到了用 AOP 实现,即使用 within 指示器匹配 feign.Client 接口的实现进行 AOP 切入。
代码如下,通过 @Before 注解在执行方法前打印日志,并在代码中定义了一个标记了 @FeignClient 注解的 Client 类,让其成为一个 Feign 接口:
//测试Feign
@FeignClient(name = "client")
public interface Client {
    @GetMapping("/feignaop/server")
    String api();
}

//AOP切入feign.Client的实现
@Aspect
@Slf4j
@Component
public class WrongAspect {
    @Before("within(feign.Client+)")
    public void before(JoinPoint pjp) {
        log.info("within(feign.Client+) pjp {}, args:{}", pjp, pjp.getArgs());
    }
}

//配置扫描Feign
@Configuration
@EnableFeignClients(basePackages = "org.geekbang.time.commonmistakes.spring.demo4.feign")
public class Config {
}
2
3
4
5
6
7
8
9
10
11
12
13
14
15
16
17
18
19
20
21
22
23
通过 Feign 调用服务后可以看到日志中有输出,的确实现了 feign.Client 的切入,切入的是 execute 方法:
[15:48:32.850] [http-nio-45678-exec-1] [INFO ] [o.g.t.c.spring.demo4.WrongAspect        :20  ] - within(feign.Client+) pjp execution(Response feign.Client.execute(Request,Options)), args:[GET http://client/feignaop/server HTTP/1.1

Binary data, feign.Request$Options@5c16561a]
2
3
一开始这个项目使用的是客户端的负载均衡,也就是让 Ribbon 来做负载均衡,代码没啥问题。后来因为后端服务通过 Nginx 实现服务端负载均衡,所以开发同学把 @FeignClient 的配置设置了 URL 属性,直接通过一个固定 URL 调用后端服务:
@FeignClient(name = "anotherClient",url = "http://localhost:45678")
public interface ClientWithUrl {
    @GetMapping("/feignaop/server")
    String api();
}
2
3
4
5
但这样配置后,之前的 AOP 切面竟然失效了,也就是 within(feign.Client+) 无法切入 ClientWithUrl 的调用了。
为了还原这个场景,这里写了一段代码,定义两个方法分别通过 Client 和 ClientWithUrl 这两个 Feign 进行接口调用:
@Autowired
private Client client;

@Autowired
private ClientWithUrl clientWithUrl;

@GetMapping("client")
public String client() {
    return client.api();
}

@GetMapping("clientWithUrl")
public String clientWithUrl() {
    return clientWithUrl.api();
}
2
3
4
5
6
7
8
9
10
11
12
13
14
15
可以看到,调用 Client 后 AOP 有日志输出,调用 ClientWithUrl 后却没有:
[15:50:32.850] [http-nio-45678-exec-1] [INFO ] [o.g.t.c.spring.demo4.WrongAspect        :20  ] - within(feign.Client+) pjp execution(Response feign.Client.execute(Request,Options)), args:[GET http://client/feignaop/server HTTP/1.1

Binary data, feign.Request$Options@5c16561
2
3
这就很费解了。难道为 Feign 指定了 URL,其实现就不是 feign.Client 了吗?
要明白原因,我们需要分析一下 FeignClient 的创建过程,也就是分析 FeignClientFactoryBean 类的 getTarget 方法。源码第 4 行有一个 if 判断,当 URL 没有内容也就是为空或者不配置时调用 loadBalance 方法,在其内部通过 FeignContext 从容器获取 feign.Client 的实例:
<T> T getTarget() {
  FeignContext context = this.applicationContext.getBean(FeignContext.class);
  Feign.Builder builder = feign(context);
  if (!StringUtils.hasText(this.url)) {
    ...
    return (T) loadBalance(builder, context,
        new HardCodedTarget<>(this.type, this.name, this.url));
  }
  ...
  String url = this.url + cleanPath();
  Client client = getOptional(context, Client.class);
  if (client != null) {
    if (client instanceof LoadBalancerFeignClient) {
      // not load balancing because we have a url,
      // but ribbon is on the classpath, so unwrap
      client = ((LoadBalancerFeignClient) client).getDelegate();
    }
    builder.client(client);
  }
  ...
}
protected <T> T loadBalance(Feign.Builder builder, FeignContext context,
    HardCodedTarget<T> target) {
  Client client = getOptional(context, Client.class);
  if (client != null) {
    builder.client(client);
    Targeter targeter = get(context, Targeter.class);
    return targeter.target(this, builder, context, target);
  }
...
}
protected <T> T getOptional(FeignContext context, Class<T> type) {
  return context.getInstance(this.contextId, type);
}
2
3
4
5
6
7
8
9
10
11
12
13
14
15
16
17
18
19
20
21
22
23
24
25
26
27
28
29
30
31
32
33
34
调试一下可以看到,client 是 LoadBalanceFeignClient,已经是经过代理增强的,明显是一个 Bean:
所以,没有指定 URL 的 @FeignClient 对应的 LoadBalanceFeignClient,是可以通过 feign.Client 切入的。
在我们上面贴出来的源码的 16 行可以看到,当 URL 不为空的时候,client 设置为了 LoadBalanceFeignClient 的 delegate 属性。其原因注释中有提到,因为有了 URL 就不需要客户端负载均衡了,但因为 Ribbon 在 classpath 中,所以需要从 LoadBalanceFeignClient 提取出真正的 Client。断点调试下可以看到,这时 client 是一个 ApacheHttpClient:
那么,这个 ApacheHttpClient 是从哪里来的呢?这里有一个小技巧:如果你希望知道一个类是怎样调用栈初始化的,可以在构造方法中设置一个断点进行调试。这样,你就可以在 IDE 的栈窗口看到整个方法调用栈,然后点击每一个栈帧看到整个过程。
用这种方式,我们可以看到,是 HttpClientFeignLoadBalancedConfiguration 类实例化的 ApacheHttpClient:
进一步查看 HttpClientFeignLoadBalancedConfiguration 的源码可以发现,LoadBalancerFeignClient 这个 Bean 在实例化的时候,new 出来一个 ApacheHttpClient 作为 delegate 放到了 LoadBalancerFeignClient 中:
@Bean
@ConditionalOnMissingBean(Client.class)
public Client feignClient(CachingSpringLoadBalancerFactory cachingFactory,
      SpringClientFactory clientFactory, HttpClient httpClient) {
   ApacheHttpClient delegate = new ApacheHttpClient(httpClient);
   return new LoadBalancerFeignClient(delegate, cachingFactory, clientFactory);
}

public LoadBalancerFeignClient(Client delegate,
      CachingSpringLoadBalancerFactory lbClientFactory,
      SpringClientFactory clientFactory) {
   this.delegate = delegate;
   this.lbClientFactory = lbClientFactory;
   this.clientFactory = clientFactory;
}
2
3
4
5
6
7
8
9
10
11
12
13
14
15
显然,ApacheHttpClient 是 new 出来的,并不是 Bean,而 LoadBalancerFeignClient 是一个 Bean。
有了这个信息,我们再来捋一下,为什么 within(feign.Client+) 无法切入设置过 URL 的 @FeignClient ClientWithUrl:
- 表达式声明的是切入 feign.Client 的实现类。
- Spring 只能切入由自己管理的 Bean。
- 虽然 LoadBalancerFeignClient 和 ApacheHttpClient 都是 feign.Client 接口的实现,但是 HttpClientFeignLoadBalancedConfiguration 的自动配置只是把前者定义为 Bean,后者是 new 出来的、作为了 LoadBalancerFeignClient 的 delegate,不是 Bean。
- 在定义了 FeignClient 的 URL 属性后,我们获取的是 LoadBalancerFeignClient 的 delegate,它不是 Bean。
因此,定义了 URL 的 FeignClient 采用 within(feign.Client+) 无法切入。
那,如何解决这个问题呢?有一位同学提出,修改一下切点表达式,通过 @FeignClient 注解来切:
@Before("@within(org.springframework.cloud.openfeign.FeignClient)")
public void before(JoinPoint pjp){
    log.info("@within(org.springframework.cloud.openfeign.FeignClient) pjp {}, args:{}", pjp, pjp.getArgs());
}
2
3
4
修改后通过日志看到,AOP 的确切成功了:
[15:53:39.093] [http-nio-45678-exec-3] [INFO ] [o.g.t.c.spring.demo4.Wrong2Aspect :17 ] - @within(org.springframework.cloud.openfeign.FeignClient) pjp execution(String org.geekbang.time.commonmistakes.spring.demo4.feign.ClientWithUrl.api()), args:[]
但仔细一看就会发现,这次切入的是 ClientWithUrl 接口的 API 方法,并不是 client.Feign 接口的 execute 方法,显然不符合预期。
这位同学犯的错误是,没有弄清楚真正希望切的是什么对象。@FeignClient 注解标记在 Feign Client 接口上,所以切的是 Feign 定义的接口,也就是每一个实际的 API 接口。而通过 feign.Client 接口切的是客户端实现类,切到的是通用的、执行所有 Feign 调用的 execute 方法。
那么问题来了,ApacheHttpClient 不是 Bean 无法切入,切 Feign 接口本身又不符合要求。怎么办呢?
经过一番研究发现,ApacheHttpClient 其实有机会独立成为 Bean。查看 HttpClientFeignConfiguration 的源码可以发现,当没有 ILoadBalancer 类型的时候,自动装配会把 ApacheHttpClient 设置为 Bean。
这么做的原因很明确,如果我们不希望做客户端负载均衡的话,应该不会引用 Ribbon 组件的依赖,自然没有 LoadBalancerFeignClient,只有 ApacheHttpClient:
@Configuration
@ConditionalOnClass(ApacheHttpClient.class)
@ConditionalOnMissingClass("com.netflix.loadbalancer.ILoadBalancer")
@ConditionalOnMissingBean(CloseableHttpClient.class)
@ConditionalOnProperty(value = "feign.httpclient.enabled", matchIfMissing = true)
protected static class HttpClientFeignConfiguration {
  @Bean
  @ConditionalOnMissingBean(Client.class)
  public Client feignClient(HttpClient httpClient) {
    return new ApacheHttpClient(httpClient);
  }
}
2
3
4
5
6
7
8
9
10
11
12
那,把 pom.xml 中的 ribbon 模块注释之后,是不是可以解决问题呢?
<dependency>
  <groupId>org.springframework.cloud</groupId>
  <artifactId>spring-cloud-starter-netflix-ribbon</artifactId>
</dependency>
2
3
4
但,问题并没解决,启动出错误了:
Caused by: java.lang.IllegalArgumentException: Cannot subclass final class feign.httpclient.ApacheHttpClient
  at org.springframework.cglib.proxy.Enhancer.generateClass(Enhancer.java:657)
  at org.springframework.cglib.core.DefaultGeneratorStrategy.generate(DefaultGeneratorStrategy.java:25)
2
3
这里,又涉及了 Spring 实现动态代理的两种方式:
- JDK 动态代理,通过反射实现,只支持对实现接口的类进行代理;
- CGLIB 动态字节码注入方式,通过继承实现代理,没有这个限制。
Spring Boot 2.x 默认使用 CGLIB 的方式,但通过继承实现代理有个问题是,无法继承 final 的类。因为,ApacheHttpClient 类就是定义为了 final:
public final class ApacheHttpClient implements Client {
为解决这个问题,我们把配置参数 proxy-target-class 的值修改为 false,以切换到使用 JDK 动态代理的方式:
spring.aop.proxy-target-class=false
修改后执行 clientWithUrl 接口可以看到,通过 within(feign.Client+) 方式可以切入 feign.Client 子类了。以下日志显示了 @within 和 within 的两次切入:
[16:29:55.303] [http-nio-45678-exec-1] [INFO ] [o.g.t.c.spring.demo4.Wrong2Aspect       :16  ] - @within(org.springframework.cloud.openfeign.FeignClient) pjp execution(String org.geekbang.time.commonmistakes.spring.demo4.feign.ClientWithUrl.api()), args:[]
[16:29:55.310] [http-nio-45678-exec-1] [INFO ] [o.g.t.c.spring.demo4.WrongAspect        :15  ] - within(feign.Client+) pjp execution(Response feign.Client.execute(Request,Options)), args:[GET http://localhost:45678/feignaop/server HTTP/1.1


Binary data, feign.Request$Options@387550b0]
2
3
4
5
这下我们就明白了,Spring Cloud 使用了自动装配来根据依赖装配组件,组件是否成为 Bean 决定了 AOP 是否可以切入,在尝试通过 AOP 切入 Spring Bean 的时候要注意。
# Spring 程序配置的优先级问题
我们知道,通过配置文件 application.properties,可以实现 Spring Boot 应用程序的参数配置。但我们可能不知道的是,Spring 程序配置是有优先级的,即当两个不同的配置源包含相同的配置项时,其中一个配置项很可能会被覆盖掉。这也是为什么我们会遇到些看似诡异的配置失效问题。
我们来通过一个实际案例,研究下配置源以及配置源的优先级问题。
对于 Spring Boot 应用程序,一般我们会通过设置 management.server.port 参数,来暴露独立的 actuator 管理端口。这样做更安全,也更方便监控系统统一监控程序是否健康。
management.server.port=45679
有一天程序重新发布后,监控系统显示程序离线。但排查下来发现,程序是正常工作的,只是 actuator 管理端口的端口号被改了,不是配置文件中定义的 45679 了。
后来发现,运维同学在服务器上定义了两个环境变量 MANAGEMENT_SERVER_IP 和 MANAGEMENT_SERVER_PORT,目的是方便监控 Agent 把监控数据上报到统一的管理服务上:
MANAGEMENT_SERVER_IP=192.168.0.2
MANAGEMENT_SERVER_PORT=12345
2
问题就是出在这里。MANAGEMENT_SERVER_PORT 覆盖了配置文件中的 management.server.port,修改了应用程序本身的端口。当然,监控系统也就无法通过老的管理端口访问到应用的 health 端口了。如下图所示,actuator 的端口号变成了 12345:
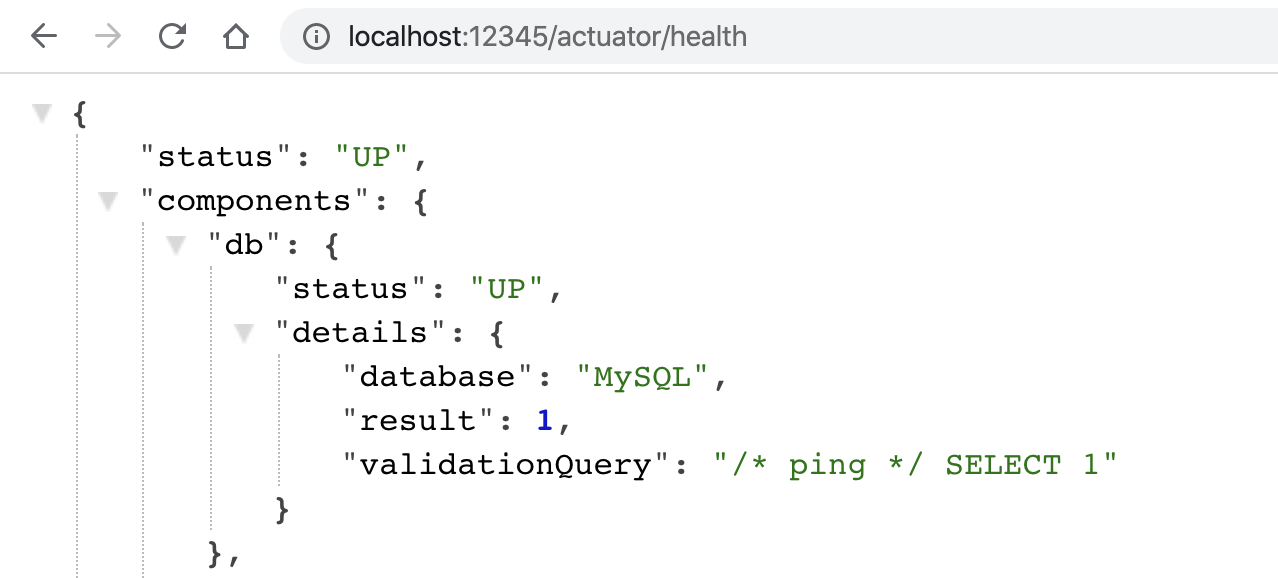
到这里坑还没完,为了方便用户登录,需要在页面上显示默认的管理员用户名,于是开发同学在配置文件中定义了一个 user.name 属性,并设置为 defaultadminname:
user.name=defaultadminname
后来发现,程序读取出来的用户名根本就不是配置文件中定义的。这,又是咋回事?
带着这个问题,以及之前环境变量覆盖配置文件配置的问题,我们写段代码看看,从 Spring 中到底能读取到几个 management.server.port 和 user.name 配置项。
要想查询 Spring 中所有的配置,我们需要以环境 Environment 接口为入口。接下来就与你说说 Spring 通过环境 Environment 抽象出的 Property 和 Profile:
- 针对 Property,又抽象出各种 PropertySource 类代表配置源。一个环境下可能有多个配置源,每个配置源中有诸多配置项。在查询配置信息时,需要按照配置源优先级进行查询
- Profile 定义了场景的概念。通常,我们会定义类似 dev、test、stage 和 prod 等环境作为不同的 Profile,用于按照场景对 Bean 进行逻辑归属。同时,Profile 和配置文件也有关系,每个环境都有独立的配置文件,但我们只会激活某一个环境来生效特定环境的配置文件。
接下来,我们重点看看 Property 的查询过程。
对于非 Web 应用,Spring 对于 Environment 接口的实现是 StandardEnvironment 类。我们通过 Spring 注入 StandardEnvironment 后循环 getPropertySources 获得的 PropertySource,来查询所有的 PropertySource 中 key 是 user.name 或 management.server.port 的属性值;然后遍历 getPropertySources 方法,获得所有配置源并打印出来:
@Autowired
private StandardEnvironment env;
@PostConstruct
public void init(){
    Arrays.asList("user.name", "management.server.port").forEach(key -> {
         env.getPropertySources().forEach(propertySource -> {
                    if (propertySource.containsProperty(key)) {
                        log.info("{} -> {} 实际取值:{}", propertySource, propertySource.getProperty(key), env.getProperty(key));
                    }
                });
    });

    System.out.println("配置优先级:");
    env.getPropertySources().stream().forEach(System.out::println);
}
2
3
4
5
6
7
8
9
10
11
12
13
14
15
我们研究下输出的日志:
2020-01-15 16:08:34.054  INFO 40123 --- [           main] o.g.t.c.s.d.CommonMistakesApplication    : ConfigurationPropertySourcesPropertySource {name='configurationProperties'} -> zhuye 实际取值:zhuye
2020-01-15 16:08:34.054  INFO 40123 --- [           main] o.g.t.c.s.d.CommonMistakesApplication    : PropertiesPropertySource {name='systemProperties'} -> zhuye 实际取值:zhuye
2020-01-15 16:08:34.054  INFO 40123 --- [           main] o.g.t.c.s.d.CommonMistakesApplication    : OriginTrackedMapPropertySource {name='applicationConfig: [classpath:/application.properties]'} -> defaultadminname 实际取值:zhuye
2020-01-15 16:08:34.054  INFO 40123 --- [           main] o.g.t.c.s.d.CommonMistakesApplication    : ConfigurationPropertySourcesPropertySource {name='configurationProperties'} -> 12345 实际取值:12345
2020-01-15 16:08:34.054  INFO 40123 --- [           main] o.g.t.c.s.d.CommonMistakesApplication    : OriginAwareSystemEnvironmentPropertySource {name=''} -> 12345 实际取值:12345
2020-01-15 16:08:34.054  INFO 40123 --- [           main] o.g.t.c.s.d.CommonMistakesApplication    : OriginTrackedMapPropertySource {name='applicationConfig: [classpath:/application.properties]'} -> 45679 实际取值:12345
配置优先级:
ConfigurationPropertySourcesPropertySource {name='configurationProperties'}
StubPropertySource {name='servletConfigInitParams'}
ServletContextPropertySource {name='servletContextInitParams'}
PropertiesPropertySource {name='systemProperties'}
OriginAwareSystemEnvironmentPropertySource {name='systemEnvironment'}
RandomValuePropertySource {name='random'}
OriginTrackedMapPropertySource {name='applicationConfig: [classpath:/application.properties]'}
MapPropertySource {name='springCloudClientHostInfo'}
MapPropertySource {name='defaultProperties'}
2
3
4
5
6
7
8
9
10
11
12
13
14
15
16
- 有三处定义了 user.name:第一个是 configurationProperties,值是 zhuye;第二个是 systemProperties,代表系统配置,值是 zhuye;第三个是 applicationConfig,也就是我们的配置文件,值是配置文件中定义的 defaultadminname。
- 同样地,也有三处定义了 management.server.port:第一个是 configurationProperties,值是 12345;第二个是 systemEnvironment 代表系统环境,值是 12345;第三个是 applicationConfig,也就是我们的配置文件,值是配置文件中定义的 45679。
- 第 7 到 16 行的输出显示,Spring 中有 9 个配置源,值得关注是 ConfigurationPropertySourcesPropertySource、PropertiesPropertySource、OriginAwareSystemEnvironmentPropertySource 和我们的配置文件。
那么,Spring 真的是按这个顺序查询配置吗?最前面的 configurationProperties,又是什么?为了回答这 2 个问题,我们需要分析下源码。先说明下,下面源码分析的逻辑有些复杂,你可以结合着下面的整体流程图来理解:
Demo 中注入的 StandardEnvironment,继承的是 AbstractEnvironment(图中紫色类)。AbstractEnvironment 的源码如下:
public abstract class AbstractEnvironment implements ConfigurableEnvironment {
  private final MutablePropertySources propertySources = new MutablePropertySources();
  private final ConfigurablePropertyResolver propertyResolver =
      new PropertySourcesPropertyResolver(this.propertySources);

  public String getProperty(String key) {
    return this.propertyResolver.getProperty(key);
  }
}
2
3
4
5
6
7
8
9
可以看到:
- MutablePropertySources 类型的字段 propertySources,看起来代表了所有配置源;
- getProperty 方法,通过 PropertySourcesPropertyResolver 类进行查询配置;
- 实例化 PropertySourcesPropertyResolver 的时候,传入了当前的 MutablePropertySources。
接下来,我们继续分析 MutablePropertySources 和 PropertySourcesPropertyResolver。先看看 MutablePropertySources 的源码(图中蓝色类):
public class MutablePropertySources implements PropertySources {

  private final List<PropertySource<?>> propertySourceList = new CopyOnWriteArrayList<>();

  public void addFirst(PropertySource<?> propertySource) {
    removeIfPresent(propertySource);
    this.propertySourceList.add(0, propertySource);
  }
  public void addLast(PropertySource<?> propertySource) {
    removeIfPresent(propertySource);
    this.propertySourceList.add(propertySource);
  }
  public void addBefore(String relativePropertySourceName, PropertySource<?> propertySource) {
    ...
    int index = assertPresentAndGetIndex(relativePropertySourceName);
    addAtIndex(index, propertySource);
  }
    public void addAfter(String relativePropertySourceName, PropertySource<?> propertySource) {
       ...
       int index = assertPresentAndGetIndex(relativePropertySourceName);
       addAtIndex(index + 1, propertySource);
    }
    private void addAtIndex(int index, PropertySource<?> propertySource) {
       removeIfPresent(propertySource);
       this.propertySourceList.add(index, propertySource);
    }
}
2
3
4
5
6
7
8
9
10
11
12
13
14
15
16
17
18
19
20
21
22
23
24
25
26
27
可以发现:
- propertySourceList 字段用来真正保存 PropertySource 的 List,且这个 List 是一个 CopyOnWriteArrayList。
- 类中定义了 addFirst、addLast、addBefore、addAfter 等方法,来精确控制 PropertySource 加入 propertySourceList 的顺序。这也说明了顺序的重要性。
继续看下 PropertySourcesPropertyResolver(图中绿色类)的源码,找到真正查询配置的方法 getProperty。
这里,我们重点看一下第 9 行代码:遍历的 propertySources 是 PropertySourcesPropertyResolver 构造方法传入的,再结合 AbstractEnvironment 的源码可以发现,这个 propertySources 正是 AbstractEnvironment 中的 MutablePropertySources 对象。遍历时,如果发现配置源中有对应的 Key 值,则使用这个值。因此,MutablePropertySources 中配置源的次序尤为重要。
public class PropertySourcesPropertyResolver extends AbstractPropertyResolver {
  private final PropertySources propertySources;
  public PropertySourcesPropertyResolver(@Nullable PropertySources propertySources) {
    this.propertySources = propertySources;
  }

  protected <T> T getProperty(String key, Class<T> targetValueType, boolean resolveNestedPlaceholders) {
    if (this.propertySources != null) {
      for (PropertySource<?> propertySource : this.propertySources) {
        if (logger.isTraceEnabled()) {
          logger.trace("Searching for key '" + key + "' in PropertySource '" +
              propertySource.getName() + "'");
        }
        Object value = propertySource.getProperty(key);
        if (value != null) {
          if (resolveNestedPlaceholders && value instanceof String) {
            value = resolveNestedPlaceholders((String) value);
          }
          logKeyFound(key, propertySource, value);
          return convertValueIfNecessary(value, targetValueType);
        }
      }
    }
    ...
  }
}
2
3
4
5
6
7
8
9
10
11
12
13
14
15
16
17
18
19
20
21
22
23
24
25
26
回到之前的问题,在查询所有配置源的时候,我们注意到处在第一位的是 ConfigurationPropertySourcesPropertySource,这是什么呢?
其实,它不是一个实际存在的配置源,扮演的是一个代理的角色。但通过调试你会发现,我们获取的值竟然是由它提供并且返回的,且没有循环遍历后面的 PropertySource:
继续查看 ConfigurationPropertySourcesPropertySource(图中红色类)的源码可以发现,getProperty 方法其实是通过 findConfigurationProperty 方法查询配置的。如第 25 行代码所示,这其实还是在遍历所有的配置源:
class ConfigurationPropertySourcesPropertySource extends PropertySource<Iterable<ConfigurationPropertySource>>
    implements OriginLookup<String> {

  ConfigurationPropertySourcesPropertySource(String name, Iterable<ConfigurationPropertySource> source) {
    super(name, source);
  }

  @Override
  public Object getProperty(String name) {
    ConfigurationProperty configurationProperty = findConfigurationProperty(name);
    return (configurationProperty != null) ? configurationProperty.getValue() : null;
  }
  private ConfigurationProperty findConfigurationProperty(String name) {
    try {
      return findConfigurationProperty(ConfigurationPropertyName.of(name, true));
    }
    catch (Exception ex) {
      return null;
    }
  }
  private ConfigurationProperty findConfigurationProperty(ConfigurationPropertyName name) {
    if (name == null) {
      return null;
    }
    for (ConfigurationPropertySource configurationPropertySource : getSource()) {
      ConfigurationProperty configurationProperty = configurationPropertySource.getConfigurationProperty(name);
      if (configurationProperty != null) {
        return configurationProperty;
      }
    }
    return null;
  }
}
2
3
4
5
6
7
8
9
10
11
12
13
14
15
16
17
18
19
20
21
22
23
24
25
26
27
28
29
30
31
32
33
调试可以发现,这个循环遍历(getSource() 的结果)的配置源,其实是 SpringConfigurationPropertySources(图中黄色类),其中包含的配置源列表就是之前看到的 9 个配置源,而第一个就是 ConfigurationPropertySourcesPropertySource。看到这里,我们的第一感觉是会不会产生死循环,它在遍历的时候怎么排除自己呢?
同时观察 configurationProperty 可以看到,这个 ConfigurationProperty 其实类似代理的角色,实际配置是从系统属性中获得的:
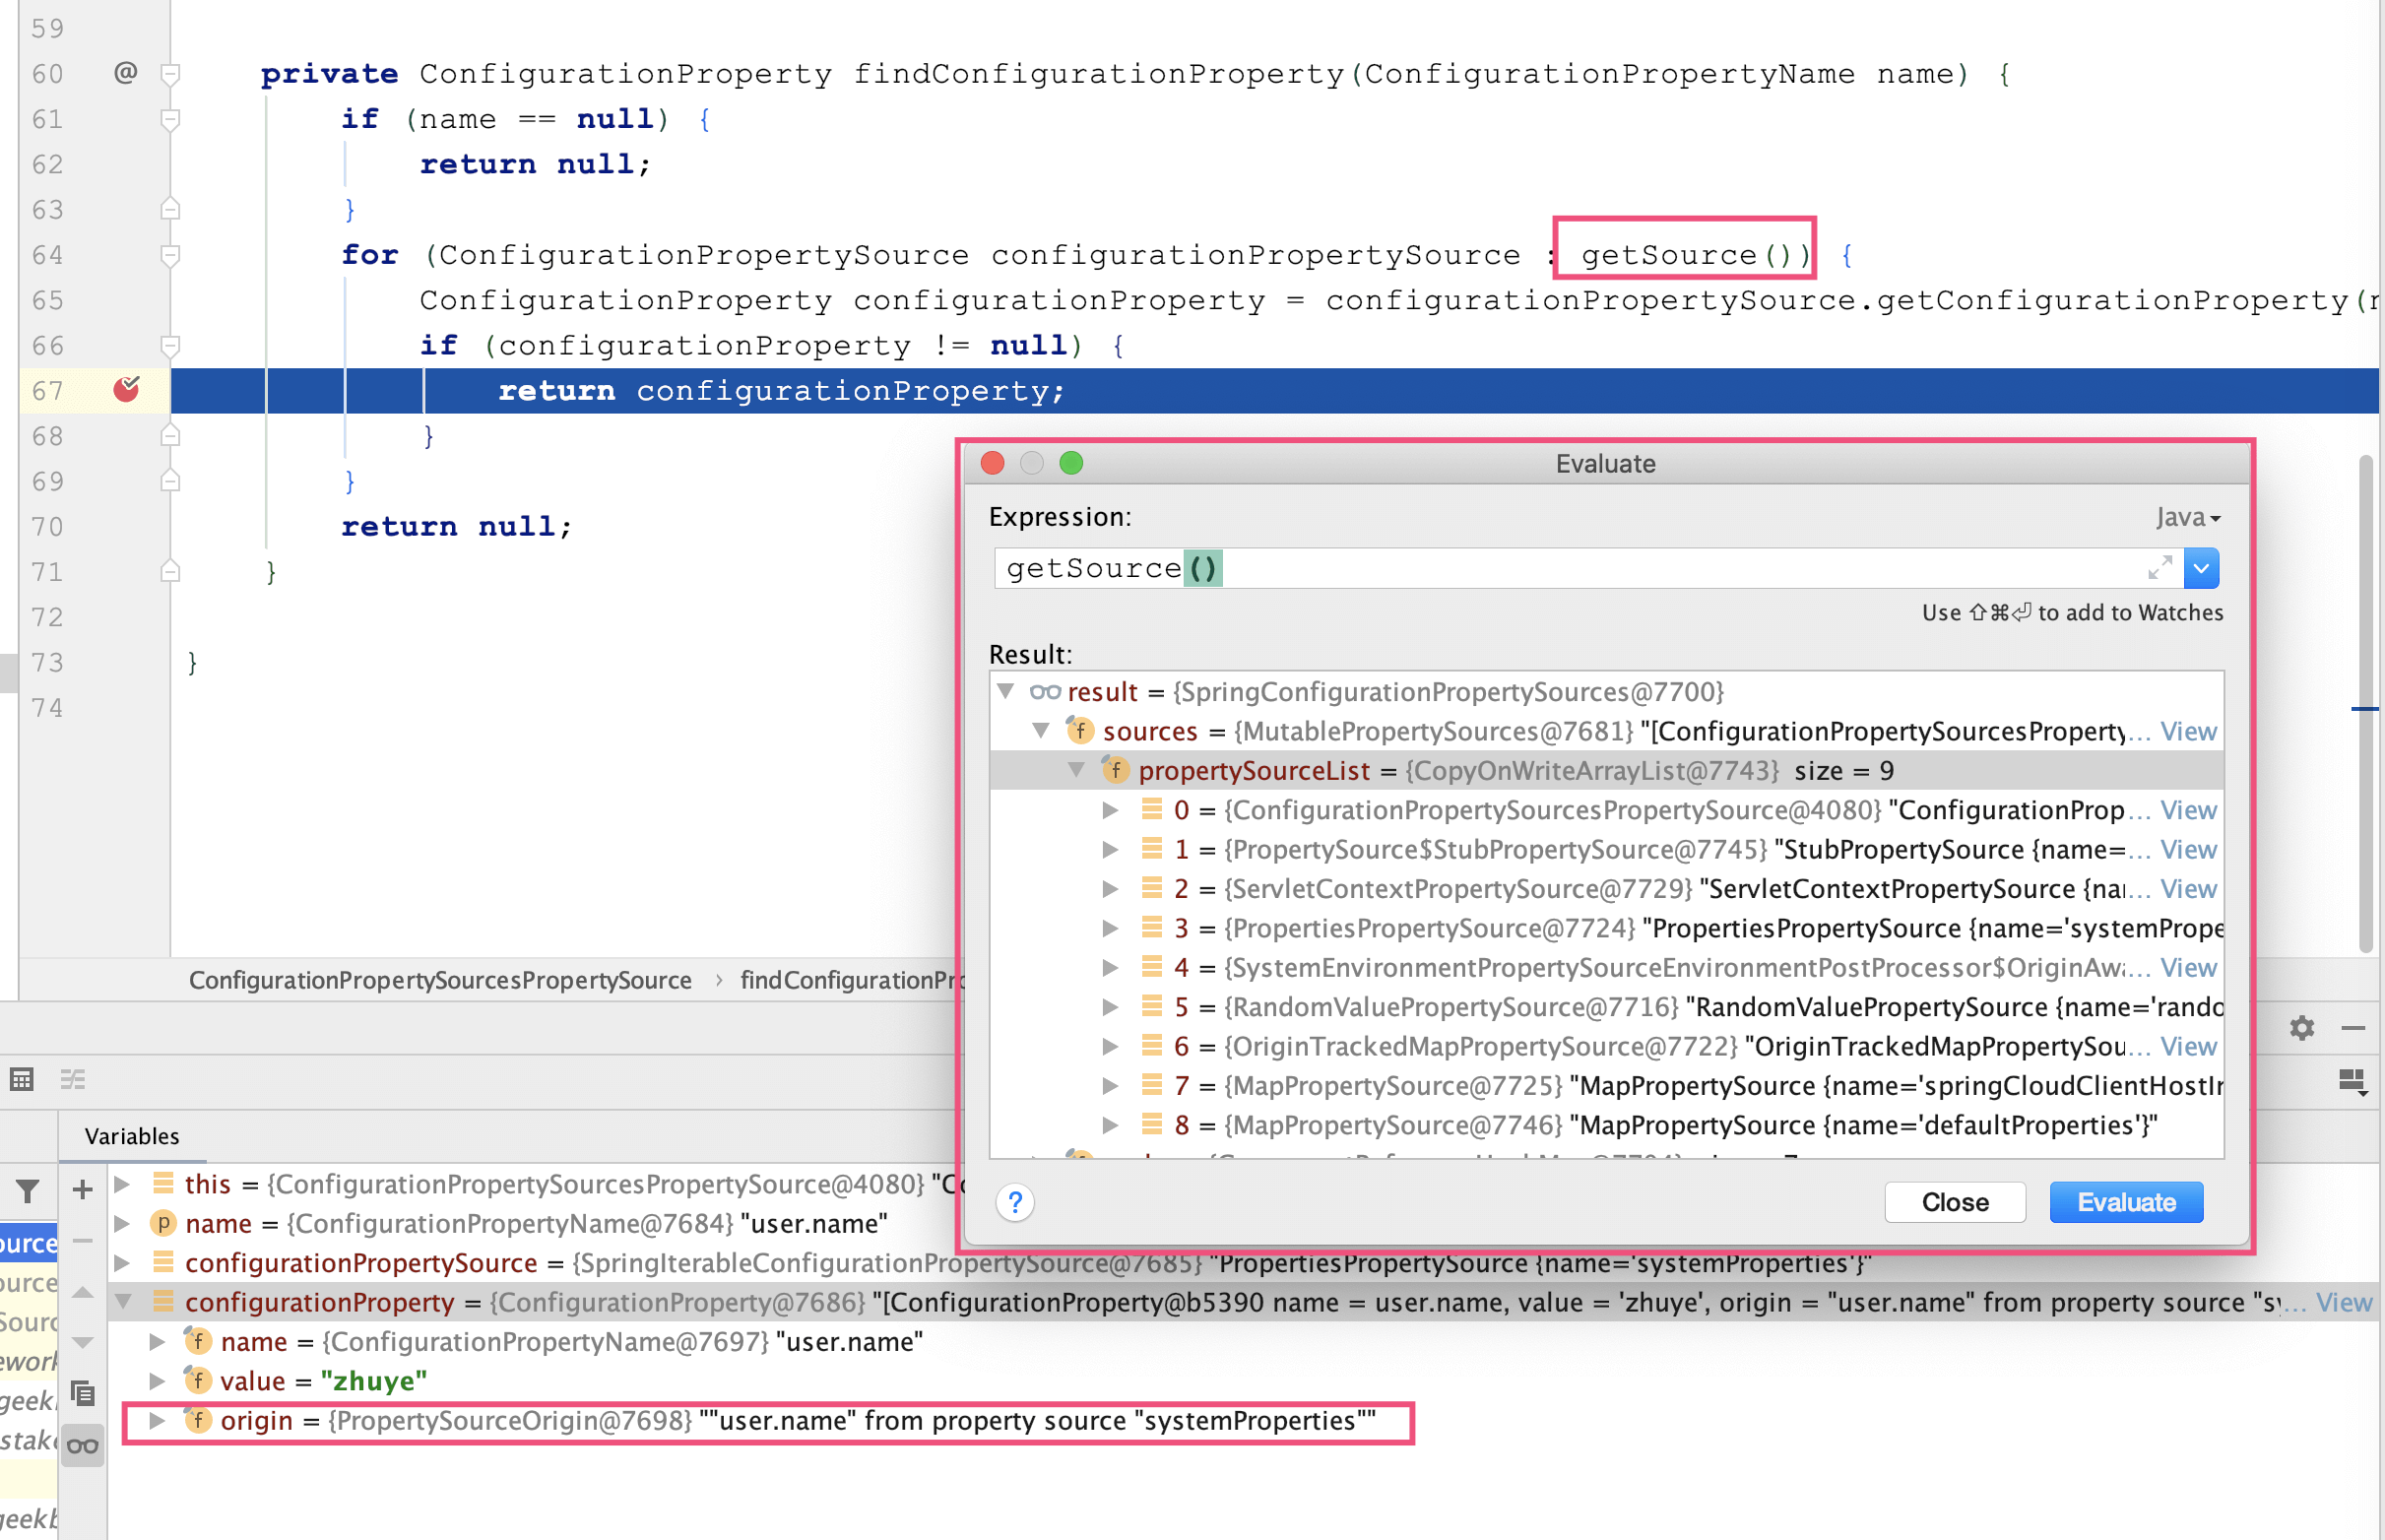
继续查看 SpringConfigurationPropertySources 可以发现,它返回的迭代器是内部类 SourcesIterator,在 fetchNext 方法获取下一个项时,通过 isIgnored 方法排除了 ConfigurationPropertySourcesPropertySource(源码第 38 行):
class SpringConfigurationPropertySources implements Iterable<ConfigurationPropertySource> {

  private final Iterable<PropertySource<?>> sources;
  private final Map<PropertySource<?>, ConfigurationPropertySource> cache = new ConcurrentReferenceHashMap<>(16,
      ReferenceType.SOFT);

  SpringConfigurationPropertySources(Iterable<PropertySource<?>> sources) {
    Assert.notNull(sources, "Sources must not be null");
    this.sources = sources;
  }

  @Override
  public Iterator<ConfigurationPropertySource> iterator() {
    return new SourcesIterator(this.sources.iterator(), this::adapt);
  }

  private static class SourcesIterator implements Iterator<ConfigurationPropertySource> {

    @Override
    public boolean hasNext() {
      return fetchNext() != null;
    }

    private ConfigurationPropertySource fetchNext() {
      if (this.next == null) {
        if (this.iterators.isEmpty()) {
          return null;
        }
        if (!this.iterators.peek().hasNext()) {
          this.iterators.pop();
          return fetchNext();
        }
        PropertySource<?> candidate = this.iterators.peek().next();
        if (candidate.getSource() instanceof ConfigurableEnvironment) {
          push((ConfigurableEnvironment) candidate.getSource());
          return fetchNext();
        }
        if (isIgnored(candidate)) {
          return fetchNext();
        }
        this.next = this.adapter.apply(candidate);
      }
      return this.next;
    }


    private void push(ConfigurableEnvironment environment) {
      this.iterators.push(environment.getPropertySources().iterator());
    }


    private boolean isIgnored(PropertySource<?> candidate) {
      return (candidate instanceof StubPropertySource
          || candidate instanceof ConfigurationPropertySourcesPropertySource);
    }
  }
}
2
3
4
5
6
7
8
9
10
11
12
13
14
15
16
17
18
19
20
21
22
23
24
25
26
27
28
29
30
31
32
33
34
35
36
37
38
39
40
41
42
43
44
45
46
47
48
49
50
51
52
53
54
55
56
57
我们已经了解了 ConfigurationPropertySourcesPropertySource 是所有配置源中的第一个,实现了对 PropertySourcesPropertyResolver 中遍历逻辑的“劫持”,并且知道了其遍历逻辑。最后一个问题是,它如何让自己成为第一个配置源呢?
再次运用之前我们学到的那个小技巧,来查看实例化 ConfigurationPropertySourcesPropertySource 的地方:
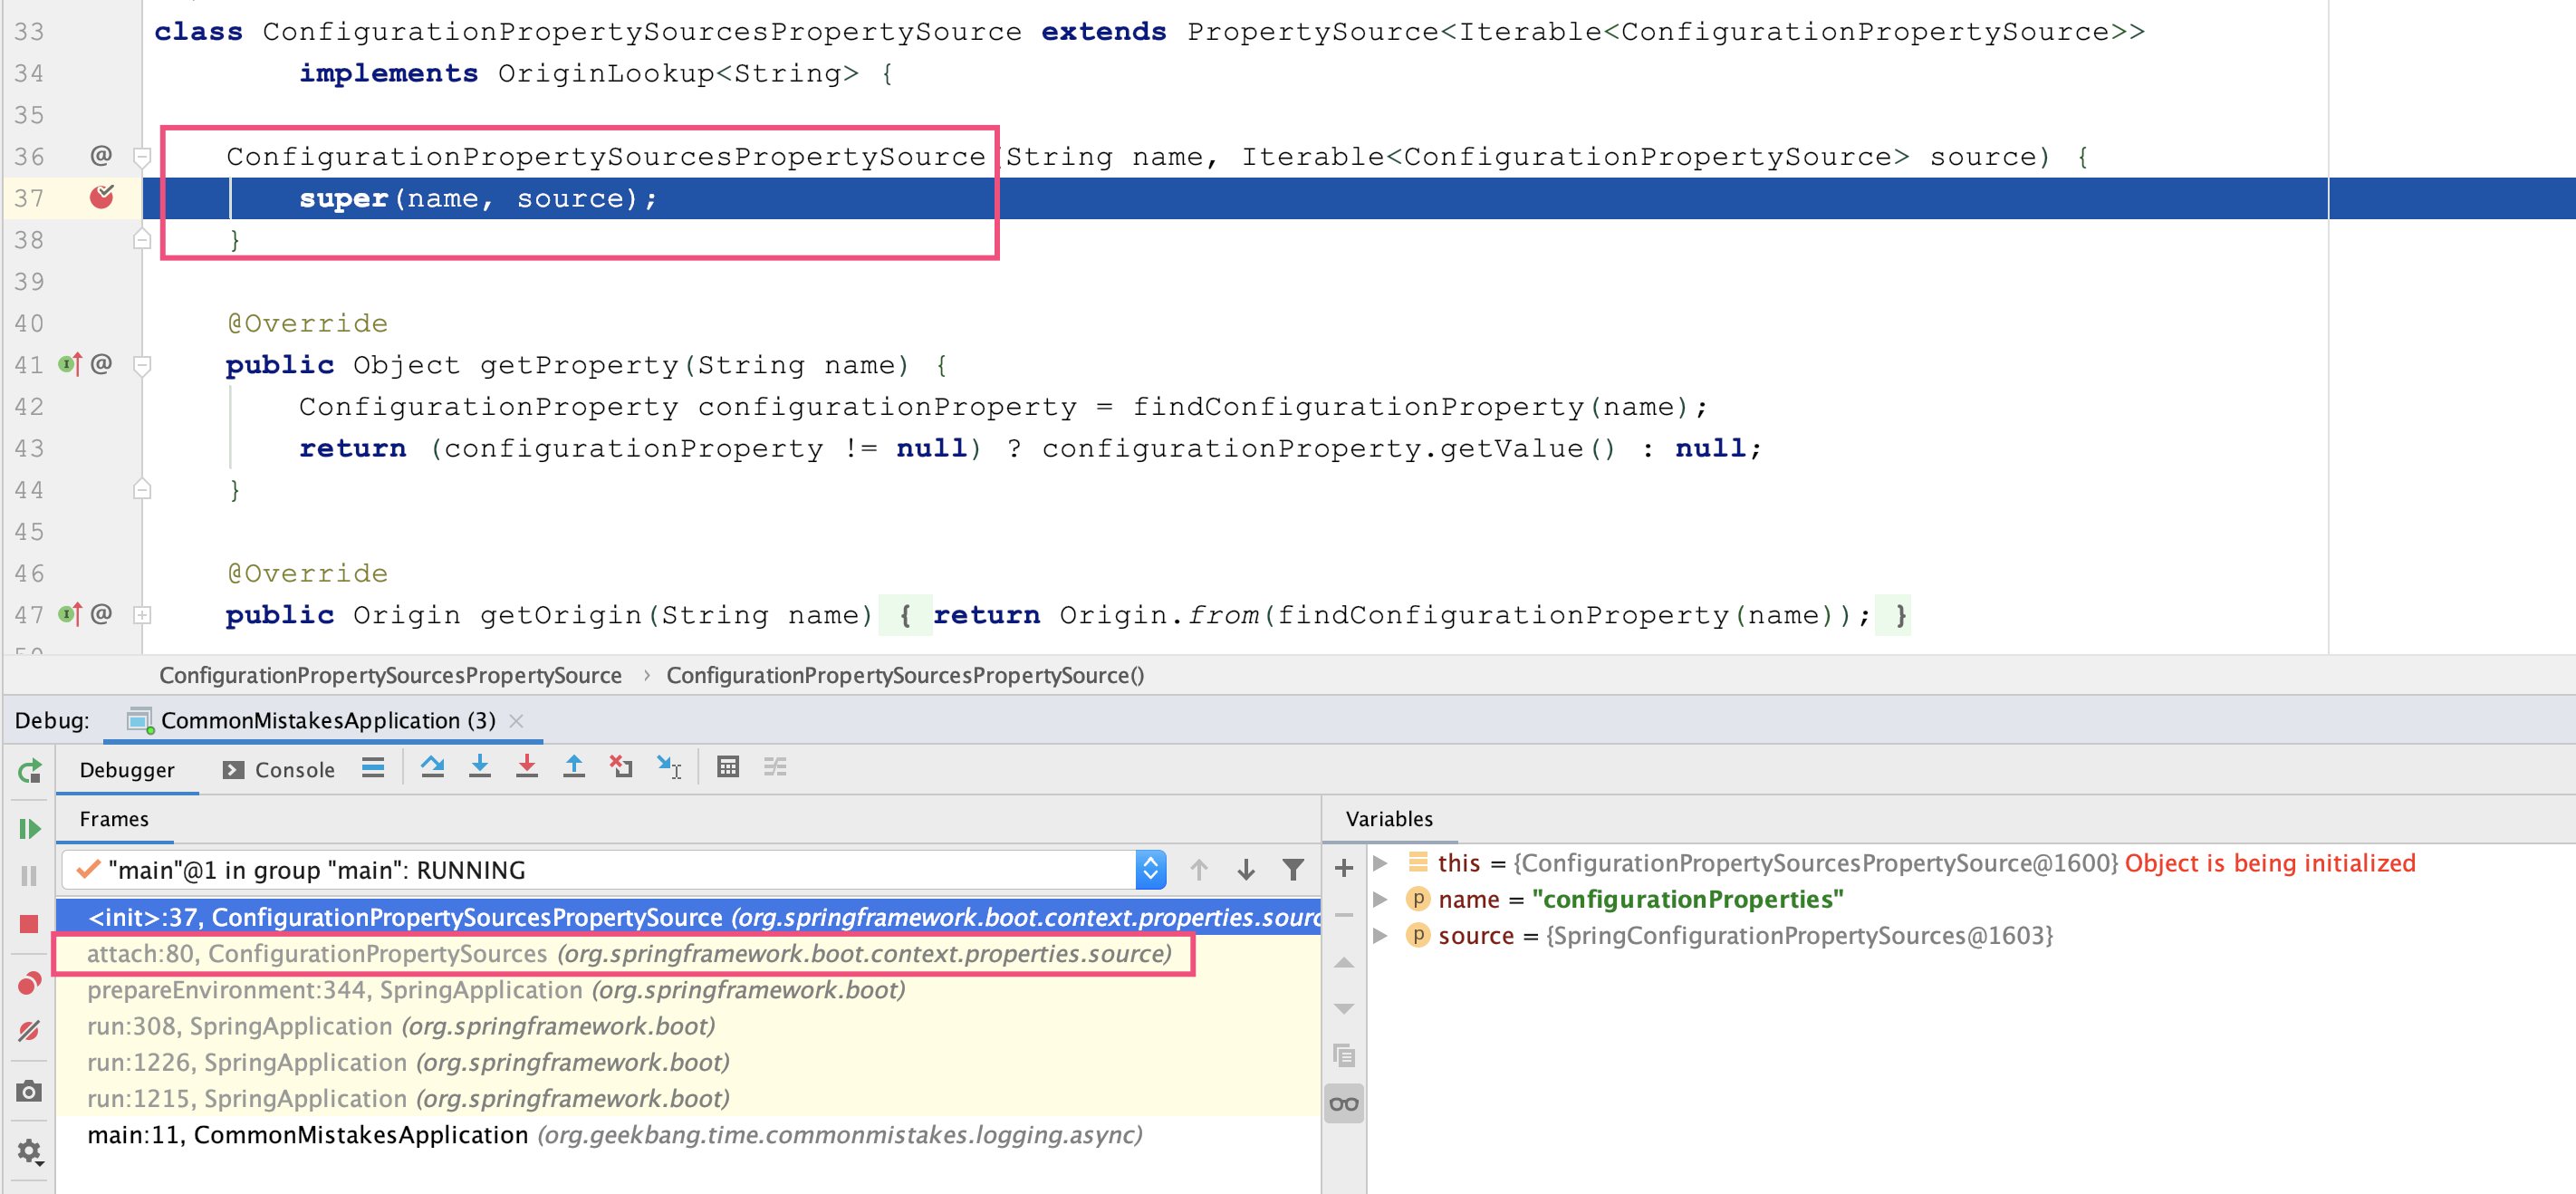
可以看到,ConfigurationPropertySourcesPropertySource 类是由 ConfigurationPropertySources 的 attach 方法实例化的。查阅源码可以发现,这个方法的确从环境中获得了原始的 MutablePropertySources,把自己加入成为一个元素:
public final class ConfigurationPropertySources {
  public static void attach(Environment environment) {
    MutablePropertySources sources = ((ConfigurableEnvironment) environment).getPropertySources();
    PropertySource<?> attached = sources.get(ATTACHED_PROPERTY_SOURCE_NAME);
    if (attached == null) {
      sources.addFirst(new ConfigurationPropertySourcesPropertySource(ATTACHED_PROPERTY_SOURCE_NAME,
          new SpringConfigurationPropertySources(sources)));
    }
  }
}
2
3
4
5
6
7
8
9
10
而这个 attach 方法,是 Spring 应用程序启动时准备环境的时候调用的。在 SpringApplication 的 run 方法中调用了 prepareEnvironment 方法,然后又调用了 ConfigurationPropertySources.attach 方法:
public class SpringApplication {

public ConfigurableApplicationContext run(String... args) {
    ...
    try {
      ApplicationArguments applicationArguments = new DefaultApplicationArguments(args);
      ConfigurableEnvironment environment = prepareEnvironment(listeners, applicationArguments);
      ...
  }
  private ConfigurableEnvironment prepareEnvironment(SpringApplicationRunListeners listeners,
      ApplicationArguments applicationArguments) {
    ...
    ConfigurationPropertySources.attach(environment);
    ...
    }
}
2
3
4
5
6
7
8
9
10
11
12
13
14
15
16
# 问题解答
问题 1:泛型类型擦除后会生成一个 bridge 方法,这个方法同时又是 synthetic 方法。除了泛型类型擦除,你知道还有什么情况编译器会生成 synthetic 方法吗?
答:Synthetic 方法是编译器自动生成的方法(在源码中不出现)。除了文中提到的泛型类型擦除外,Synthetic 方法还可能出现的一个比较常见的场景,是内部类和顶层类需要相互访问对方的 private 字段或方法的时候。
编译后的内部类和普通类没有区别,遵循 private 字段或方法对外部类不可见的原则,但语法上内部类和顶层类的私有字段需要可以相互访问。为了解决这个矛盾,编译器就只能生成桥接方法,也就是 Synthetic 方法,来把 private 成员转换为 package 级别的访问限制。
比如如下代码,InnerClassApplication 类的 test 方法需要访问内部类 MyInnerClass 类的私有字段 name,而内部类 MyInnerClass 类的 test 方法需要访问外部类 InnerClassApplication 类的私有字段 gender。
public class InnerClassApplication {

    private String gender = "male";
    public static void main(String[] args) throws Exception {
        InnerClassApplication application = new InnerClassApplication();
        application.test();
    }

    private void test(){
        MyInnerClass myInnerClass = new MyInnerClass();
        System.out.println(myInnerClass.name);
        myInnerClass.test();
    }

    class MyInnerClass {
        private String name = "zhuye";
        void test(){
            System.out.println(gender);
        }
    }
}
1
2
3
4
5
6
7
8
9
10
11
12
13
14
15
16
17
18
19
20
21编译器会为 InnerClassApplication 和 MyInnerClass 都生成桥接方法。
如下图所示,InnerClassApplication 的 test 方法,其实调用的是内部类的 access$000 静态方法:
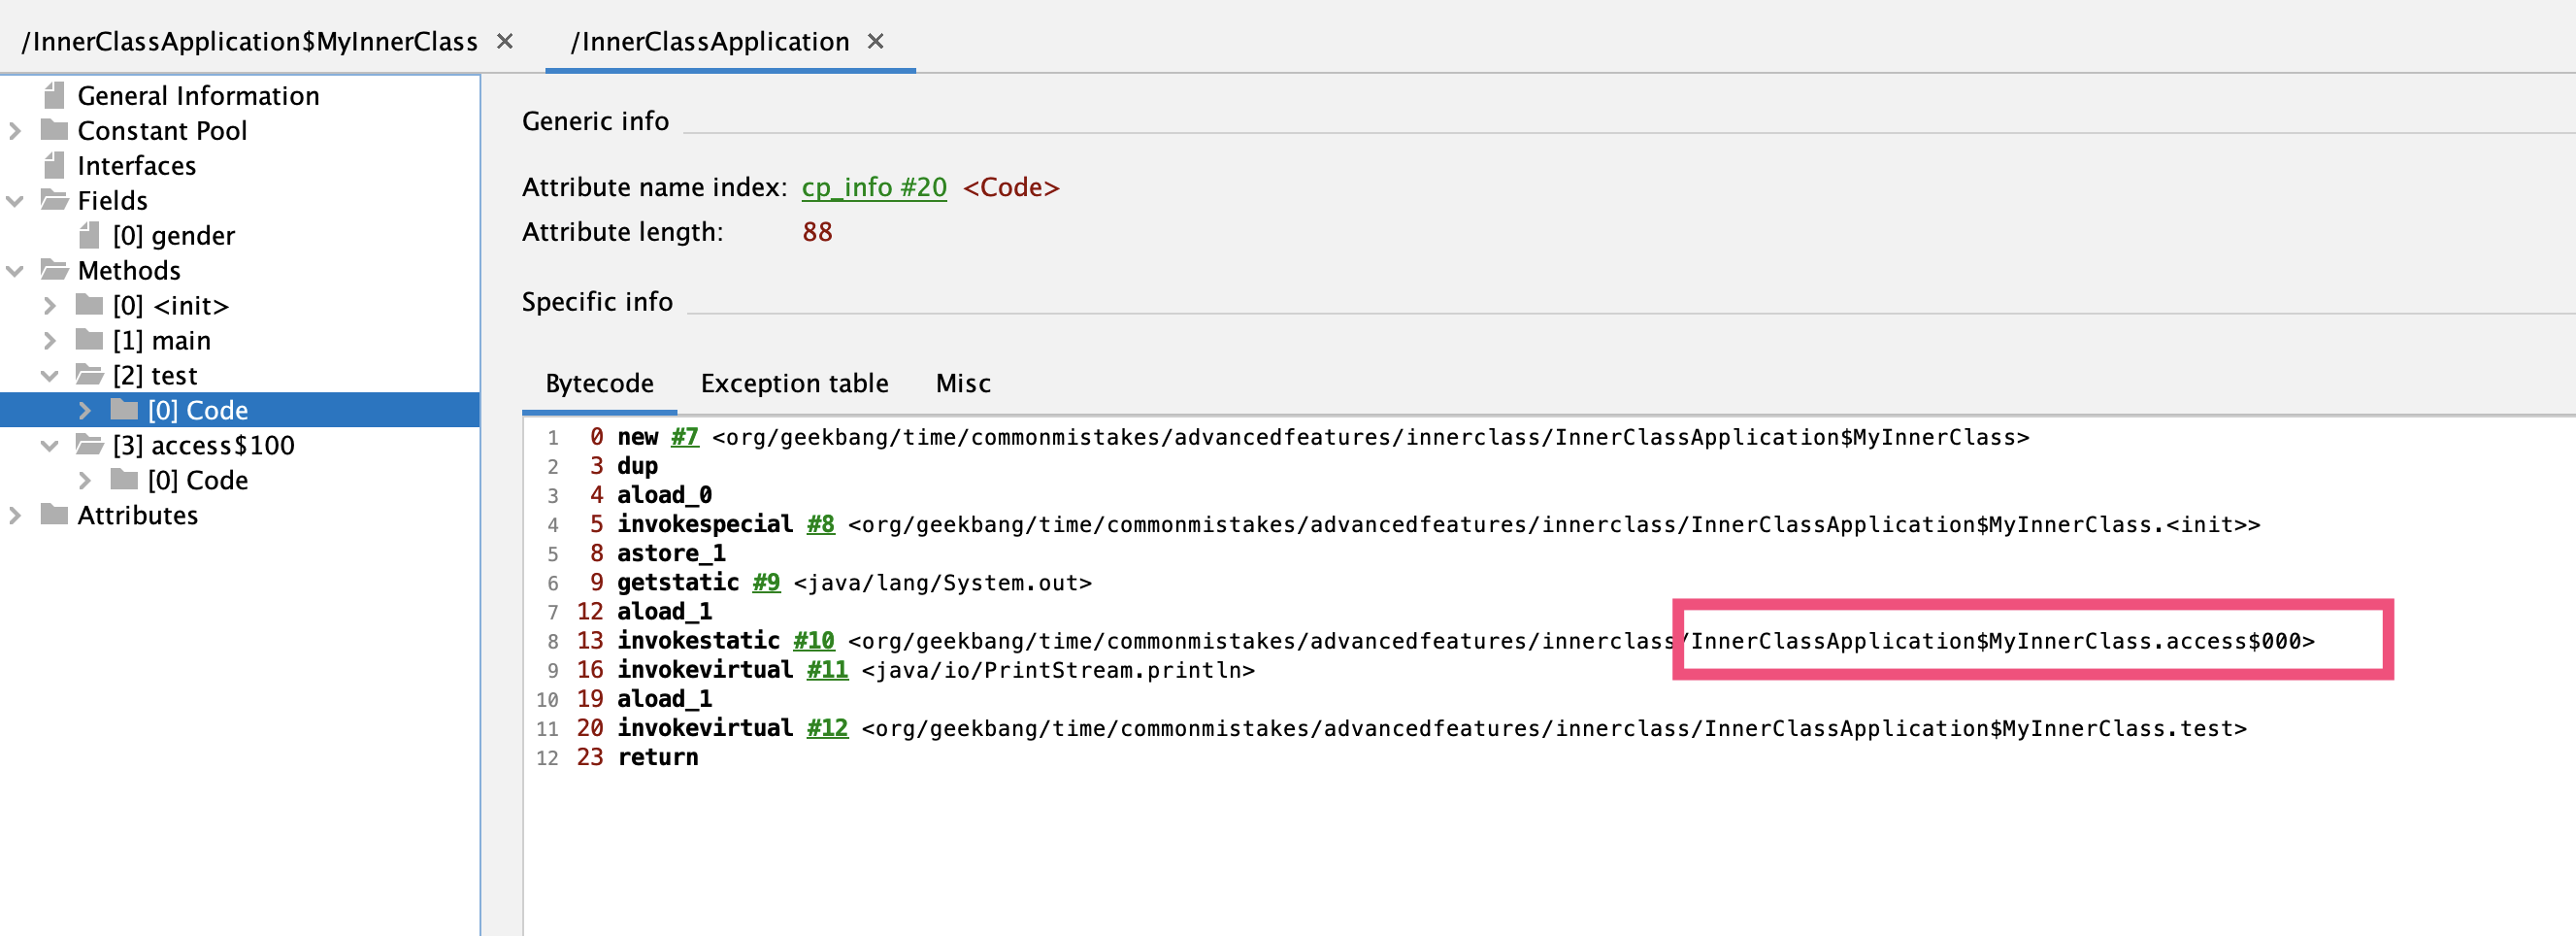
这个 access$000 方法是 Synthetic 方法:
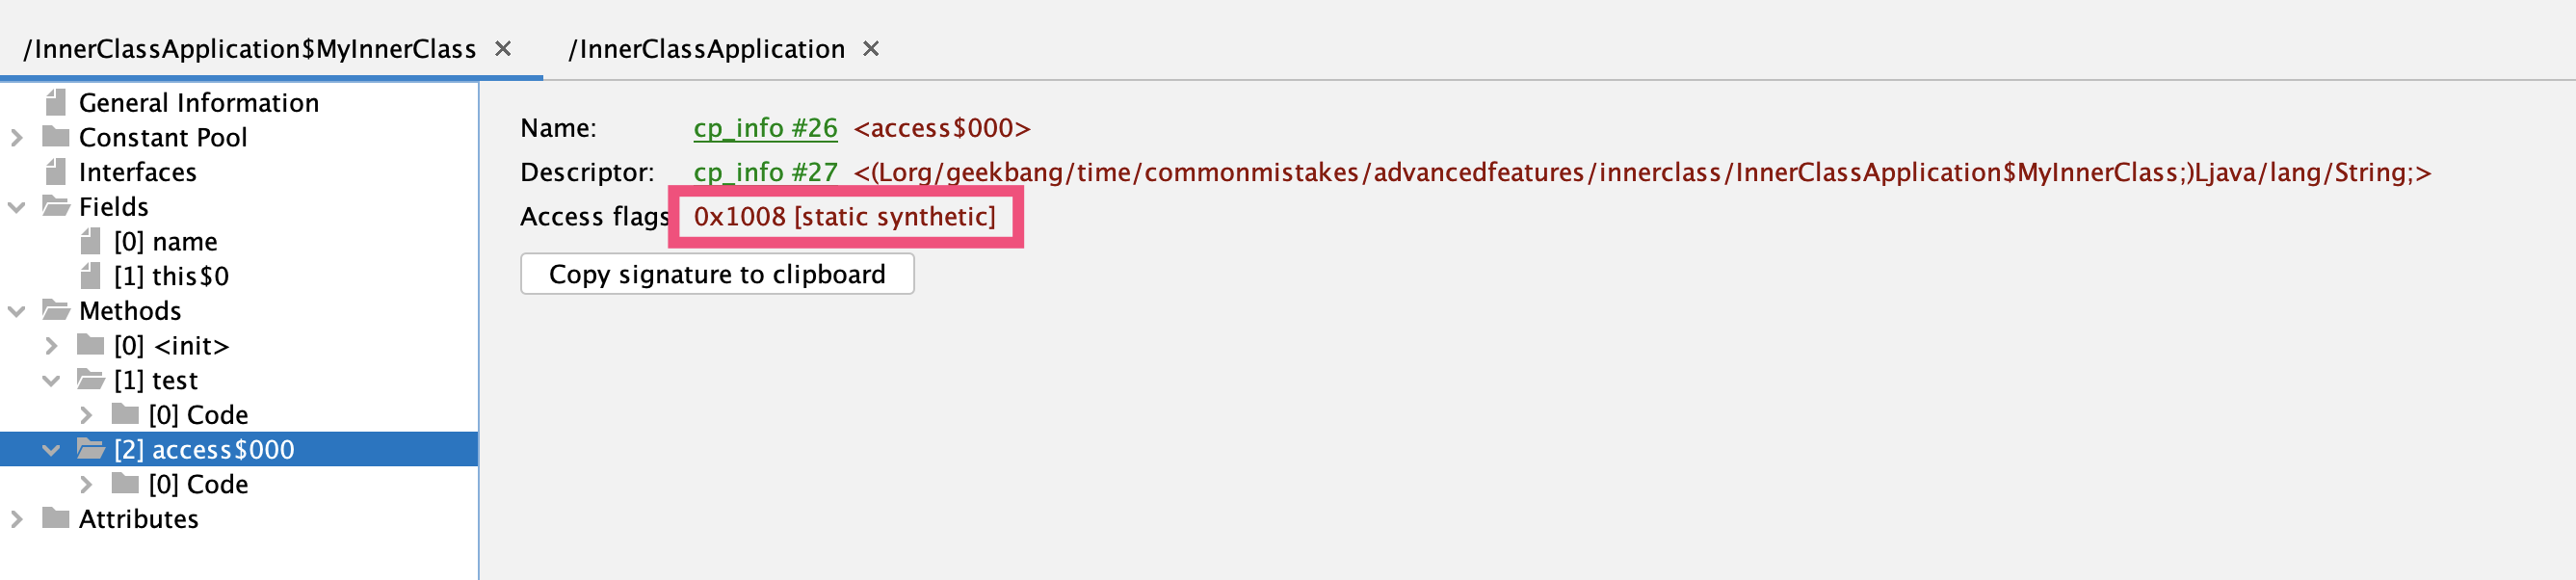
而 Synthetic 方法的实现转接调用了内部类的 name 字段:
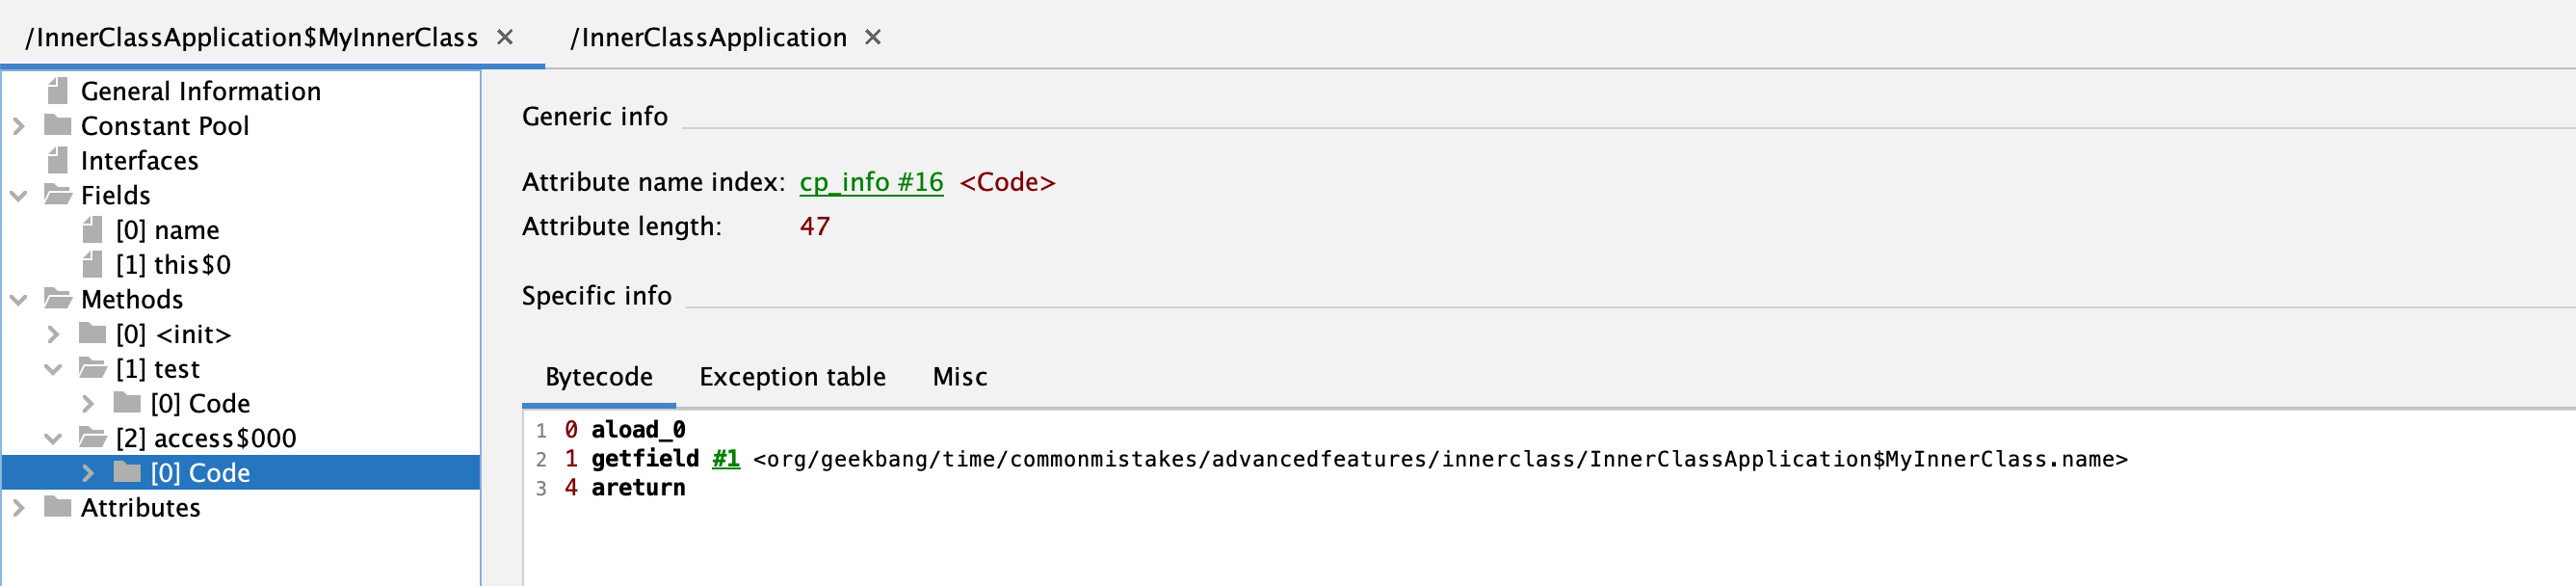
反过来,内部类的 test 方法也是通过外部类 InnerClassApplication 类的桥接方法 access$100 调用到其私有字段:
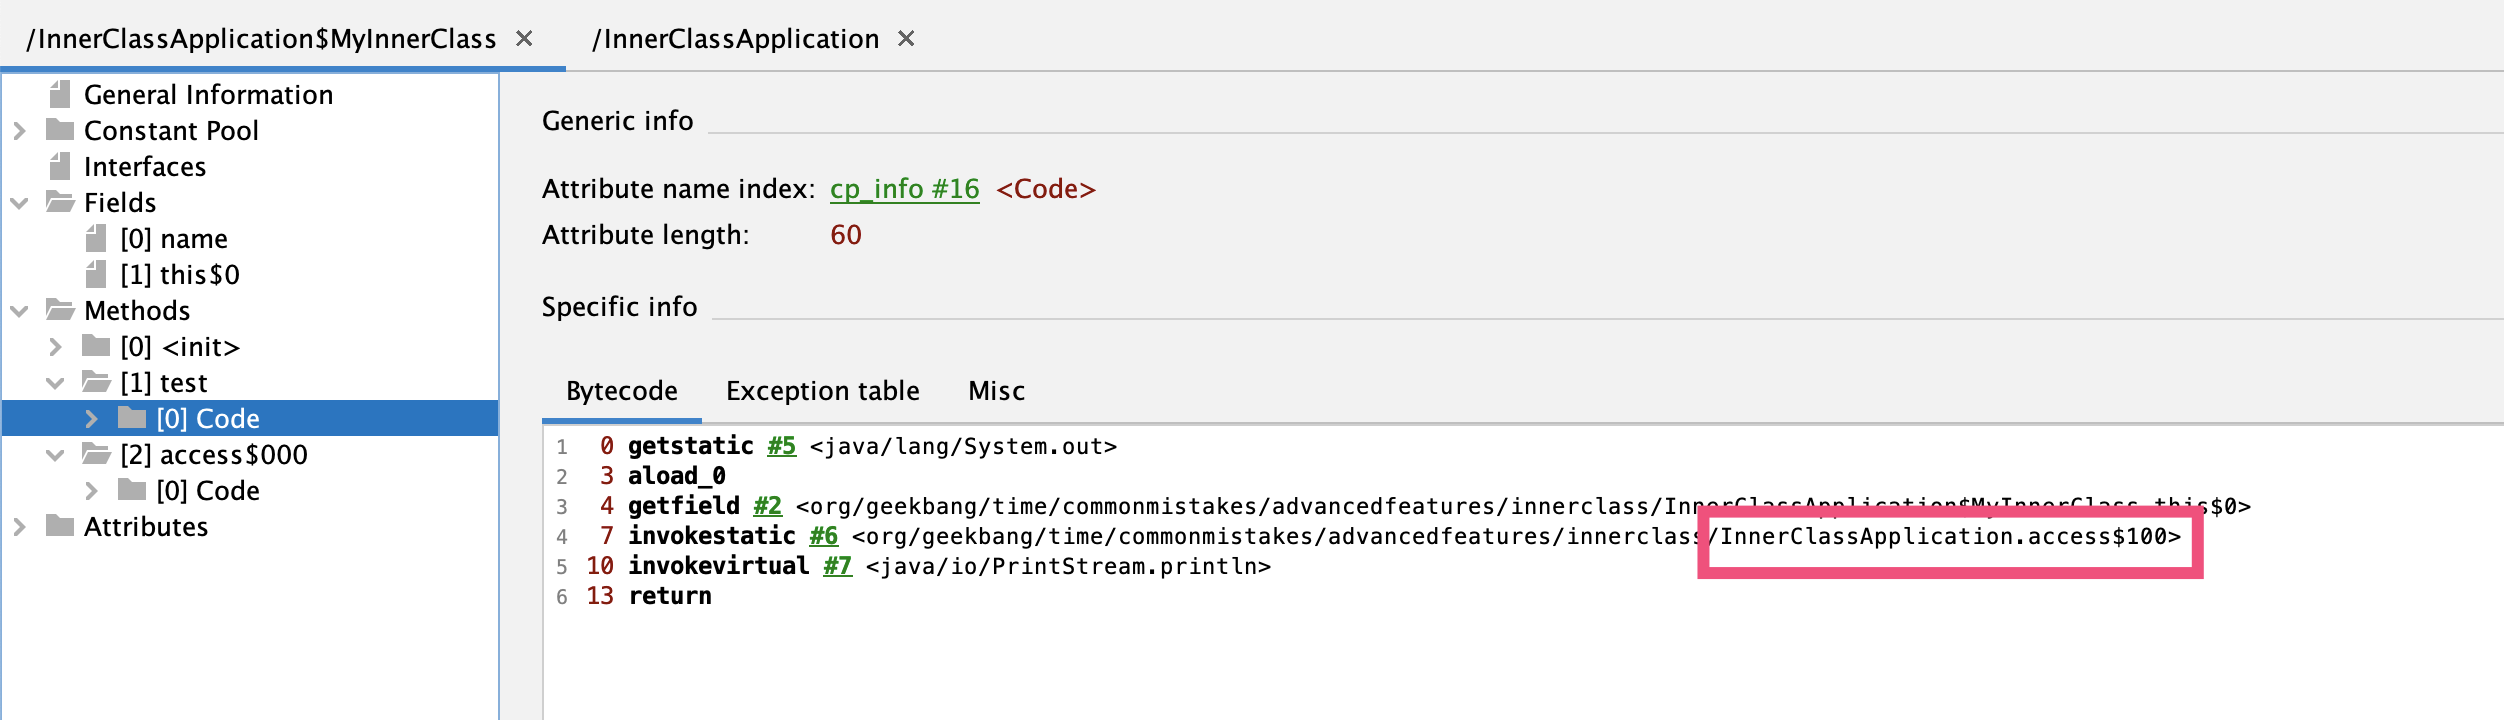
问题 2:关于注解继承问题,你觉得 Spring 的常用注解 @Service、@Controller 是否支持继承呢?
答:Spring 的常用注解 @Service、@Controller,不支持继承。这些注解只支持放到具体的(非接口非抽象)顶层类上(来让它们成为 Bean),如果支持继承会非常不灵活而且容易出错。
问题 3:Spring 的 ConcurrentReferenceHashMap,针对 Key 和 Value 支持软引用和弱引用两种方式。你觉得哪种方式更适合做缓存呢?
答:软引用和弱引用的区别在于:若一个对象是弱引用可达,无论当前内存是否充足它都会被回收,而软引用可达的对象在内存不充足时才会被回收。因此,软引用要比弱引用“强”一些。
那么,使用弱引用作为缓存就会让缓存的生命周期过短,所以软引用更适合作为缓存。
问题 4:当我们需要动态执行一些表达式时,可以使用 Groovy 动态语言实现:new 出一个 GroovyShell 类,然后调用 evaluate 方法动态执行脚本。这种方式的问题是,会重复产生大量的类,增加 Metaspace 区的 GC 负担,有可能会引起 OOM。你知道如何避免这个问题吗?
答:我们可以把脚本包装为一个函数,先调用 parse 函数来得到 Script 对象,然后缓存起来,以后直接使用 invokeMethod 方法调用这个函数即可:
private Object rightGroovy(String script, String method, Object... args) {
    Script scriptObject;

    if (SCRIPT_CACHE.containsKey(script)) {
        //如果脚本已经生成过Script则直接使用
        scriptObject = SCRIPT_CACHE.get(script);
    } else {
        //否则把脚本解析为Script
        scriptObject = shell.parse(script);
        SCRIPT_CACHE.put(script, scriptObject);
    }
    return scriptObject.invokeMethod(method, args);
}
1
2
3
4
5
6
7
8
9
10
11
12
13问题 5:在介绍二级索引代价时,我们通过 EXPLAIN 命令看到了索引覆盖和回表的两种情况。你能用 optimizer trace 来分析一下这两种情况的成本差异吗?
答:如下代码所示,打开 optimizer_trace 后,再执行 SQL 就可以查询 information_schema.OPTIMIZER_TRACE 表查看执行计划了,最后可以关闭 optimizer_trace 功能:
SET optimizer_trace="enabled=on";
SELECT * FROM person WHERE NAME >'name84059' AND create_time>'2020-01-24 05:00:00';
SELECT * FROM information_schema.OPTIMIZER_TRACE;
SET optimizer_trace="enabled=off";
1
2
3
4假设我们为表 person 的 NAME 和 SCORE 列建了联合索引,那么下面第二条语句应该可以走索引覆盖,而第一条语句需要回表:
explain select * from person where NAME='name1';
explain select NAME,SCORE from person where NAME='name1';
1
2通过观察 OPTIMIZER_TRACE 的输出可以看到,索引覆盖(index_only=true)的成本是 1.21 而回表查询(index_only=false)的是 2.21,也就是索引覆盖节省了回表的成本 1。
索引覆盖:
analyzing_range_alternatives": {
  "range_scan_alternatives": [
  {
    "index": "name_score",
    "ranges": [
      "name1 <= name <= name1"
    ] /* ranges */,
    "index_dives_for_eq_ranges": true,
    "rowid_ordered": false,
    "using_mrr": false,
    "index_only": true,
    "rows": 1,
    "cost": 1.21,
    "chosen": true
  }
]
1
2
3
4
5
6
7
8
9
10
11
12
13
14
15
16回表:
"range_scan_alternatives": [
  {
    "index": "name_score",
    "ranges": [
      "name1 <= name <= name1"
    ] /* ranges */,
    "index_dives_for_eq_ranges": true,
    "rowid_ordered": false,
    "using_mrr": false,
    "index_only": false,
    "rows": 1,
    "cost": 2.21,
    "chosen": true
  }
]
1
2
3
4
5
6
7
8
9
10
11
12
13
14
15问题 6:索引除了可以用于加速搜索外,还可以在排序时发挥作用,你能通过 EXPLAIN 来证明吗?你知道,针对排序在什么情况下,索引会失效吗?
答:排序使用到索引,在执行计划中的体现就是 key 这一列。如果没有用到索引,会在 Extra 中看到 Using filesort,代表使用了内存或磁盘进行排序。而具体走内存还是磁盘,是由 sort_buffer_size 和排序数据大小决定的。
排序无法使用到索引的情况有:
- 对于使用联合索引进行排序的场景,多个字段排序 ASC 和 DESC 混用;
- a+b 作为联合索引,按照 a 范围查询后按照 b 排序;
- 排序列涉及到的多个字段不属于同一个联合索引;
- 排序列使用了表达式。
其实,这些原因都和索引的结构有关。
问题 7:考虑到 Demo 的简洁,这一讲中所有数据访问使用的都是 Spring Data JPA。国内大多数互联网业务项目是使用 MyBatis 进行数据访问的,使用 MyBatis 配合 Spring 的声明式事务也同样需要注意这一讲中提到的这些点。你可以尝试把今天的 Demo 改为 MyBatis 做数据访问实现,看看日志中是否可以体现出这些坑?
核心代码:
@Transactional
public void createUser(String name) {
    createMainUser(name);
    try {
        subUserService.createSubUser(name);
    } catch (Exception ex) {
        log.error("create sub user error:{}", ex.getMessage());
    }
    //如果createSubUser是NESTED模式,这里抛出异常会导致嵌套事务无法“提交”
    throw new RuntimeException("create main user error");
}
1
2
3
4
5
6
7
8
9
10
11子方法使用了 NESTED 事务传播模式:
@Transactional(propagation = Propagation.NESTED)
public void createSubUser(String name) {
    userDataMapper.insert(name, "sub");
}
1
2
3
4执行日志如下图所示:
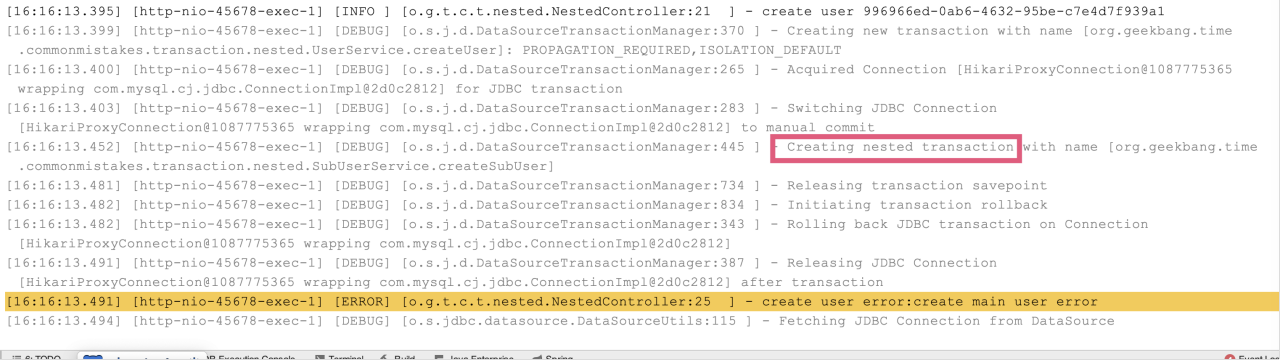
每个 NESTED 事务执行前,会将当前操作保存下来,叫做 savepoint(保存点)。NESTED 事务在外部事务提交以后自己才会提交,如果当前 NESTED 事务执行失败,则回滚到之前的保存点。
问题 8:在讲“小心 Spring 的事务可能没有生效”时我们提到,如果要针对 private 方法启用事务,动态代理方式的 AOP 不可行,需要使用静态织入方式的 AOP,也就是在编译期间织入事务增强代码,可以配置 Spring 框架使用 AspectJ 来实现 AOP。你能否参阅 Spring 的文档“Using @Transactional with AspectJ”试试呢?注意:AspectJ 配合 lombok 使用,还可能会踩一些坑。
答:我们需要加入 aspectj 的依赖和配置 aspectj-maven-plugin 插件,并且需要设置 Spring 开启 AspectJ 事务管理模式。具体的实现方式,包括如下 4 步。
第一步,引入 spring-aspects 依赖:
<dependency>
    <groupId>org.springframework</groupId>
    <artifactId>spring-aspects</artifactId>
</dependency>
1
2
3
4第二步,加入 lombok 和 aspectj 插件:
<plugin>
    <groupId>org.projectlombok</groupId>
    <artifactId>lombok-maven-plugin</artifactId>
    <version>1.18.0.0</version>
    <executions>
        <execution>
            <phase>generate-sources</phase>
            <goals>
                <goal>delombok</goal>
            </goals>
        </execution>
    </executions>
    <configuration>
        <addOutputDirectory>false</addOutputDirectory>
        <sourceDirectory>src/main/java</sourceDirectory>
    </configuration>
</plugin>
<plugin>
    <groupId>org.codehaus.mojo</groupId>
    <artifactId>aspectj-maven-plugin</artifactId>
    <version>1.10</version>
    <configuration>
        <complianceLevel>1.8</complianceLevel>
        <source>1.8</source>
        <aspectLibraries>
            <aspectLibrary>
                <groupId>org.springframework</groupId>
                <artifactId>spring-aspects</artifactId>
            </aspectLibrary>
        </aspectLibraries>
    </configuration>
    <executions>
        <execution>
            <goals>
                <goal>compile</goal>
                <goal>test-compile</goal>
            </goals>
        </execution>
    </executions>
</plugin>
1
2
3
4
5
6
7
8
9
10
11
12
13
14
15
16
17
18
19
20
21
22
23
24
25
26
27
28
29
30
31
32
33
34
35
36
37
38
39
40使用 delombok 插件的目的是,把代码中的 Lombok 注解先编译为代码,这样 AspectJ 编译不会有问题,同时需要设置中的 sourceDirectory 为 delombok 目录:
<sourceDirectory>${project.build.directory}/generated-sources/delombok</sourceDirectory>1第三步,设置 @EnableTransactionManagement 注解,开启事务管理走 AspectJ 模式:
@SpringBootApplication
@EnableTransactionManagement(mode = AdviceMode.ASPECTJ)
public class CommonMistakesApplication {
1
2
3第四步,使用 Maven 编译项目,编译后查看 createUserPrivate 方法的源码,可以发现 AspectJ 帮我们做编译时织入(Compile Time Weaving):
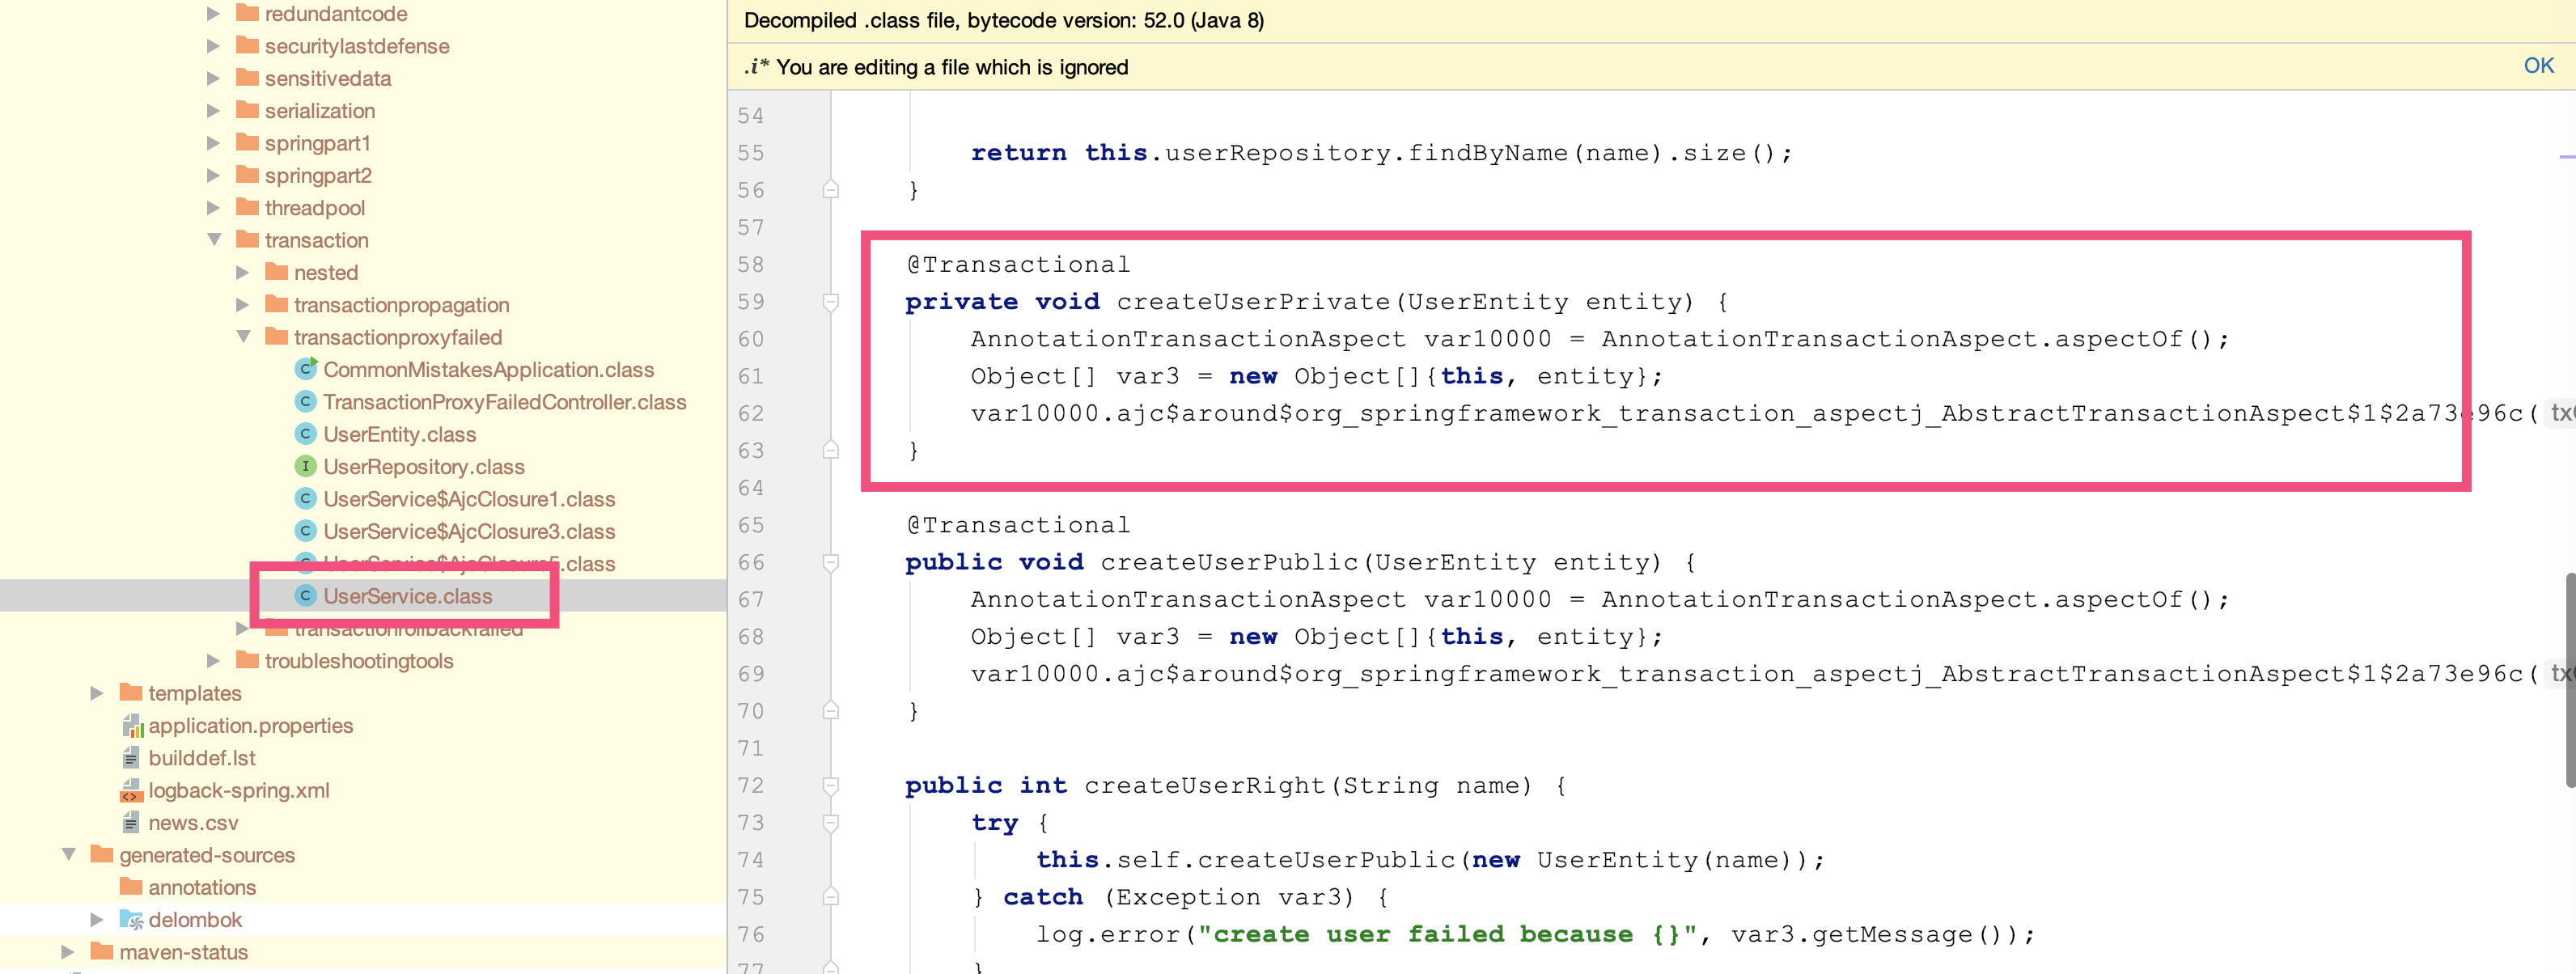
运行程序,观察日志可以发现 createUserPrivate(私有)方法同样应用了事务,出异常后事务回滚:
[14:21:39.155] [http-nio-45678-exec-2] [DEBUG] [o.s.orm.jpa.JpaTransactionManager:370 ] - Creating new transaction with name [org.geekbang.time.commonmistakes.transaction.transactionproxyfailed.UserService.createUserPrivate]: PROPAGATION_REQUIRED,ISOLATION_DEFAULT
[14:21:39.155] [http-nio-45678-exec-2] [DEBUG] [o.s.orm.jpa.JpaTransactionManager:393 ] - Opened new EntityManager [SessionImpl(1087443072<open>)] for JPA transaction
[14:21:39.158] [http-nio-45678-exec-2] [DEBUG] [o.s.orm.jpa.JpaTransactionManager:421 ] - Exposing JPA transaction as JDBC [org.springframework.orm.jpa.vendor.HibernateJpaDialect$HibernateConnectionHandle@4e16e6ea]
[14:21:39.159] [http-nio-45678-exec-2] [DEBUG] [o.s.orm.jpa.JpaTransactionManager:356 ] - Found thread-bound EntityManager [SessionImpl(1087443072<open>)] for JPA transaction
[14:21:39.159] [http-nio-45678-exec-2] [DEBUG] [o.s.orm.jpa.JpaTransactionManager:471 ] - Participating in existing transaction
[14:21:39.173] [http-nio-45678-exec-2] [DEBUG] [o.s.orm.jpa.JpaTransactionManager:834 ] - Initiating transaction rollback
[14:21:39.173] [http-nio-45678-exec-2] [DEBUG] [o.s.orm.jpa.JpaTransactionManager:555 ] - Rolling back JPA transaction on EntityManager [SessionImpl(1087443072<open>)]
[14:21:39.176] [http-nio-45678-exec-2] [DEBUG] [o.s.orm.jpa.JpaTransactionManager:620 ] - Closing JPA EntityManager [SessionImpl(1087443072<open>)] after transaction
[14:21:39.176] [http-nio-45678-exec-2] [ERROR] [o.g.t.c.t.t.UserService:28  ] - create user failed because invalid username!
[14:21:39.177] [http-nio-45678-exec-2] [DEBUG] [o.s.o.j.SharedEntityManagerCreator$SharedEntityManagerInvocationHandler:305 ] - Creating new EntityManager for shared EntityManager invocation
1
2
3
4
5
6
7
8
9
10问题 9:除了通过 @Autowired 注入 Bean 外,还可以使用 @Inject 或 @Resource 来注入 Bean。你知道这三种方式的区别是什么吗?
答:我们先说一下使用 @Autowired、@Inject 和 @Resource 这三种注解注入 Bean 的方式:
- @Autowired,是 Spring 的注解,优先按照类型注入。当无法确定具体注入类型的时候,可以通过 @Qualifier 注解指定 Bean 名称。
- @Inject:是 JSR330 规范的实现,也是根据类型进行自动装配的,这一点和 @Autowired 类似。如果需要按名称进行装配,则需要配合使用 @Named。@Autowired 和 @Inject 的区别在于,前者可以使用 required=false 允许注入 null,后者允许注入一个 Provider 实现延迟注入。
- @Resource:JSR250 规范的实现,如果不指定 name 优先根据名称进行匹配(然后才是类型),如果指定 name 则仅根据名称匹配。
问题 10:当 Bean 产生循环依赖时,比如 BeanA 的构造方法依赖 BeanB 作为成员需要注入,BeanB 也依赖 BeanA,你觉得会出现什么问题呢?又有哪些解决方式呢?
答:Bean 产生循环依赖,主要包括两种情况:一种是注入属性或字段涉及循环依赖,另一种是构造方法注入涉及循环依赖。
第一种,注入属性或字段涉及循环依赖,比如 TestA 和 TestB 相互依赖:
@Component
public class TestA {
    @Autowired
    @Getter
    private TestB testB;
}

@Component
public class TestB {
    @Autowired
    @Getter
    private TestA testA;
}
1
2
3
4
5
6
7
8
9
10
11
12
13针对这个问题,Spring 内部通过三个 Map 的方式解决了这个问题,不会出错。基本原理是,因为循环依赖,所以实例的初始化无法一次到位,需要分步进行:
- 创建 A(仅仅实例化,不注入依赖);
- 创建 B(仅仅实例化,不注入依赖);
- 为 B 注入 A(此时 B 已健全);
- 为 A 注入 B(此时 A 也健全)。
参见:一文告诉你Spring是如何利用"三级缓存"巧妙解决Bean的循环依赖问题的 (opens new window)
第二种,构造方法注入涉及循环依赖。遇到这种情况的话,程序无法启动,比如 TestC 和 TestD 的相互依赖:
@Component
public class TestC {
    @Getter
    private TestD testD;

    @Autowired
    public TestC(TestD testD) {
        this.testD = testD;
    }
}

@Component
public class TestD {
    @Getter
    private TestC testC;

    @Autowired
    public TestD(TestC testC) {
        this.testC = testC;
    }
}
1
2
3
4
5
6
7
8
9
10
11
12
13
14
15
16
17
18
19
20
21这种循环依赖的主要解决方式,有 2 种:
改为属性或字段注入;
使用 @Lazy 延迟注入。比如如下代码:
@Component
public class TestC {
    @Getter
    private TestD testD;

    @Autowired
    public TestC(@Lazy TestD testD) {
        this.testD = testD;
    }
}
1
2
3
4
5
6
7
8
9
10其实,这种 @Lazy 方式注入的就不是实际的类型了,而是代理类,获取的时候通过代理去拿值(实例化)。所以,它可以解决循环依赖无法实例化的问题。
问题 11:除了 Spring 框架这两讲涉及的 execution、within、@within、@annotation 四个指示器外,Spring AOP 还支持 this、target、args、@target、@args。你能说说后面五种指示器的作用吗?
答:关于这些指示器的作用,你可以参考官方文档,文档里已经写的很清晰。
总结一下,按照使用场景,建议使用下面这些指示器:
- 针对方法签名,使用 execution;
- 针对类型匹配,使用 within(匹配类型)、this(匹配代理类实例)、target(匹配代理背后的目标类实例)、args(匹配参数);
- 针对注解匹配,使用 @annotation(使用指定注解标注的方法)、@target(使用指定注解标注的类)、@args(使用指定注解标注的类作为某个方法的参数)。
你可能会问,@within 怎么没有呢?
其实,对于 Spring 默认的基于动态代理或 CGLIB 的 AOP,因为切点只能是方法,使用 @within 和 @target 指示器并无区别;但需要注意如果切换到 AspectJ,那么使用 @within 和 @target 这两个指示器的行为就会有所区别了,@within 会切入更多的成员的访问(比如静态构造方法、字段访问),一般而言使用 @target 指示器即可。
问题 12:Spring 的 Environment 中的 PropertySources 属性可以包含多个 PropertySource,越往前优先级越高。那,我们能否利用这个特点实现配置文件中属性值的自动赋值呢?比如,我们可以定义 %%MYSQL.URL%%、%%MYSQL.USERNAME%% 和 %%MYSQL.PASSWORD%%,分别代表数据库连接字符串、用户名和密码。在配置数据源时,我们只要设置其值为占位符,框架就可以自动根据当前应用程序名 application.name,统一把占位符替换为真实的数据库信息。这样,生产的数据库信息就不需要放在配置文件中了,会更安全。
答:我们利用 PropertySource 具有优先级的特点,实现配置文件中属性值的自动赋值。主要逻辑是,遍历现在的属性值,找出能匹配到占位符的属性,并把这些属性的值替换为实际的数据库信息,然后再把这些替换后的属性值构成新的 PropertiesPropertySource,加入 PropertySources 的第一个。这样,我们这个 PropertiesPropertySource 中的值就可以生效了。
主要源码如下:
public static void main(String[] args) {
    Utils.loadPropertySource(CommonMistakesApplication.class, "db.properties");
    new SpringApplicationBuilder()
            .sources(CommonMistakesApplication.class)
            .initializers(context -> initDbUrl(context.getEnvironment()))
            .run(args);
}
private static final String MYSQL_URL_PLACEHOLDER = "%%MYSQL.URL%%";
private static final String MYSQL_USERNAME_PLACEHOLDER = "%%MYSQL.USERNAME%%";
private static final String MYSQL_PASSWORD_PLACEHOLDER = "%%MYSQL.PASSWORD%%";
private static void initDbUrl(ConfigurableEnvironment env) {

    String dataSourceUrl = env.getProperty("spring.datasource.url");
    String username = env.getProperty("spring.datasource.username");
    String password = env.getProperty("spring.datasource.password");

    if (dataSourceUrl != null && !dataSourceUrl.contains(MYSQL_URL_PLACEHOLDER))
        throw new IllegalArgumentException("请使用占位符" + MYSQL_URL_PLACEHOLDER + "来替换数据库URL配置!");
    if (username != null && !username.contains(MYSQL_USERNAME_PLACEHOLDER))
        throw new IllegalArgumentException("请使用占位符" + MYSQL_USERNAME_PLACEHOLDER + "来替换数据库账号配置!");
    if (password != null && !password.contains(MYSQL_PASSWORD_PLACEHOLDER))
        throw new IllegalArgumentException("请使用占位符" + MYSQL_PASSWORD_PLACEHOLDER + "来替换数据库密码配置!");

    //这里我把值写死了,实际应用中可以从外部服务来获取
    Map<String, String> property = new HashMap<>();
    property.put(MYSQL_URL_PLACEHOLDER, "jdbc:mysql://localhost:6657/common_mistakes?characterEncoding=UTF-8&useSSL=false");
    property.put(MYSQL_USERNAME_PLACEHOLDER, "root");
    property.put(MYSQL_PASSWORD_PLACEHOLDER, "kIo9u7Oi0eg");
    //保存修改后的配置属性
    Properties modifiedProps = new Properties();
    //遍历现在的属性值,找出能匹配到占位符的属性,并把这些属性的值替换为实际的数据库信息
    StreamSupport.stream(env.getPropertySources().spliterator(), false)
            .filter(ps -> ps instanceof EnumerablePropertySource)
            .map(ps -> ((EnumerablePropertySource) ps).getPropertyNames())
            .flatMap(Arrays::stream)
            .forEach(propKey -> {
                String propValue = env.getProperty(propKey);
                property.entrySet().forEach(item -> {
                    //如果原先配置的属性值包含我们定义的占位符
                    if (propValue.contains(item.getKey())) {
                        //那么就把实际的配置信息加入modifiedProps
                        modifiedProps.put(propKey, propValue.replaceAll(item.getKey(), item.getValue()));
                    }
                });
            });

    if (!modifiedProps.isEmpty()) {
        log.info("modifiedProps: {}", modifiedProps);
        env.getPropertySources().addFirst(new PropertiesPropertySource("mysql", modifiedProps));
    }
}
1
2
3
4
5
6
7
8
9
10
11
12
13
14
15
16
17
18
19
20
21
22
23
24
25
26
27
28
29
30
31
32
33
34
35
36
37
38
39
40
41
42
43
44
45
46
47
48
49
50
51有一些同学会问,这么做的意义到底在于什么,为何不直接使用类似 Apollo 这样的配置框架呢?
其实,我们的目的就是不希望让开发人员手动配置数据库信息,希望程序启动的时候自动替换占位符实现自动配置(从 CMDB 直接拿着应用程序 ID 来换取对应的数据库信息。你可能会问了,一个应用程序 ID 对应多个数据库怎么办?其实,一般对于微服务系统来说,一个应用就应该对应一个数据库)。这样一来,除了程序其他人都不会接触到生产的数据库信息,会更安全。
# 参考
- 来源:极客时间《Java 业务开发常见错误 100例》